Writing an extension to add new GREL functions to OpenRefine

I’ve been an enthusiastic user of OpenRefine for a long time and think it is a great tool. However, I sometimes come across things that it doesn’t do, or doesn’t do easily, and end up wishing someone would add some function or other to make my life easier. In theory I’ve always been able to do this myself by writing an OpenRefine extension that adds to the functionality OpenRefine but in practice I’ve always struggled to understand how to write an extension.

I had previously read the “How to write an extension”, and “Extension Points” documentation on the wiki but not really understood how to actually write an extension. Since I tend to learn best from examples I also had a look at the Sample Extension documentation and the “OpenRefine’s Technical Documentation for Extension’s Writing” document by Giuliano Tortoreto (alongside two extensions Giuliano wrote).

Despite all this I still hadn’t quite got my head around writing an extension – until I started looking at an extension that added a simple GREL function called ‘extractHost’ which could be used to extract the hostname from a URL. This was part of a much bigger extension that was developed by Steve Osguthorpe and Ian Ibbotson of Knowledge Integration as part of a project called ‘GOKb’.

When I saw how this was written I realised that while OpenRefine extensions could be complex, writing one that simply added a new GREL function was quite straightforward with a little boilerplate code and the actual GREL function written in Java – and even with very little (pretty much zero) experience of writing Java I could manage to write a new function and bundle it in an extension with very little effort – this is my attempt to document that process – any corrections or additions to what I’ve written here are very welcome via the comments.

Create the basic files

The basic structure for an extension is:


build.xml
src/
    com/foo/bar/.../*.java source files
module/
    *.html, *.vt files
    scripts/... *.js files
	styles/... *.css and *.less files
	images/... image files
    MOD-INF/
        lib/*.jar files
        classes/... java class files
        module.properties
        controller.js

(where /foo/bar…/ is the path representing the namespace you want to use for your extension).

However, the only files you need to create an extension which adds new GREL functions are:


build.xml
src/
    com/foo/bar/... *.java (this is where the Java for your new GREL function will go)
module/
    MOD-INF/
        module.properties
        controller.js

The first step is to create the basic directory structure, and the only real decision to make here is the name and namespace for your extension. The name is entirely up to you, but the namespace would usually be based on a domain you own. In my case I’m going to call my extension “Overdue”, and the namespace I’m going to use is “com.ostephens.overdue.refine”. Additionally, I’m going to put my java source files which contain my new GREL functions into a directory called ‘functions’ – which means my directory structure looks like this:


build.xml
src/
    com/ostephens/overdue/refine/functions
module/
    MOD-INF/
        module.properties
        controller.js

The next step is to populate the basic information for your extension into the module.properties file and the build.xml file.

module.properties

The module.properties file is a simple text file which contains the name, description and any dependencies for the extension. The only dependency in this case is the OpenRefine core module, so my module.properties looks like:


name = overdue
description = Collection of small additions to OpenRefine functionality
requires = core

Just change the name and description to whatever you want for your extension.

build.xml

The ‘build.xml’ is more complex than module.properties, and to be honest I don’t fully understand it. It isn’t part of the extension proper, but is used as part of the ‘build’ process that compiles the java code in your extension into executable code.

However, starting from the example build.xml file given by Giuliano I only had to edit a few lines to get this working for my extension. The content of my build.xml is:


<?xml version="1.0" encoding="UTF-8"?>

<project name="overdue" default="build" basedir=".">
    <property name="name" value="overdue"/>
    <property environment="env"/>

    <condition property="version" value="trunk">
        <not><isset property="version"/></not>
    </condition>

    <condition property="revision" value="r1">
        <not><isset property="revision"/></not>
    </condition>

    <condition property="full_version" value="0.0.0.1">
        <not><isset property="full_version"/></not>
    </condition>

    <condition property="dist.dir" value="dist">
        <not><isset property="dist.dir"/></not>
    </condition>

    <property name="fullname" value="${name}-${version}-${revision}" />
    <property name="refine.dir" value="${basedir}/../../main" />
    <property name="refine.webinf.dir" value="${refine.dir}/webapp/WEB-INF" />
    <property name="refine.modinf.dir" value="${refine.dir}/webapp/modules/core/MOD-INF" />
    <property name="refine.classes.dir" value="${refine.webinf.dir}/classes" />
    <property name="refine.lib.dir" value="${refine.webinf.dir}/lib" />
    <property name="server.dir" value="${basedir}/../../server" />
    <property name="server.lib.dir" value="${server.dir}/lib" />

    <property name="src.dir" value="${basedir}/src" />
    <property name="module.dir" value="${basedir}/module" />
    <property name="modinf.dir" value="${module.dir}/MOD-INF" />
    <property name="lib.dir" value="${modinf.dir}/lib" />
    <property name="classes.dir" value="${modinf.dir}/classes" />

    <path id="class.path">
        <fileset dir="${lib.dir}" erroronmissingdir="false">
            <include name="**/*.jar" />
        </fileset>
        <fileset dir="${refine.lib.dir}">
            <include name="**/*.jar" />
        </fileset>
        <fileset dir="${server.lib.dir}">
            <include name="**/*.jar" />
        </fileset>
        <pathelement path="${refine.classes.dir}"/>
    </path>

    <target name="build_java">
        <mkdir dir="${classes.dir}" />
        <javac encoding="utf-8" destdir="${classes.dir}" debug="true" includeAntRuntime="no">
            <src path="${src.dir}"/>
            <classpath refid="class.path" />
        </javac>
    </target>

    <target name="build" depends="build_java"/>

    <target name="clean">
        <delete dir="${classes.dir}" />
    </target>
</project>

The only parts I edited were:

  • The project name property (mine is called ‘overdue’)
  • The revision value (mine is ‘r1’ but may change as I further develop the extension)

That’s it – everything else here is exactly the same as in Giuliano’s example build.xml (which in turn is pretty much identical to the sample extension build.xml).

The only other property you might want to edit is the full_version value – which you can keep updating as you develop the extension.

Writing a new GREL function

This is the meat of the extension (everything else is just scaffolding of the extension) – here you get to define a new GREL function. To do this you need to be able to write some Java, but the complexity of the Java you need will depend on what your want your function to do. One really useful thing to do at this stage is look at the structure of the GREL functions in the core OpenRefine product, as your GREL function will follow the same pattern, and you may well be able to learn (and copy) from existing code.


package com.k_int.gokb.refine.functions;

import java.util.Properties;
import java.util.concurrent.ThreadLocalRandom;
import org.json.JSONException;
import org.json.JSONWriter;
import com.google.refine.expr.EvalError;
import com.google.refine.grel.ControlFunctionRegistry;
import com.google.refine.grel.Function;

public class RandomNumber implements Function {
    
    @Override
    public Object call(Properties bindings, Object[] args) {
        if (args.length == 2 && args[0] != null && args[0] instanceof Number
                && args[1] != null && args[1] instanceof Number && ((Number) args[0]).intValue()<((Number) args[1]).intValue()) {
            int randomNum = ThreadLocalRandom.current().nextInt(((Number) args[0]).intValue(), ((Number) args[1]).intValue()+1);
            return randomNum;
        }
        return new EvalError(ControlFunctionRegistry.getFunctionName(this) + " expects two numbers, the first must be less than the second");
    }

    
    @Override
    public void write(JSONWriter writer, Properties options)
        throws JSONException {
    
        writer.object();
        writer.key("description"); writer.value("Returns a pseudo-random integer between the lower and upper bound (inclusive)");
        writer.key("params"); writer.value("lower bound,upper bound");
        writer.key("returns"); writer.value("number");
        writer.endObject();
    }
}

I don’t really write Java, and I relied heavily on looking at existing GREL functions to understand how to get this working. This file defines a ‘RandomNumber’ class which is a GREL function. The first bit of the code:


    @Override
    public Object call(Properties bindings, Object[] args) {
        if (args.length == 2 && args[0] != null && args[0] instanceof Number
                && args[1] != null && args[1] instanceof Number && ((Number) args[0]).intValue()<((Number) args[1]).intValue()) {
            int randomNum = ThreadLocalRandom.current().nextInt(((Number) args[0]).intValue(), ((Number) args[1]).intValue()+1);
            return randomNum;
        }
        return new EvalError(ControlFunctionRegistry.getFunctionName(this) + " expects two numbers, the first must be less than the second");
    }

This is the actual function – it takes two arguments (a lower and upper bound to the range in which to generate a random integer). It also includes an error message which will be displayed in the GREL/Transform dialogue in OpenRefine if the user does not enter the two required parameters (upper and lower bound)

The second bit of the code:


    @Override
    public void write(JSONWriter writer, Properties options)
        throws JSONException {
    
        writer.object();
        writer.key("description"); writer.value("Returns a pseudo-random integer between the lower and upper bound (inclusive)");
        writer.key("params"); writer.value("lower bound,upper bound");
        writer.key("returns"); writer.value("number");
        writer.endObject();
    }
}

This is the documentation for the function – this is what will appear in the ‘Help’ tab on the GREL/Transform dialogue screen.

Once the function has been written, what remains is to make sure that this new function is registered with OpenRefine when the extension is installed. This is done in ‘controller.js’.

Registering and initialising new GREL functions in controller.js

The controller.js is the file in which you tell OpenRefine about the new functions, commands and operations your extension adds to OpenRefine. However, in this case we are only creating new GREL functions (and not, for example, adding any new menu items or export formats). This means you only need to register functions. The content of my controller.js file looks like:


function registerFunctions() {
    Packages.java.lang.System.out.print("Registering Overdue utilities functions...");
    var FR = com.google.refine.grel.ControlFunctionRegistry
    FR.registerFunction("randomNumber", new com.ostephens.overdue.refine.functions.RandomNumber());
}

function init() {
    Packages.java.lang.System.out.println("Initializing Overdue utilities...");
    Packages.java.lang.System.out.println(module.getMountPoint());
    registerFunctions();
   );
}

The first part of this file (the ‘registerFunctions’ function) registers my new GREL function – called ‘RandomNumber’. The second part of the file (thie ‘init’ function) ensures that these functions are added when OpenRefine starts up.

The key line is:


FR.registerFunction("randomNumber", new com.ostephens.overdue.refine.functions.RandomNumber());

This tells OpenRefine that the GREL command will be ‘randomNumber’ (case sensitive) – this is what the user will type in the GREL/Transform dialogue to use the function. It then points to the class that I created in the Java file above (RandomNumber – again case sensitive).

If I wanted to add another new function, I’d just need to edit this file to include any other functions I’ve written. For example:


FR.registerFunction("newGrelFunction", new com.ostephens.overdue.refine.functions.newGrelFunction());

Now all the pieces are in place, all that remains is to ‘build’ the extension, and you are ready to use it.

Building the extension

OpenRefine is built using Apache Ant, a piece of software which can be used to compile, assemble, test and run Java applications. The same software is used to build extensions, and this must be done from while the extension code is sitting within the larger OpenRefine extension. So to get this working you need to:

  • Install Ant – there are general installation instructions on the Ant websites, but searching for a guide on installing it on your specific platform may also be helpful
  • Download the development version of OpenRefine – use the source code links from https://github.com/OpenRefine/OpenRefine/releases
  • Put the directory containing your extension under the OpenRefine ‘extensions’ directory
  • Go to the directory containing your extension and type ‘ant build’ (note that this is not done from the OpenRefine root folder, but at the root of your extension)
  • If everything is OK, this will build your extension with no errors

If there are errors in your Java class or your build.xml file, this is the point where you will find out as the extension won’t build successfully if it has problems at this point. However it is worth noting that other issues may not be caught at this point, since the extension can build even if there are (for example) errors in controller.js. Errors in controller.js may not become apparent until you start using the extension.

Using the extension

Once you’ve built the extension, you can copy the directory containing your extension into your working OpenRefine installation (again, in the appropriate ‘extensions’ directory), and run OpenRefine. You should see (in the command window) any output your extension is programmed to print on initialisation (in my case: “Initializing Overdue utilities” and “Registering Overdue utilities functions”)

Open up a project in OpenRefine and open a GREL/Transform dialogue – and you should be able to use your new GREL command – in my case by typing something like:


randomNumber(1,10)

Which would generate a random integer between 1 and 10.

If you look in the ‘Help’ tab you should be able to see the ‘description’, ‘params’ and ‘returns’ information from the Java file.

If you hit problems with your extension working at this point it may be worth checking the javascript console to see if controller.js has generated any errors. However, tracking this back is slightly complicated by the way OpenRefine builds all the javascript together when it runs – so you’ll have to check for errors and then work out if they relate to your controller.js or something else.

Conclusion

Once I’d understood how the various bits of an OpenRefine extension interacted through the documentation and (really importantly for me) looking at examples of clearly written code, I could see how adding a new GREL function was essentially as simple as writing a new Java class and then wiring it all together.

I wouldn’t have got this far without the documentation and examples written by Giuliano Tortoreto and the GOKb extension written by Steve Osguthorpe and Ian Ibbotson of Knowledge Integration – but of course any mistakes or misunderstanding in the above remain my own!

Keeping up to date with ejournal collections using KB+ and IFTTT

KnowledgebasePlus (KB+) is a Jisc service (which I work on) which helps (UK HE) libraries manage their e-resources more efficiently by providing accurate publication, subscription, licence and management information.

It has always been possible to keep an eye on how ejournal collections and title lists (called ‘Packages’ in KB+) are changing through the information made public by KB+ (no login required) but at the start of November we added some new features that provide an easy and flexible way to keep up to date with changes to ejournal collections using KB+. The new features are:

  • A feed which contains details of all the changes to ejournal collections being tracked in KB+
  • New public package pages listing all the titles currently in a collection/title list, with the option to export in a number of formats
  • New public ‘package history’ pages for each collection tracked in KB+ which lists the changes made to the collection/title list since it was first added to KB+

These new features are in addition to the existing public searchable list of packages in KB+, with the option to download the title lists under an open licence – meaning you can use the data from KB+ however you like.

The new ‘feed’ is an Atom feed – this works in a similar way to RSS and if you already use an RSS reader to subscribe to updates to blogs and news sites, you can add the Atom feed (https://www.kbplus.ac.uk/kbplus/publicExport/index?format=atom) to your reader to track changes in KB+.

However, the Atom feed becomes even more useful if you combine it with an online tool called ‘If this, then that’ (IFTTT) IFTTT provides a way of getting different online services to talk to each other and carry out specific actions. This is done through what IFTTT calls ‘applets’ (previously ‘recipes’). Each Applet monitors for a specific type of event, and when it detects an event carries out one or more action – so for example you can have an Applet which looks for new pictures being posted to your Instagram account, and when it sees a new picture posted, re-posts the picture to your Twitter and Facebook accounts.

One of the types of event IFTTT can monitor for is ‘new item in an Atom feed’, which means you can use IFTTT together with the KB+ Atom Feed to monitor for changes to packages in KB+ and do something as a result. For example I have set up an IFTTT applet that looks for new items in the KB+ feed, and adds them to a daily digest email that is sent to me at 7am everyday.

Because IFTTT works with a very wide range of services you have a huge amount of flexibility in how you can be notified of changes to ejournal collections including:

In addition when monitoring for new items in feeds, IFTTT supports an option to filter the feed only for entries that match specific criteria. That means you can monitor for changes to specific ejournal collections, or collections from a specific publisher rather being overwhelmed by seeing information about all packages in KB+.

I particularly like the idea of linking updates from KB+ into task lists or workflow management tools but to get you started, I’m including here instructions for getting updates about ejournal collections  by email:

  1. If you don’t already have an IFTTT account you can sign up at https://ifttt.com/join
  2. Once you have signed up, login and go to “My Applets” (https://ifttt.com/my_applets)
  3. Click the “New Applet” option
  4. Click the word “+this” in the phrase “If +this then that”
  5. In the “Choose a service” box, type “Feed”, then click the Feed icon
  6. On the “Choose a Trigger” page click the option “New feed item”
    If you want to create alerts about specific packages being updated in KB+ (rather than just any update to KB+) then you can use the “New feed item matches”option to look only for updates that contain a specific package or provider name. For example, to only get updates for Jisc Collections packages, choose the “New feed item matches” trigger and use the search phrase “Jisc Collections”.
  7. In the “Feed URL” box type the URL for the KB+ update feed https://www.kbplus.ac.uk/kbplus/publicExport?format=atom and click “Create Trigger”
  8. Click the word “+that” on the next page
  9. In the Choose Action Service box type “email” and click the “Email Digest” item that is displayed
    If you would prefer to get emails every time there is an update to a package in KB+ you can instead choose “Email” at this step – this action will send an email each time there is an update to a KB+ package (or a specific package if you used the “New feed item matches” option in step 6).
  10. If you have never used an email or email digest action on IFTTT before at this point you will be asked to connect the Email Digest channel. If you see the following screen, click “Connect” (otherwise, skip to step 14)
  11. You will now be asked to enter the email address you wish to use for the alert. Enter the email address and click “Send PIN”
  12. Check your email account for an email with the PIN (subject line “Email Digest Channel connection PIN”). Enter this PIN into the screen and click “Connect”, then click “Done”
  13. You will now be returned to the setup process – click “Continue to the next step” to continue
  14. On the Choose an Action page click “Add to daily digest”
    If you would prefer to get updates less frequently, you can choose “Add to weekly digest” at this step.
  15. On the “Complete Action Fields” page you can edit the details of the email that comes through including the time it will be sent, the subject line of the email and the content of the email. You can leave the defaults unless you have any specific requirements
  16. Once you have edited the details on this page, you can click the “Create Action” button and you will be presented with a final confirmation page. Click “Finish” to create and save this recipe
  17. The recipe is now ready to use. You should receive the digest email on a daily basis at the time you specified when setting up the Applet

Introduction to APIs using IIIF

This “Introduction to APIs” was developed by Owen Stephens (owen@ostephens.com) on behalf of the British Library. This work is licensed under a Creative Commons Attribution 4.0 International License http://creativecommons.org/licenses/by/4.0/. It is suggested when crediting this work, you include the phrase “Developed by Owen Stephens on behalf of the British Library”

Purpose of these exercises

The purpose of this set of exercises is provide an insight into what it is like to work with an API on the web. Specifically the exercises here will introduce:

  • the basics of how APIs work
  • what questions you need to ask and challenges you can face when using an API to build an application, and so…
  • what things you need to consider when providing an API for people to use (or selecting a system that offers an API)

While the exercises here work, they are not a genuine attempt to build a useful application with an API. If you are interested in using APIs you may want to consider looking at the lessons and tutorials available from:

How APIs work

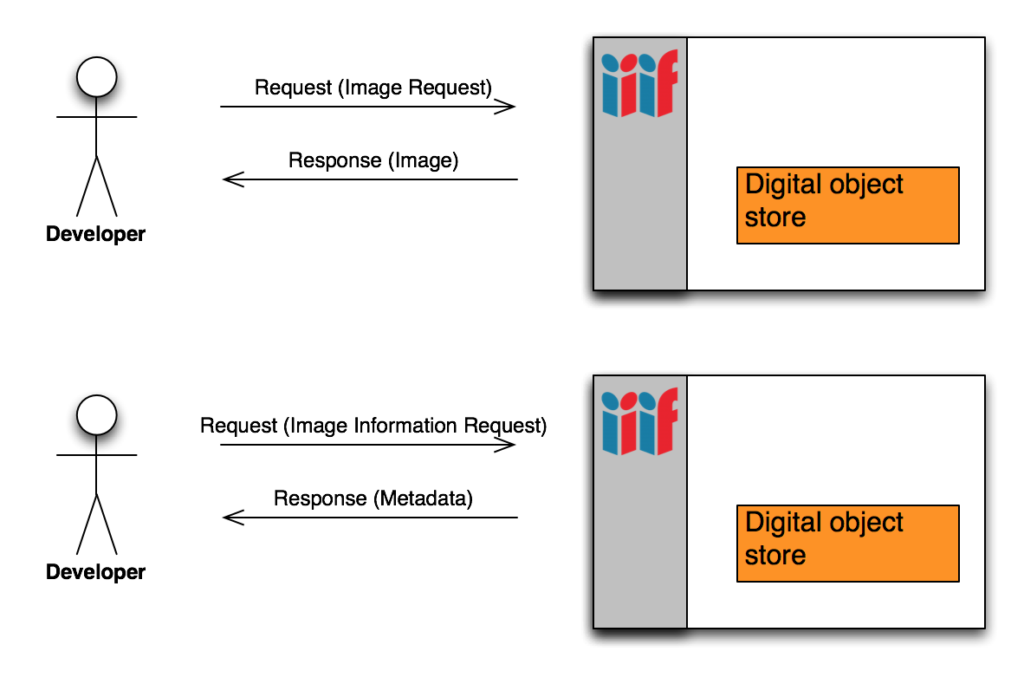
There are many different types of API, and they don’t all work in the same way. However, broadly the user of the API (e.g. the developer or the software written by the developer) makes a request to the API, and gets back a response.

API Illustration

A single API may support different types of request. For example, the Twitter API supports a range of requests including:

  • search
  • status update (i.e. post a Tweet)
  • get list of follower

Sometimes these different API requests are called ‘API calls’.

The API will define what information can be included in a request and what information will be sent back in the response (and in what format).

This is where good documentation for an API is essential – it is really difficult to use an API when you are left guessing what information you need to send it and what information you can expect to get back. When assessing an API, assessing the quality and availability of the documentation should be taken into account.

To use an API, you also need to know where to send the request to – when working with web APIs this will be a URL.

Exercise 1: Using an API for the first time

Introduction

In this exercise you are going to use a Google Spreadsheet to display and manipulate an image using the IIIF Image API.

Understanding the API

The API you are going to use is the IIIF Image API. The IIIF Image API is designed to enable you to work with a single image, requesting either the image itself OR information about the image. The IIIF Image API is documented at http://iiif.io/api/image/2.1/.

The IIIF Image API supports two types of requests – the “Image Request” (gets back an Image) and the “Image Information Request” (gets back information(!) about the image – this includes data such as the size of the image and the types of image manipulation that can be requested using the Image Request parameters).Illustration of IIIF Image API

The place you send the request to will depend on what digital library (or other IIIF compliant service) you want to get the image from.

In this first exercise you are going to use the ‘Image Request’ API call. The request to the API is made using a URL, and you can vary the details of the request by modifying different parts of the URL. The parts of the request you can modify are sometimes called ‘parameters’. The IIIF Image Request URI is structured as follows:

{scheme}://{server}{/prefix}/{identifier}/{region}/{size}/{rotation}/{quality}.{format}

Each word in curly bracket { } represents a part of the URL you need to create to make a request to the Image Request API.

You can look at these using an example from the Bodleian’s IIIF compliant service:

http://iiif.bodleian.ox.ac.uk/iiif/image/a1795520-e3c8-44a0-a077-c80a398978b9/full/full/0/default.jpg

You can see how this URL maps to the structured described by the IIIF Image Request documentation.

Breakdown of URL…
{scheme} http Together these three parts of the URL essentially form the address to which the API request can be made
{server} iiif.bodleian.ox.ac.uk
{prefix} iiif/image
{identifier} a1795520-e3c8-44a0-a077-c80a398978b9 This is an identifier for the digital object you want the API to use as the basis of its response
{region} full The ‘region’ parameter lets you define whether the API will return the whole object, or just a specific region of the object. In the example ‘full’ is used indicating the whole image
{size} full The ‘size’ parameter lets you define the size of the image returned by the API. In the example ‘full’ is used indicating the API should respond with full size image
{rotation} 0 The ‘rotation’ parameter lets you specify if you want the API to rotate the image in the response
{quality} default The ‘quality’ parameter tells the API whether to respond with a colour, gray scale, or bitonal image. In the example ‘default’ is used to indicate that the API should respond with whichever format is the default for the requested image
{format} jpg The ‘format’ parameter tells the API what image format to use when it sends its response. In the example ‘jpg’ is used to indicate that a JPEG image should be sent.

The response you get from a request to this URI is an image.

The key things you need to know to work with this API are:

  • The address of the API (the first three rows in the table above)
  • The parameters that the API expects in a request (the remaining rows in the table above)
  • What the API will send in response to a request (an image)

Now you’ve got this information, you are ready to start using the API.

Going Further

To find out what valid values can be used for each of the parameters in the IIIF Image Request API, read the documentation available at http://iiif.io/api/image/2.1/.

Using the IIIF Image Request API to retrieve and display an Image

To use the API, you are going to use a Google Spreadsheet. A template spreadsheet has already been setup which you will use for this exercise.

Go to http://drive.google.com and login to your Google account. In a separate browser tab or window, visit the following URL:

http://bit.ly/BL109-1

Click on “File” and choose “Make a copy”. You should be prompted to set a name for your copy, and once you click ‘OK’, this should make a copy of the Google Spreadsheet in your own Google account.

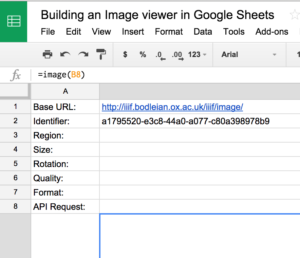
You should now have an editable spreadsheet that looks something like:

Illustration of template spreadsheet

The way this spreadsheet is laid out is to have one cell per parameter for a valid IIIIF Image request. By filling out the rest of this spreadsheet, and then telling it to send the request to the API, you will be able to retrieve and display an image.

Based on the information you obtained by understanding the API (see above) you can complete the parameters in column B as follows:

  • B3: full
  • B4: full
  • B5: 0
  • B6: default
  • B7: jpg

You now have all the parameters we need to build the API call. To do this you want to create a URL very similar to the one you looked at above. You can do this using a handy spreadsheet function/formula called “Concatenate” which allows you to combine the contents of a number of spreadsheet cells with other text.

In Cell B8 type the following formula:

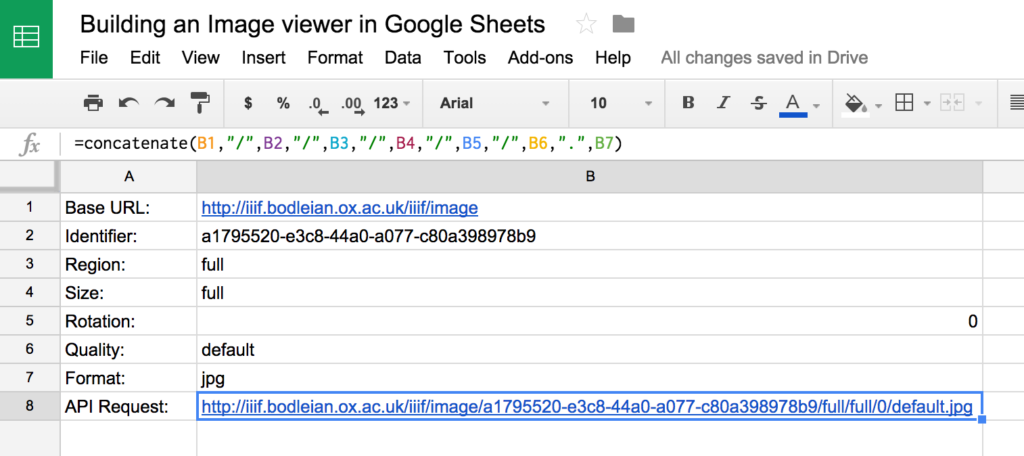
=concatenate(B1,"/",B2,"/",B3,"/",B4,"/",B5,"/",B6,".",B7)

This joins the contents of cells B1 to B7, with the appropriate characters in between to make a valid IIIF Image Request URL. Once you have entered this formula and pressed enter your spreadsheet should look like:

Illustration of template with well formatted IIIF Image request URL

The final step is to send this query display the response. Since we know the API ‘request’ takes the form of a URL, and the response is going to be a JPEG image, we can take advantage of the fact that Google Spreadsheets has a special function for retrieving and displaying Images.

To use this, in Cell B9 type the following formula:

=image(B8)

Now, hit enter, and see the result.

Congratulations! You have built an API request, and displayed the response.

Modify the API request to change how the image is displayed

Now you have a working API request, you can start to modify the request to control exactly what image is returned in the response. We have to use valid values for the parameters in order that the API knows how to respond correct.

For example, the ‘Rotation’ parameter controls whether the image is rotated in the API response. The Rotation parameter is a numeric value expressed in degrees of rotation, that is a number between 0 and 360 inclusive. Some images (including the one used in this example) only allow rotations in steps of 90 degrees, so in this particular case on values of 0, 90, 180, 270 and 360 are allowed.

To change the rotation, modify the value of the ‘Rotation’ parameter (in cell B5) from ‘0’ to ’90’.

The value in the ‘Rotation’ parameter can also be preceded by an exclamation mark ‘!’ to request a mirror image version of the digital object.

Try modifying the value of the ‘Rotation’ parameter to ‘!0’

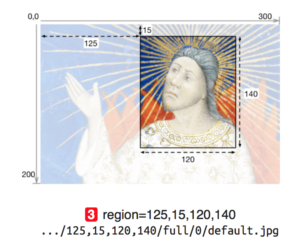
The ‘Region’ parameter defines a rectangular portion of the full image to be returned. This can be expressed in a number of different ways (all described in the API documentation). In this case you are going to display a rectangular area of the image by specifying the coordinates of the top left corner of the rectangle in pixels (a unit of measure for digital images) and the width and height of the rectangle, also in pixels. An example from the IIIF documentation is illustrated here:

Graphic from IIIF documentation explaining the 'region' parameter in an Image Request

In this example, by setting the ‘range’ parameter to “125,15,120,140”, the API will respond with a rectangle from the original image that is 120 pixels wide, and 140 pixels high, starting 125 pixels from the left of the image and 15 pixels from the top of the image.

  • Try changing the Region parameter to “1090,860,360,250”
  • You can play around with these numbers to show different areas of the original image.
  • Change the Region parameter back to ‘full’ to display the whole image again

You have:

  • Explored the IIIF Image Request API
  • Seen how you can create a request (aka Call) for the API by constructing a URL with appropriate parameters
  • Retrieved an Image using the IIIF Image Request API
  • Modified the request to control how the image is returned to you

Going Further

This spreadsheet will work with any service which supports the IIIF Image Request API. To try this you can replace the ‘Base URL’ with the URL of the British Library’s IIIF API, and enter an identifier for an image on the British Library server. Try replacing the Base URL and Identifier in the spreadsheet above with the following information:

This image is part of a digitised magazine. By modifying the identifier you can view other pages from the magazine. E.g.:

  • ark:/81055/vdc_100004173859.0x000003
  • ark:/81055/vdc_100004173859.0x000004
  • ark:/81055/vdc_100004173859.0x000005

etc.

Can you modify the spreadsheet to make it easy to move from page to page without having to re-type the identifier each time?

A worked example of fixing problem MARC data: Part 5 – OpenRefine and MarcEdit redux

This is the fifth and last post in a series of 5.

In Part 4 I described how I used OpenRefine to fix issues with MARC records. In this fifth and final blog post in this series I’m going to cover exporting the mnemonic MARC records from OpenRefine and back to MarcEdit to produce a file of valid MARC records.

The mnemonic MARC format consists of one line per MARC field. Each line starts with an ‘=’ sign, followed immediately by the three digit/letter tag, which in turn is followed by two spaces. For fixed length fields the spaces are followed by the contents of the field. For other MARC fields the spaces are followed by the two indicators for the field, and then the content of the field (subfields marked with a ‘$’ signs):

=LDR 00759nam _22002414_245__
=001 000000001
...
=245 10$aExtension staff handbook;$nVolume II.

Where you have multiple records they are separated by a single blank line.

When I imported the file into OpenRefine I had put the information into three columns – one containing the MARC field tag, one containing indicators (blank for fixed fields) and one containing the field contents. However, I’d kept the blank lines that were in the original file and not done any sorting that would lose the order of the original file contents (I had removed some lines completely, but none of the blank lines). This is important because preserving the ordering and the blank lines from the original file is the only way the ‘records’ are preserved. I could have done some work in OpenRefine to link each field to a record ID, and then not worried about the blank lines and ordering, but to be honest that was extra work that wasn’t necessary in this case.

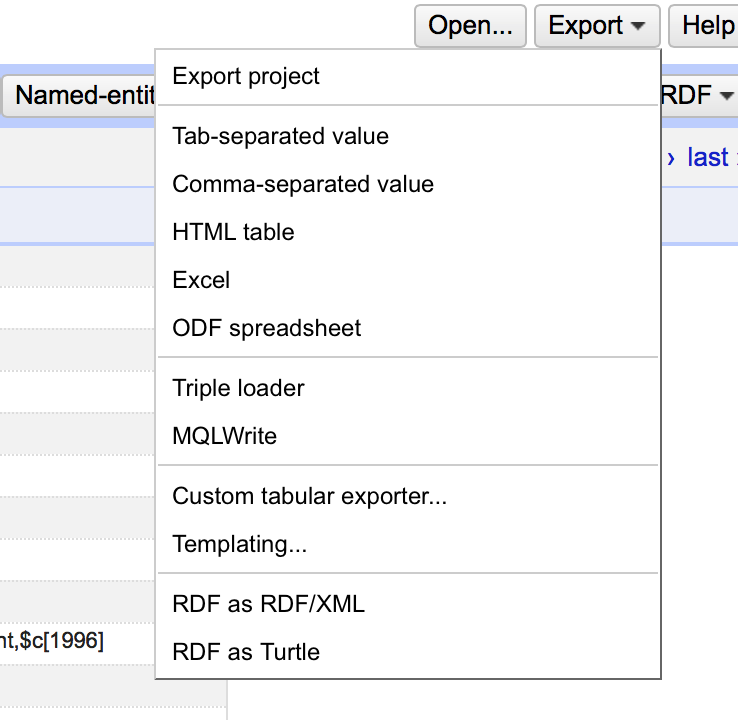
There are a number of export options in OpenRefine, all accessed from an ‘Export’ menu in the top right of the screen:

OpenRefine Export Options

It is worth remembering that when exporting data from OpenRefine the default is to only export data that is in the current OpenRefine display – observing any filters etc you have applied to the data. So if you want to export the whole data set, make sure you remove any facets/filters before doing so.

As well as a number of standard formats, the “Custom tabular exporter” and “Templating” options allow you to build exports to your own specification. In this case I needed to use the “Templating” option which is the most flexible way of configuring exports.

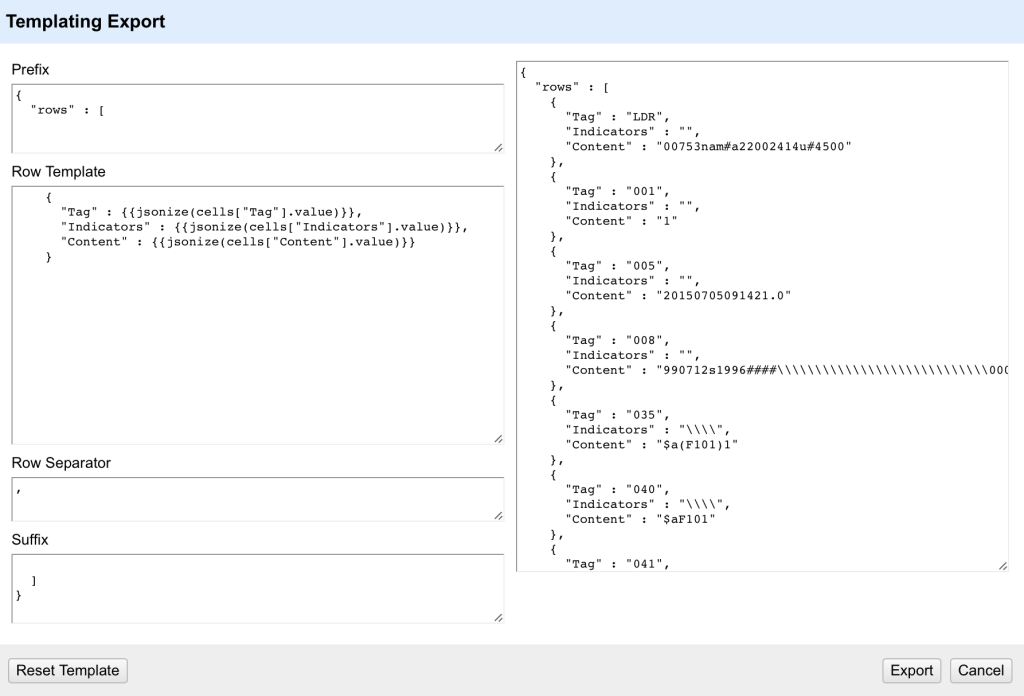
The Templating option allows you to fully configure how each field in your OpenRefine project is exported. It also allows you to specify how records are separated and any header (prefix) or footer (suffix) you want in the complete export.

OpenRefine Export Template

The default layout is a format called ‘JSON’ (Javascript Object Notation, but it doesn’t really matter). However we can completely re-write this into whatever format we want. The ‘Prefix’ and ‘Suffix’ areas on this form as simple text – you can just type whatever you want in here. Since in the case of mnemonic MARC file there are no headers or footers, I can remove all the text from the ‘Prefix’ and ‘Suffix’ areas in this form.

The ‘Row Template’ is the key part of the template – this defines how each row in the OpenRefine project is processed and output for the export. Inside the Row Template the text inside double curly brackets {{ }} is processed as a GREL expression – so you can manipulate the data as you output it if you need to – this makes the template extremely flexible. Because the export doesn’t relate to any single column you have to use the ‘cells[“Column name”].value’ syntax to bring in the values from the cells.

The default is to use a ‘jsonize’ function – which essentially makes sure that the data from a cell is valid for a JSON output file. However, in this case we don’t want to mess with the data on output – we just want the values, with the additional text required for the mnemonic MARC format.

So the row template I need to use is:

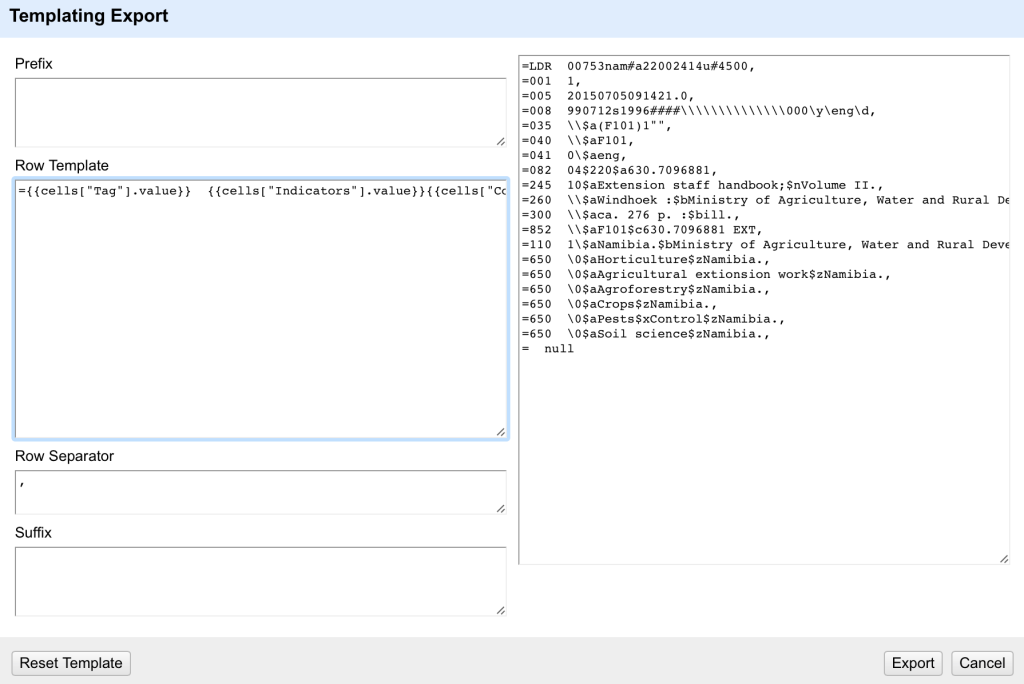
={{cells["Tag"].value}}  {{cells["Indicators"].value}}{{cells["Content"].value}}

Because some lines will have values in the Indicators column and some won’t (the fixed fields), we have to sure that the indicators are populated (even if uncoded) for all non-fixed fields, and contain an empty string for fixed fields. As long as this is the case, the output will be formatted correctly for both types of field.

One thing to look out for is that there are a few different ways in which a field can appear ‘blank’ – it can be an empty string (“”) or ‘null’ or an error. In the export template any cells containing a ‘null’ rather than an empty string will appear as ‘null’ – as can be seen in the last row in this screenshot:

Null field in export template

To avoid these ‘null’ values appearing you can either do a cell transformation on the appropriate columns to replace ‘null’ with “”, or you can write tests for ‘null’ values and replace them with blanks within the template using GREL expressions.

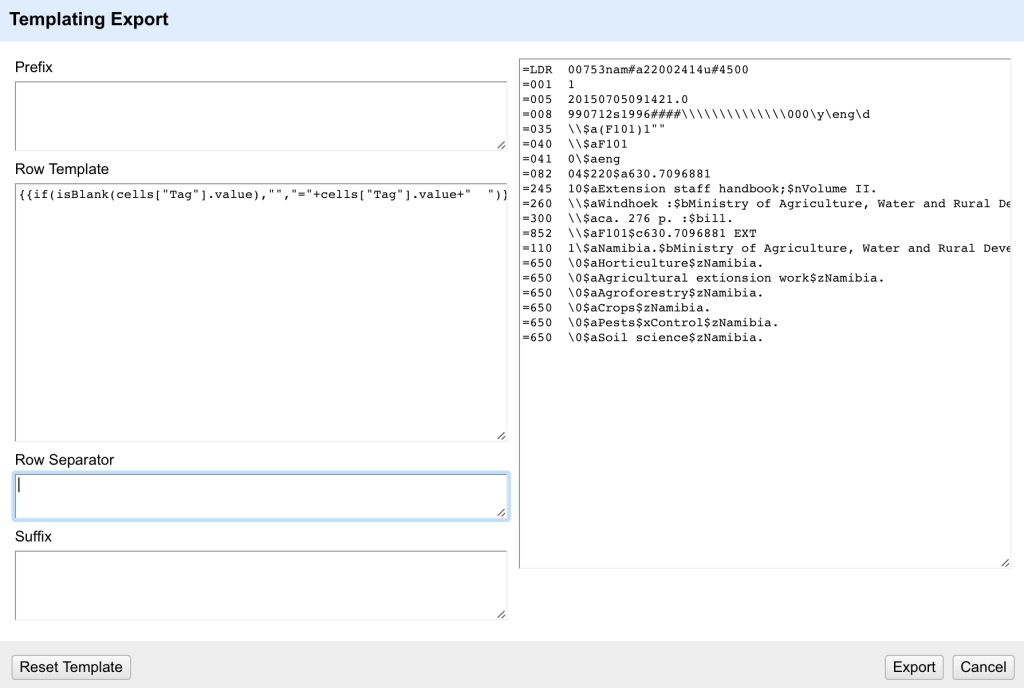
The other issue I’ve got here is that the ’empty’ line at the end of the record still starts with an ‘=’ sign – because I’ve set this to output on every row – and it doesn’t care that the row is blank. I could decide to not worry about this and edit out these lines after the export (e.g. in a text editor using find/replace on lines only consisting of an equals sign and two spaces). Alternatively I can write GREL in my template that checks to see if there is a value in the Tag column before outputting the equals sign and spaces. If I put this together with a check for ‘null’ values I get a more complex expression:

{{if(isBlank(cells["Tag"].value),"","="+cells["Tag"].value+"  ")}}{{if(isBlank(cells["Indicators"].value),"",cells["Indicators"].value)}}{{if(isBlank(cells["Content"].value),"",cells["Content"].value)}}

This tests if the Tag cell in the row is blank and only outputs the ‘=’ at the start of the row and the two spaces following the tag if it finds a tag to use.

The final option on this screen is the ‘Row Separator’. In the default this is a comma followed by a newline/enter (which is of course difficult to see in the editor). I don’t need the comma at the end of each line but I do need a newline (otherwise all the rows would merge together). So I end up with:

Finalised mnemonic MARC export template

Unfortunately there is no way of saving the Template within OpenRefine (although it will persist between sessions, but if you are using different templates at different times, this won’t help). If I’ve got a complex export I usually create a text file with each part of the export template (prefix, suffix, row template, row separator) documented. This would be important if you were doing a complex export like this OpenRefine MODS export template.

I can now export the the file in mnemonic MARC format by clicking Export. It will download as a text file with a ‘txt’ extension. I will want to rename the file with an ‘mrk’ extension so that MarcEdit recognises it as a mnemonic MARC file.

My final step is to use MarcEdit to do a final validation of this file (happily this found only one outstanding error which I was able to correct directly in the MarcEdit Editor), and finally I can use one of several routes in MarcEdit to covert the mnemonic MARC file to a proper MARC file (you can do this using the ‘MARC Maker’ function, using ‘Save as’ or ‘Compile File to MARC’  options in the Marc Editor).

And that’s it – a worked example of fixing MARC records using a combination of three tools – the Notepad++ text editorMarcEdit and OpenRefine. I’d like to re-iterate my thanks to the Polytechnic of Namibia Library for giving me permission to share this example.

Finally – if there are things that I’m missing here, steps that could be improved/more efficient, questions to ask or clarifications to make please leave comments here or contact me on Twitter – I’m @ostephens.

A worked example of fixing problem MARC data: Part 4 – OpenRefine

This is the fourth post in a series of 5.

In Part 3 I describe how converted the MARC records into the ‘mnemonic’ format using MarcEdit, and also created a list of issues with the file using the MarcEdit Marc Validator. In this post I’m going to describe how I used OpenRefine to investigate and fix the issues in the file. (n.b. this post dives straight into OpenRefine functionality – I’ve written an introduction to OpenRefine which includes a full tutorial which covers much of the basic functionality)

The mnemonic MARC format looks like this:

=LDR 00759nam _22002414_245__
=002 $a1
=005 $_20150201
=008 $_990712s1996____--------------000-y-eng-d
=035 __$a(F101)1
=040 __$aF101
=041 0_$aeng
=082 04$220$a630.7096881
=245 10$aExtension staff handbook;$nVolume II.
=260 __$aWindhoek :$bMinistry of Agriculture, Water and Rural Development,$c[1996]
=300 __$aca. 276 p. :$bill.
=852 __$aF101$c630.7096881 EXT
=110 2_$aNamibia.$bMinistry of Agriculture, Water and Rural Development.
=650 _0$aHorticulture$zNamibia.
=650 _0$aAgricultural extionsion work$zNamibia.
=650 _0$aAgroforestry$zNamibia.
=650 _0$aCrops$zNamibia.
=650 _0$aPests$xControl$zNamibia.
=650 _0$aSoil science$zNamibia.
=LDR 00289nam _22001214_245__
=002 $a2
=005 $_20150202
...

As you can see, each line starts with the same layout – an equals sign, three digit/letter tag, two spaces. There are then either the first two characters of a fixed field, or two indicators, the the content of the MARC field with subfields marked with ‘$’ signs.

The other thing to note is that a new record is indicated by a blank line.

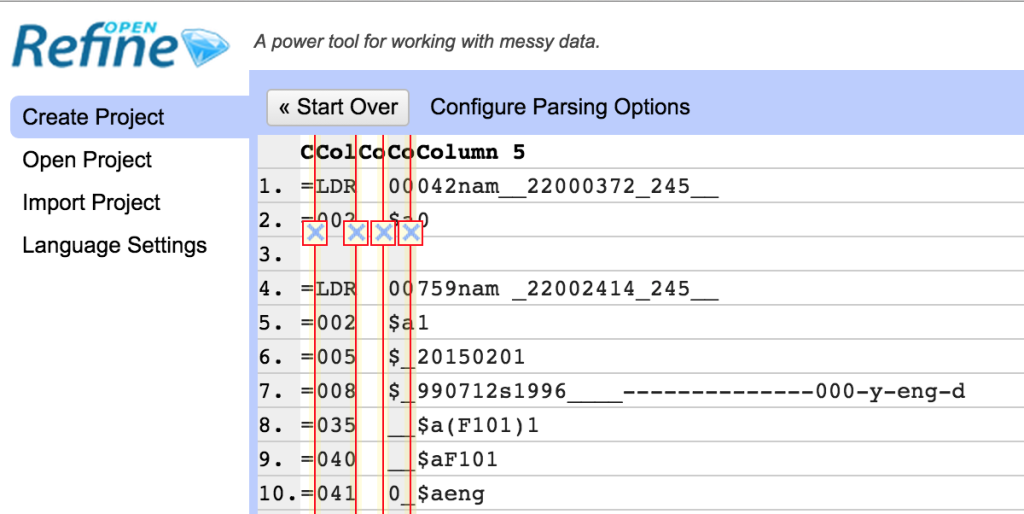
This layout makes it easy to import into OpenRefine using the “Fixed-width field text files import” option – this format assumes a standard format for each line which we basically have here. You can set the places where you want to split each line into columns by clicking in the appropriate place.

Fixed-width field text files import


I split the file up as shown here – so I’m going to get one column with the MARC tag in, one that will generally include the indicators (for the non-fixed width fields) and then a last column with the content of the MARC field (the two other columns I’ll get contain the ‘=’ and the spaces between the tag and the indicators).

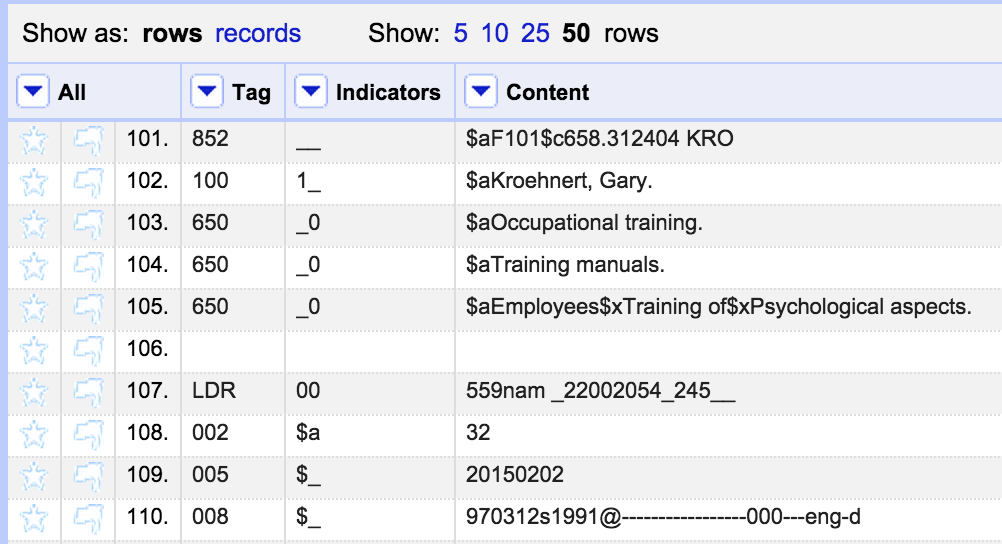
I immediately removed the columns without any real data in them, and renamed the columns to ‘Tag’,’Indicators’ and ‘Content’.

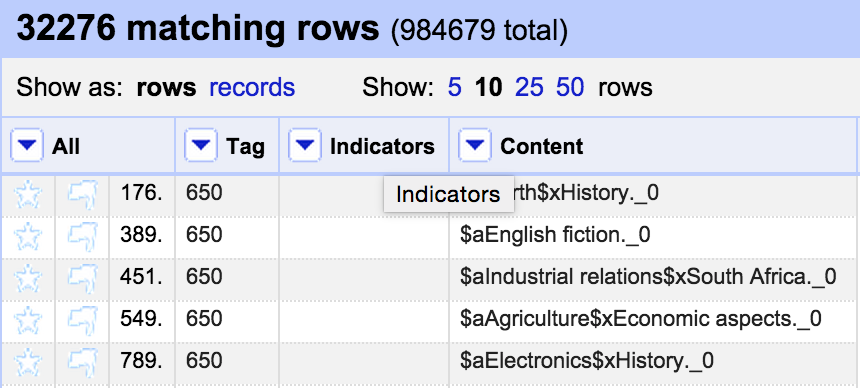
MARC Mnemonic in OpenRefine


The lines between records are empty, as you can see in the screenshot above. As long as I keep these rows in order, and maintain the order of the file then this will easily export back to the MARC mnemonic format.

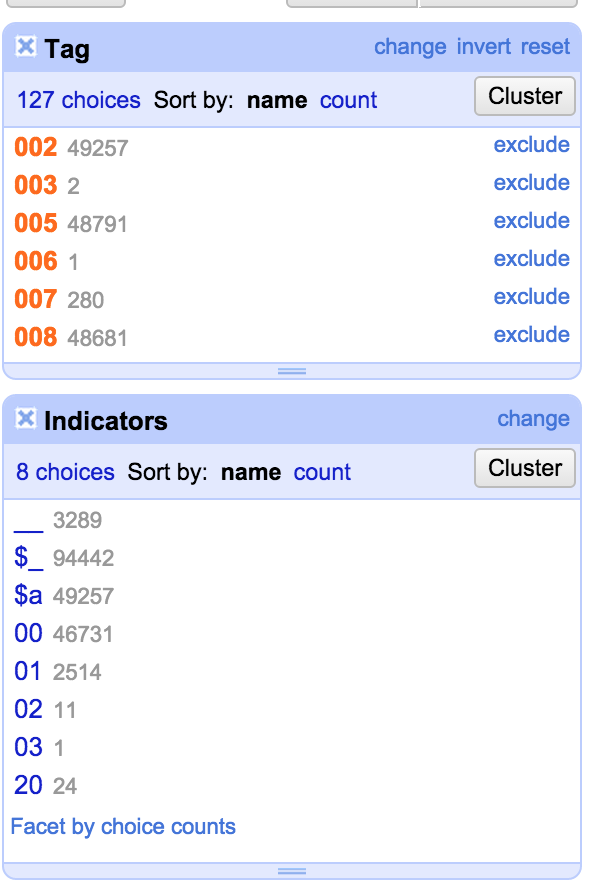
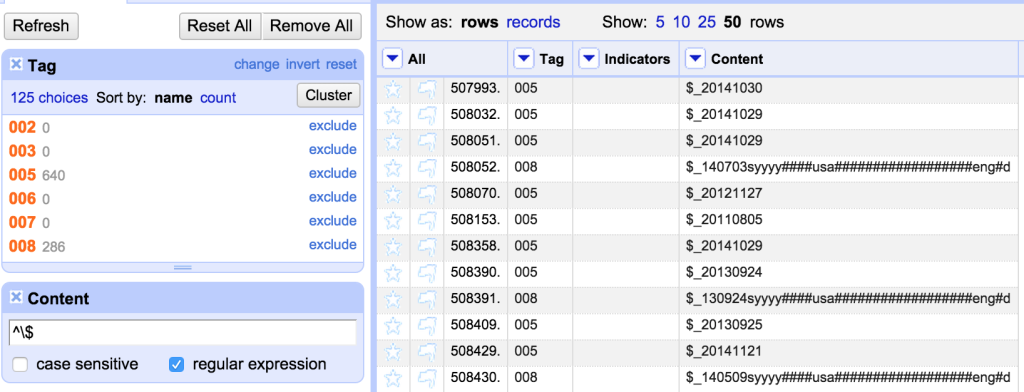
However, this approach has lead to some characters from the fixed fields in the ‘Indicators’ column rather than in the ‘Content’ column. So the first thing I do is to fix this. Firstly I create a Facet on the ‘Tag’ Column:

Tag facet with fixed fields selected


I used the facet to select the fixed fields and I could then see where (for some unknown reason) the file had a subfield at the start of a fixed field, I was able to use another facet on the Indicators column to see what values were there:

Tag and Indicator facets

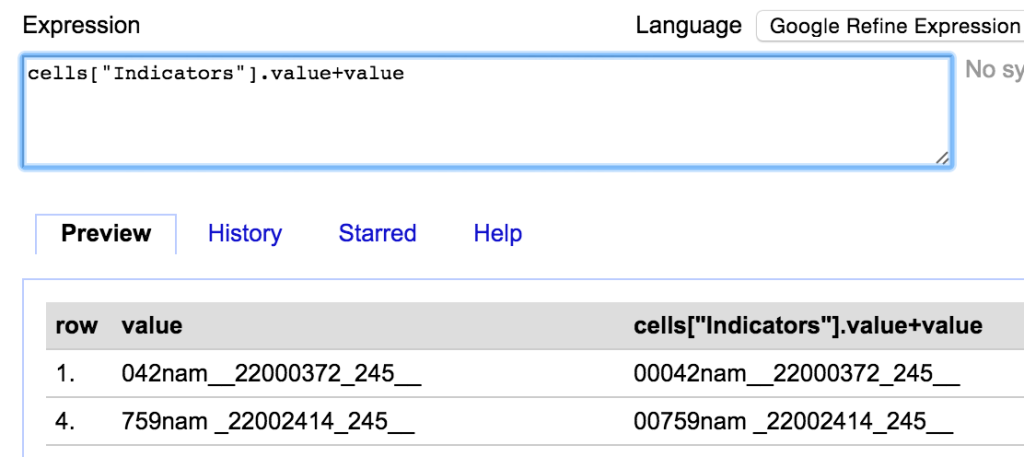
All the ‘Indicators’ that started with a ‘$’ I was able to just remove (by clicking ‘edit’ in the Indicators facet and just deleting the contents). Once I’d done this I was left with the situation where, for the fixed field, the contents of the Indicators column should actually be the first two characters of the ‘Content’ column. So the next job was to fix this. I made sure that the I was only working with the rows where the characters were misplaced (using the facets to select the right rows) and then I used the ‘Edit cells’->’Transform’ option for the ‘Content’ column and used the GREL expression:

cells["Indicators"].value+value

This takes the value from the Indicators column, and puts it in front of the value in the Content column:

Combine column values


I could then get rid of the values from the Indicators column (again just for the filtered rows).

The next thing I’d noticed was that some fixed fields still had subfield indicators at the start. I wanted to find all fixed fields starting with a ‘$’ symbol. I could do this using a ‘text filter’:

Text filter

I’ve used a regular expression in the Filter which allows me to find only rows that start with the ‘$’ symbol (as opposed to having ‘$’ anywhere in the string).

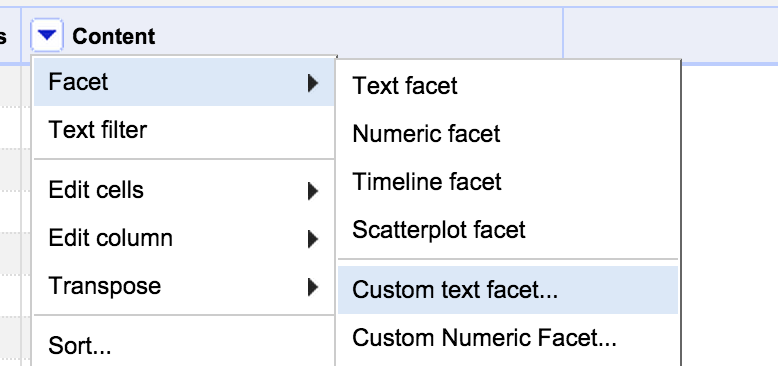
All the lines I can see start with ‘$_’ but I want to check that there are no other patterns that I might need to take account of. I did this with a ‘Custom Text Facet’ on the Content column (Custom Facets are one of my favourite features and I use them a lot):

Custom Text Filter


The Custom text facet allows you to create a facet by writing a GREL expression. I use the expression:

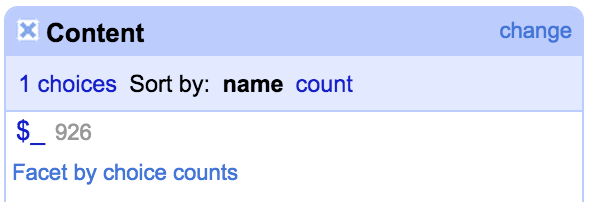
value.substring(0,2)

Which creates a facet with the first two characters from each cell – this immediately tells me that out of the rows I’ve filtered, they all start with “$_”:

Facet illustration


So I could now confidently run a transformation on the Content column to remove the first two characters for all these rows – using:

value.substring(2)

Which takes the whole of the string excluding the first two characters.

From the errors file (which I also opened in OpenRefine in a separate project which allowed me to group the errors easily) I could see situations where there were incorrect indicators for a MARC field (and other errors) – and I could use the facets to filter down to the field in question, and then look at the issues with the indicators – and fix them. I’m not going to describe every single situation, but one example was the 650 field. Here for some reason the indicators seemed to have been shifted to the end of the field, rather than appearing at the start of the field. This, in turn, had lead to the first subfield appearing where the indicators should have been:

650 issues


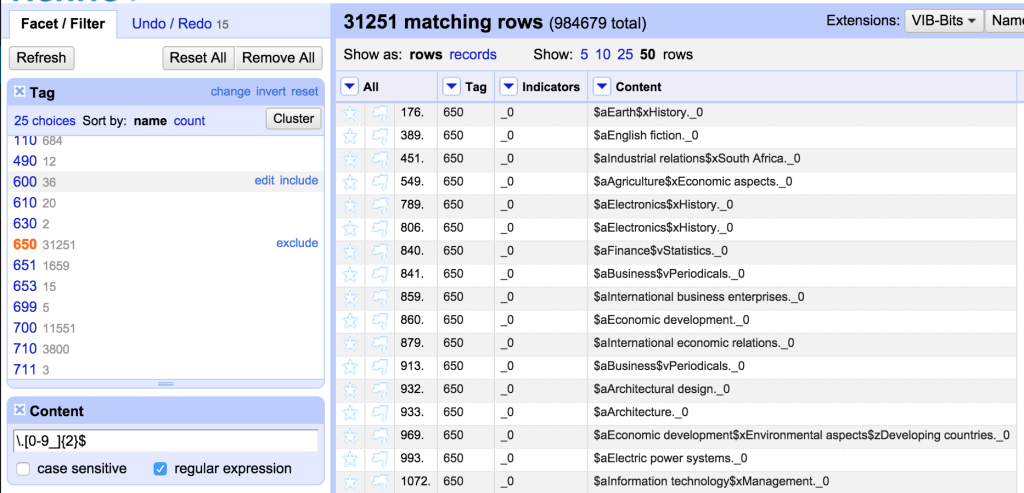
So here I want to move the contents of the ‘Indicators’ column into the Content column. I did this with the same approach as described above. Then I wanted to move the indicators from the end of the string into the Indicators column. I used a Filter with a regular expression to find 650 fields ending with a digit or an ‘_’ which seems to be used generally for uncoded indicators:

Regular expression filter


This seems to give me what I need:

650 fields ending with indicators


So now I can run a transformation on the Indicators column:

cells["Content"].value.substring(-2)

Which inserts the last two characters from the Content column into the Indicators column.

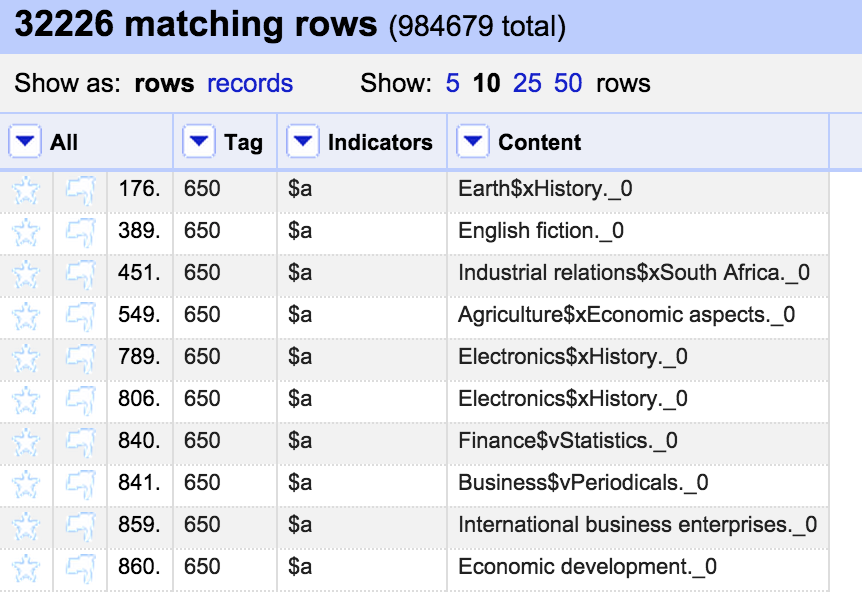
However, after doing this, I realised that this had ended up including some situations where the 650 field finished with a year (hence ending with two digits). So I used the ability of OpenRefine to reverse my last steps, and then I improved my filter and made sure I didn’t include those rows and then re-applied the transformations:

Improved 650 filter

As you can see in this screen shot – this transformation is being applied to over 30,000 650 fields in one go.

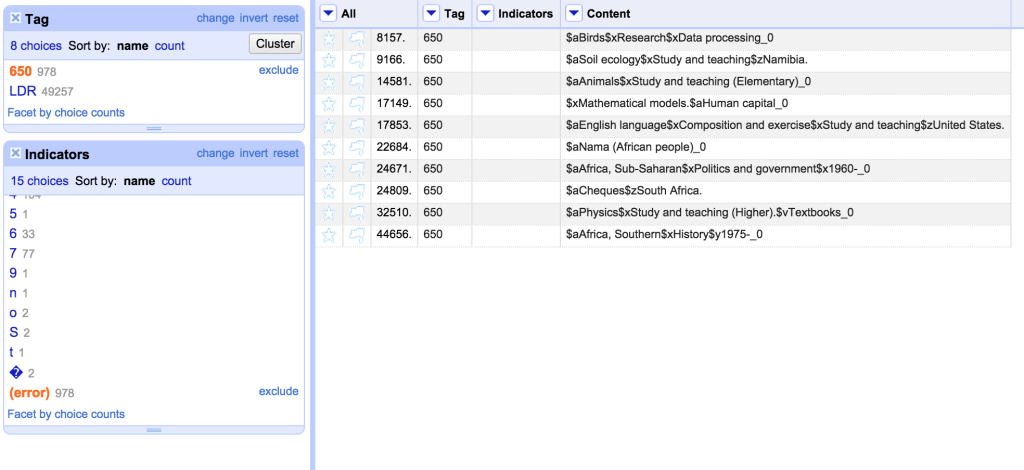
A lot of the issues in the MarcEdit Validation report were incorrect indicators on various fields. I could see from this that there were problems with the second indicator on the 650 field in some cases. To investigate this I created a new custom text facet using the expression:

value[1]

This takes the second character in the ‘value’ (lots of stuff in OpenRefine counts from zero – value[0] is the first character from value, and value[1] takes the second). I used the ‘Tag’ facet to filter down to the 650 field, and then I could see where there were problems:

Indicator facet

I can see that there are lots of 650 fields which have no second indicator (and for some reason haven’t been caught by my previous expression) and also some odd stuff like ‘9’, ‘n’ and ‘S’. These need investigating individually. However, you can see how this method could be used to check for incorrect indicators and look for patterns to fix them.

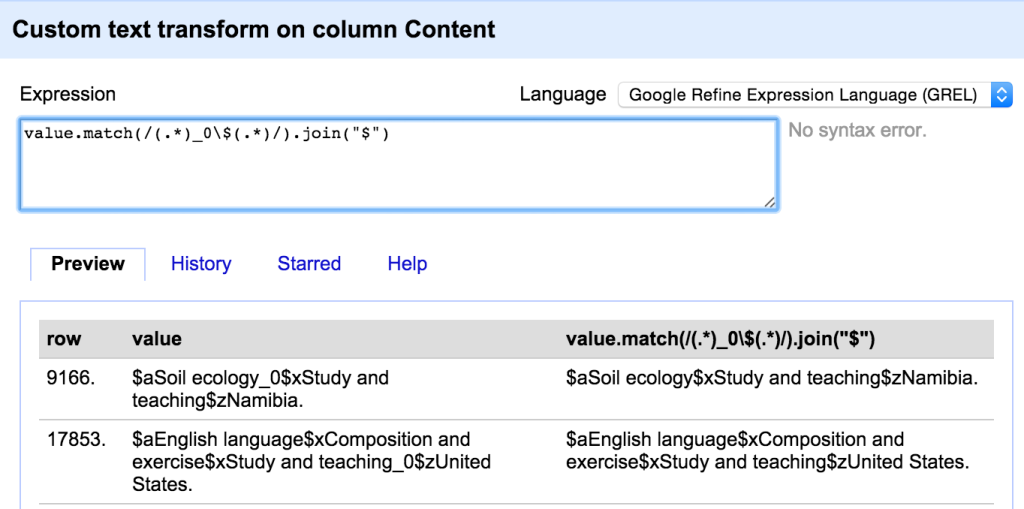
While there were many more issues to work through, the techniques were pretty much what I’ve already described here – lots of use of filters, facets, custom facets, substring and replace transformations. There were also situations where I wanted to find and extract values from the middle of a MARC field and in this case I used the ‘match’ transformation with a regular expression – for example here I’m using a ‘match’ transformation to remove some indicators that have somehow ended up in the middle of a MARC field:

Using a Match expression

For the LDR and 008 fields I was able to check various character positions using custom text facets with the ‘substring’ command. I was also able to check the length of these fields using a custom text facet with:

value.length()

All of these showed me problems that I could work on fixing.

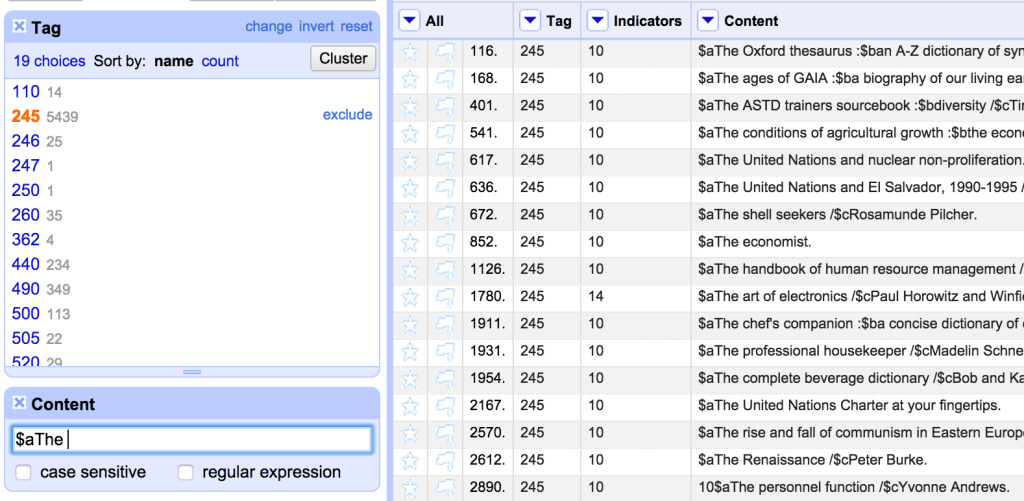
I want to share one final example in this post – because while the records I was dealing with here were obviously really messy, and invalid, and hopefully not issues you’d see in most MARC data, while I was dealing with the records I noticed some of the 245 fields had incorrect non-filing indicators. Despite the fact this wouldn’t affect the validity of the records, I couldn’t ignore these, and so I thought I should look for any examples of this and fix them. So I used the Tag facet to get the 245 field only, and then started playing around with filters intended to find potential non-filing words at the start of the field. I started by looking for 245 fields that started with a $a subfield followed by the word ‘The’:

Incorrect non-filing indicators

As can be seen, the indicators are incorrect for most of these. So I could fix these in one go by setting the second character in the indicator column to ‘4’ using the following expression on the Indicator column:

value[0]+"4"

(value[0] takes the first character from whatever string is in the column currently – I want to preserve this as it is, and only change the second character)

I then got a bit more inventive with the Filter – doing things like looking for 245$a starting with one, two or three letter words, then identifying common patterns (essentially definite and indefinite articles in various languages) and fixed those as well.

This kind of small data fix might apply to any set of MARC records where some inconsistencies and typos will have occurred.

After a lot (a lot!) of work, I’d finally fixed up the records as far as I could. There were circumstances where I’d had to make my best guess (were those ‘650’ fields really LCSH?) but generally I was pretty happy with what I’d achieved. It was time to export the records from OpenRefine and get them back into MarcEdit to validate them again… which I’ll cover in Part 5.

A worked example of fixing problem MARC data: Part 3 – MarcEdit

This is the third post in a series of 5.

In Part 2 I describe how I used a text editor to get a malformed file to the point where it could be read as a MARC file by MarcEdit. I knew that there would still be many issues in the file at this point, because I’d spotted them in my initial investigation, and when editing the file in a text editor – but I wanted to get a more structured list of the issues and happily the MarcEdit software has an option to validate files.

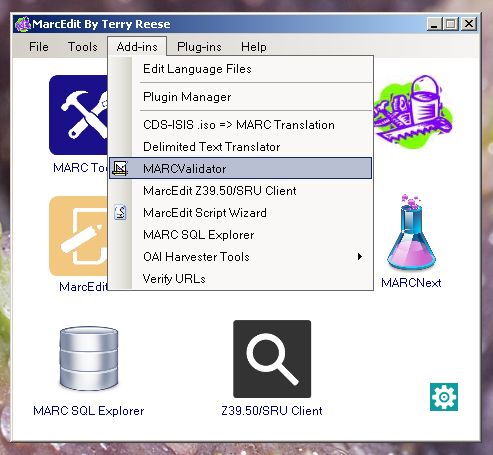
Like several other functions in MarcEdit, the ‘Validate MARC Records’ option can be accessed both from the MarcEdit opening screen, and from with the MarcEdit editor. To access the validation option without going through the editor look in the ‘Add-ins’ menu:

MarcEdit Add-ins menu

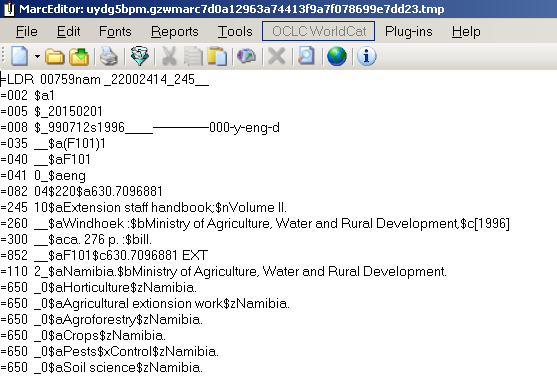
However, first I wanted to make sure that the file would open OK in the MarcEdit Editor, and see how it looked, so I used the ‘MarcEditor’ option and opened my file:

marcedit5


The layout of the MARC record in the editor is much easier to read than the native MARC format – for comparison:

Example of a MARC Record

The MarcEditor layout is called ‘mnemonic format‘ (for what seem like slightly obscure reasons to be honest, and as far as I can tell relate back to the origins of this format in the Library of Congress MarcMaker and MarcBreaker software)

The layout of this mnemonic format is reasonably easy to read if you are used to MARC records – each line contains:

  • an equals sign as the first character on the line
  • a three digit (or letter in the case of LDR) MARC field code
  • two spaces
  • two MARC field indiciators
  • the content of the field – with subfields included where appropriate using the syntax ‘$’ followed by the subfield code

Even from a very brief examination of the MARC record in the editor I can immediately see there is a problem with the fixed fields (LDR, 001-009 fields) in that they all start with a subfield:

Illustration showing problem with Indicators on fixed fields

I can also see that I’ve got a ‘002’ field containing what seems to be a system number – which I’d expect to be in ‘001’.

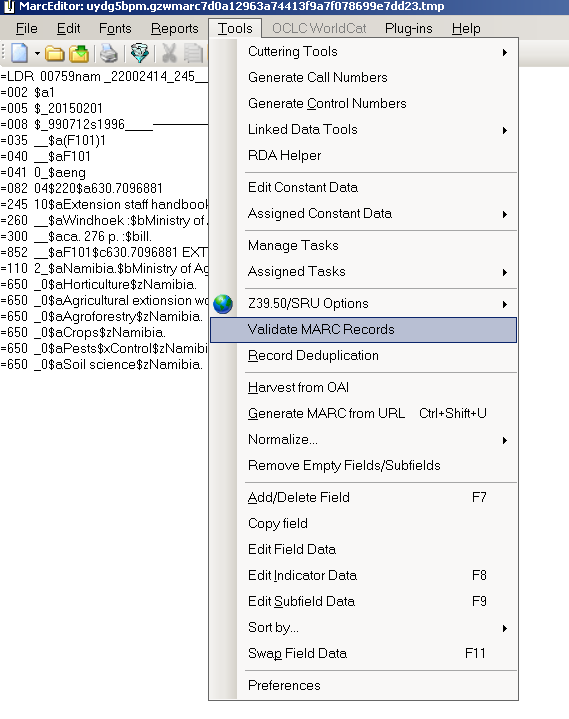
I then ran the Validate Marc Records function, which can be accessed from inside the MarcEditor through the ‘Tools’ menu:

How to access the Marc Validator from the MarcEditor

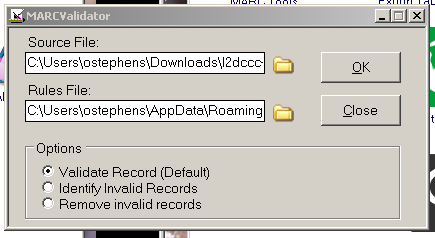
When you choose this option, you are prompted for the ‘rules’ file you want to use:

Choose rules file for Marc Validator


MarcEdit comes with a ready made rules file for validating MARC – but you can modify this, or design your own validation file if you have specific things you want to validate (or ignore) in different types of file.

(n.b. in the illustration above shows the option to select the ‘source’ file – that is the file you want to validate. This isn’t an option when using the Marc Validator from the Marc Editor, as it will always validate the file you are viewing in the editor. However when you access the Marc Validator directly without going via the Editor, you will be asked which file you want to validate)

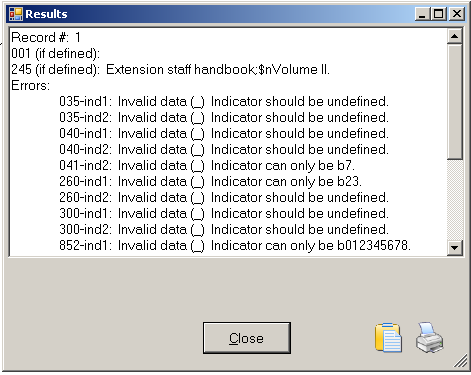
There are different options for the record validation process, but in this case I want to use the default ‘Validate Record’ option. When I click ‘OK’, the validator runs (this will take a while on a large file) and then displays the results which in my case looked something like:

Marc Validator results

I can see now that my problems extend beyond the fixed field problems I identified by eye – I’ve got all kinds of problems with incorrect indicators (and many other problems not shown in this screenshot).

I used the clipboard icon to copy these results into the clipboard and pasted them into a text file so I could refer back to them.

At this point I have a file of MARC records that will at least open in MarcEdit. I also have a list of issues with the MARC records in the file. I now want to start fixing these errors. Of course I could start fixing these issues directly in MarcEdit, and there are some tools and approaches in MarcEdit that might help me – but with this volume of issues over a file of 50,000 records I’m not sure MarcEdit is the right tool.

Instead I’m going to use another tool to start fixing the records – a tool called OpenRefine which is designed specifically to help ‘fix messy data’. I’m a big fan of OpenRefine and use it a lot, so for me it is the obvious tool to use for this task.

However, OpenRefine doesn’t understand MARC records. It can use XML, and so converting to MARCXML might be one approach I could use – but to be honest I don’t think it is the right approach in this case, and I suspect trying to fix MARCXML in OpenRefine would be a very painful process.

Instead I’m going to use the ‘mnemonic’ format that is used by the MarcEdit editor. There are two ways of converting a MARC file into the mnemonic format in MarcEdit. You can use the ‘MARC Breaker’ function which can be accessed from the MarcEdit opening screen, or (and this is the approach I took) once you have a file open in the MARC editor you can simply save it in the Mnemonic format simply by using the File->Save option from the File menu. The mnemonic format is designated in Marc Edit by the ‘mrk’ file extension (as opposed to ‘mrc’ which designates a proper aka ‘compiled’ aka ‘binary’ MARC file). ‘mrk’ files are simple text files, and can be opened in any text editor, and happily also in OpenRefine.

I now have a file of errors (from the MARC Validator) and my MARC records in mnemonic format – the next step is to open the files in OpenRefine so I can see all of the different types of error that I need to fix and start to fix them – which I’ll describe in Part 4 of this series.

A worked example of fixing problem MARC data: Part 2 – Text editor

This is the second post in a series of 5.

As described in Part 1 – I had 50K MARC records in a file, but due to the use of incorrect ‘delimiter’ and ‘record terminator’ characters the file wasn’t recognised as MARC by standard tools such as MarcEdit. My first job was to correct the file to the point that I could use MarcEdit to validate and manipulate the records.

If you haven’t looked at a MARC record before, they have a slightly odd structure which consists of the ‘leader’ and then the ‘directory’ which between them contain overall information about the structure of the record (how long the record is, what fields are present, where each field starts in the record, etc.), and then the content of the fields – essentially the actual content of the MARC record. TheMARC record structure documentation describes this in some detail.

Within the record a special character called the ASCII ‘Record Separator‘ which is used to indicate the end of the directory and variable fields within a record. The ASCII ‘Unit Separator‘ character is used to separate out subfields. Finally, because a single file can contain more than one MARC record, the records are separated from each other by another special character called the ASCII ‘Group Separator‘.

What I’d got was MARC records that looked liked this:

00667nam _22002414_245__002000800000005001900008008004300027020001500070035001000085039001800095040002300113082001600136245005700152250001100209260004300220300002400263500002000287500003400307852002600341100002100367650002000388650001700408#$a13568#$_00000000000000.0#$_030129s1992____--------------000-y-eng-d#__$a0314922180#__$a13568#80$a2$b1$c_$d_$e1#__$aZA$aF101$c20030129#04$220$a621.395#10$aFundamentals of logic design /$cCharles H. Roth, Jr.#__$a4th ed#__$aSt. Paul, MN :$bWest Publishing,$c1992#__$axviii, 770 p :$bill#__$aIncludes index.#__$aIncludes answers to problems.#__$aF101$b_N$c621.395 ROT#$aRoth, Charles H._1#_0$aLogic circuits.#_0$aLogic design#*

Here instead of the special Record separator character, a simple ‘#’ has been used, instead of the Unit separator a ‘$’ has been used, and instead of a Group Separator, a ‘*’ has been used.

I could open the file is a text editor – I ended up (for no particular reason) using a combination of Sublime Text and Notepad++, but either could have probably done the job by itself. I wanted to replace the #, $ and * characters with their appropriate special ASCII characters. However, it seemed likely that at least the ‘$’ sign might also be used as an actual dollar sign in the file, as well as the subfield separator.

I used the fact that both Sublime Text and Notepad++ support find and replace using ‘regular expressions’. Regular expressions are a powerful way of matching text strings. As well as simply making a precise match to a word or piece of text, you can use Regular Expressions to match types of characters (e.g. ‘match a digit’, ‘match a lowercase letter’), or sequences of characters.

For example, you can see in the example above that there is a repeated pattern of a ‘#’ followed by two characters, followed by ‘$’ – this is the record separator (start of a new MARC field) followed by two indicators, followed by the unit separator – the first subfield in the MARC field. The regular expression that will match this is:

#..\$

The ‘#’ matches the # character – just a simple match. The ‘.’ (period/fullstop) character is a wildcard that will match any other character – so the two dots mean ‘match any two characters’. Finally the ‘\$’ matches the dollar sign – the ‘\’ in front of it is needed because a ‘$’ on its own in a regular expression has a special meaning of ‘end of the line’ – the ‘\’ forces it to match the dollar sign directly (using a ‘\’ in this way is called ‘escaping’ the special character).

I was pretty confident that this pattern wouldn’t appear randomly elsewhere in the file – so I could use this as a first find/replace. I wanted to replace the # and $ with the record separator and unit separator characters, but keep whatever two characters were between them. You can do this using regular expressions with something called a ‘capture group’ – where you put the characters you want to ‘capture’ (to be able to use in the ‘replace’ expression) using brackets ‘(‘ and ‘)’. So the Find expression becomes:

#(..)\$

You can capture multiple groups in a single Find expression, and these are just numbered from 1. The syntax for using the ‘captured’ group in the Replace command varies – in Sublime Text it is ‘\1’, while in Notepad++ it is ‘$1’ – but they do the same thing – take whatever value was captured, and use it in the replace expression.

Using this approach I was able to replace the ‘#’ and ‘$’ with the appropriate ASCII characters (which I copied and pasted from a valid MARC file I already had – these special characters didn’t actually show visibly in the Notepad++ Find/Replace dialogue – but they were there and do work in a replace statement).

Once I’d done this I was also able to replace the ‘#*’ that appeared at the end of every line with a Unit Separator followed by a Group Separator. I checked that this replace action replaced the expected number of characters to reassure myself that this had worked OK.

Working with 50,000 lines in a text editor like Sublime Text or Notepad++ can cause some problems. This kind of text editor typically holds the whole of the file in active memory while you are editing the file – and large files can take up large amounts of memory. Fifty thousand lines did make Sublime Text and Notepad++ slightly sluggish in their response times, but happily it didn’t prove too much for either of them.

If I’d hit problems with file size, I’d probably have tried using a tool called ‘sed’ instead. ‘sed’ is a ‘streaming editor’ (hence ‘sed’) which means it doesn’t try to hold the whole file in memory, and instead will run through the file bit by bit when you carry out a command. I have to admit that I don’t find sed very intuitive and often struggle to get it to do what I want. There is a good basic introduction to sed on Mac at http://www.maclife.com/article/columns/terminal_101_find_and_replace_using_sed, and sed is also available for Unix/Linux (natch) and Windows (a simple intro available at http://www.thoughtasylum.com/blog/2011/9/30/using-sed-on-windows.html)

To do the best job I could on the ‘replace’ I had to play around with various matching patterns. For the subfield markers, one of the approaches I used was to use a regular expression to see occurrences that didn’t fit the usual subfields. So for example the regular expression:
\$[^a-z]
Finds all occurrences of the dollar sign that is followed by anything except a lowercase letter. Using this I found immediately some numeric subfields, so I could add these in:
\$[^a-z2468]
I used this kind of approach to investigate oddities and make sure I wasn’t replacing a load of currency ‘dollar’ signs with the Unit separator used for subfields.
I didn’t expect (or achieve) perfection here – I’d probably end up at least accidentally replacing some genuine ‘dollar’ signs from price information with a Unit Separator instead. I also wasn’t trying to fix anything but the most basic problems here – for example there were many examples of “$_” subfields – clearly these aren’t valid MARC subfields, but for the moment I didn’t care about this I just wanted to do the minimum I needed to get to the point where I could open the file with MarcEdit. After some fiddling around with various search/replace strategies, I eventually managed this, and was able to go to the next step in the process which I’ll describe in Part 3 of this series.

A worked example of fixing problem MARC data: Part 1 – The Problem

In what will eventually be a series of 5 posts (I think) I’m going to walk through a real life example of some problematic MARC records I’ve been working with using a combination of three tools (the Notepad++ text editor, MarcEdit and OpenRefine). I want to document this process partly because I hope it will be useful to others (including future me) and partly because I’m interested to know if I’m missing some tricks here. I’d like to thank the Polytechnic of Namibia Library for giving me permission to share this example.

This is the first post in the series, and describes the problem I was faced with…

I was recently contacted by a library who were migrating to a new library system but they’d hit a problem. When they came to export MARC records from their existing system, it turned out that what they got wasn’t valid MARC, and wouldn’t import into the new system.

I agreed to take a look and based on a sample of 2000 records found the following problems:

  • Missing indicators / indicators added in the incorrect place within the field, rather than preceding the field
  • Incorrect characters used to indicate ‘not coded/no information’ in MARC field indicators
  • Subfields appearing in fixed length fields
  • Use of invalid subfield codes (in particular ‘_’)
  • System number incorrectly placed in 002 field, rather than 001 field
  • Several issues with the MARC record leader (LDR) including:
    • Incorrect characters used to indicate ‘not coded/no information’
    • Incorrect character encoding information (LDR/09)
    • Incorrect characters in “Multipart resource record level” (LDR/19)
    • Incorrect characters in “Record status” (LDR/05)
    • Incorrect characters in “Bibliographic level” (LDR/07)
    • Incorrect characters in “Encoding level” (LDR/17)
    • Incorrect characters in “Descriptive cataloging form” (LDR/18)
    • Incorrect characters in “Multipart resource record level” (LDR/19)
    • Incorrect characters in “Length of the implementation-defined portion” and “Undefined” (LDR/22 and LDR/23)

At this point I felt I had a pretty good view of the issues, and agreed to fix the records to the point they could be successfully loaded into new library system – making it clear that:

  • It wouldn’t be possible improve the MARC records beyond the data provided to me
  • That where there was insufficient data in the export to improve the MARC records to the extent they are valid, I’d use a ‘best guess’ on the appropriate values in order to make the records valid MARC
  • That I wouldn’t be trying to improve the cataloguing data itself, but only to correct the records to the point they were valid MARC records

At this point the library sent me the full set of records they needed correcting – just under 50k records. Unfortunately this new file turned up an additional problem –  that incorrect ‘delimiter’, ‘field terminator’ and ‘record terminator’ characters had been used in the MARC file – which meant (as far as I could tell) that MarcEdit (or code libraries like PyMARC etc.) wouldn’t recognise the file as MARC at all.

So I set to work – my first task was to get to the point where MarcEdit could understand the file as MARC records, and for that I was going to need a decent text editor as I’ll describe in Part 2


Using Google Sheets with ESTC

I’ve done a lot of work with early English texts (and especially the related medata) over the past few years as part of my work on the Jisc ‘Historical Texts‘ platform which brings together texts from Early English Books Online (EEBO), Eighteenth Century Collections Online (ECCO) and a collection of digitised 19th Century books from the British Library.

I’m hoping that over the next few months I’ll be able to do more work looking at the opportunities to build on APIs over the Historical Texts platform. I’m interested in what sort of things people might want to do with an API which gives access to the metadata or texts in the collections, so I was very interested when, via @heatherfro on Twitter I saw a blog post from @BArmintor describing how he wanted to be able to find a Wing or STC number for a given ESTC number, to make it possible to find data on the Database of Early English Playbooks (DEEP)

Slightly tangentially I also do some training for British Library staff on using APIs, and in that training I use Google Sheets to get people with no experience of writing code interacting with an API at the British Library. Inevitably(?) the exercises we work through in this course are slightly artificial, and so I’m always interested in finding examples (especially ones working with British Library resources, which includes the ESTC) from the real world.

Given @BArmintor had already worked out the method to extract a Wing or STC number from the ESTC (the online catalogue is hosted at the British Library), I thought I’d amuse myself by seeing if I could turn it into a Google Sheets exercise – so here it is…

Introduction

In this exercise you are going to use a Google Spreadsheet to search for an ESTC number in the ESTC, find the full record, and then extract the Wing or STC number from the record.

Since (as far as I know) there isn’t a public API to the ESTC, then you will be extracting information from the web (HTML) interface to the ESTC (this method of extracting information from web pages is sometimes referred to as ‘scraping’ or ‘web scraping’).

Understanding the web interface to ESTC

The first thing you need to understand is how the web interface to ESTC is structured, how you can search using an ESTC number, and where you can get the Wing and STC numbers from. Luckily @BArmintorhas already outlined this in his blog post. The basics are:

  • You can search for an ESTC Number using a URL of the form http://estc.bl.uk/{ESTC_Number}. E.g. http://estc.bl.uk/S109167.
  • Following this URL will take you to a list of results which (hopefully) will contain a single item – the record you are looking for
  • This single record in the results list contains a link to the full record for the item
  • There are several different ‘format’ options for viewing the full record. The view you see is controlled by a ‘format’ parameter in the URL for the full record. By default this is ‘format=999’, but the ‘MARC’ view is probably the easiest to work with for our purposes, and to get this you need to use ‘format=001’
  • In the MARC view, the Wing or STC numbers are stored in a table. The rows in the table which have Wing and STC numbers will have the text ‘5104’ in their first cell

For more detail read @BArmintor’s post.

Setup a Google Sheet

You’ll need to register for Google Drive if you haven’t already, then you can use the ‘New’ option to create a new Google Sheet.

You are going to create a sheet where you can enter ESTC numbers in the first column, and then retrieve and display various information in subsequent columns. Put a heading at the top of column A to show it will contain ESTC numbers, and add your first ESTC number in the second cell in the column (I’m going to use the ESTC number S109167).

ESTC Google Sheets setup illustartion 1

Search ESTC and get the full record URL

You know that you can use the URL http://estc.bl.uk/S109167 to search for this item on the ESTC, and that you’ll get the results page back, which will include a link to the full record – so in column B you are going to retrieve the page from http://estc.bl.uk/S109167 and extract the link to the full record. You can do this by using a couple of Google Sheets functions: ‘concat‘ (or ‘concatenate’) and ‘importXml‘.

‘Concat’ joins together multiple strings – you’ll use this to create the first URL you need:

concat("http://estc.bl.uk/",A2)

‘importXml’ allows you to import data formatted as XML and extract information from it using a language called ‘xpath’. Happily @BArmintor has already worked out the ‘xpath’ statement you need as:

//td[@class=td1]/a[contains(@href,'&set_entry')]/@href

This means the importXml we’ll use will look like:

=importXml(concat("http://estc.bl.uk/",A2),"//td[@class=td1]/a[contains(@href,'&set_entry')]/@href")

The function imports the URL that you are building with the ‘concat’ statement, and then uses the XPath statement that @BArmintor has provided to get the URL for the full record.

You are going to put this formula in Cell B2, and while you are at it add a heading for column B:

ESTC Google Sheets Illustration 2

When you’ve added this formula and hit ‘enter’ you should find that the sheet finds the URL for the full record and displays it in the cell:

ESTC Google Sheets illustration 3

Retrieve full record and get the STC Number

Now you have the Full Record URL, the next step is to retrieve the full record in MARC format and extract an STC number (if it exists). To do this we’ll need to:

  • change the ‘format’ parameter (which is ‘format=999’ in this URL) to be ‘format=001’ (to get the MARC record view)
  • retrieve the HTML for that MARC record view and search for the table rows beginning ‘5104’, then see if the contents of the next cell in the row contains ‘STC’

We’ll do this step in column C – so you are going to be adding a formula to Cell C2. Here we’ll be using the ‘SUBSTITUTE‘ function to change the ‘format’ parameter:

SUBSTITUTE(B2,"format=999","format=001")

You then combine this with another importXml function. In this case @BArmintor hasn’t given the relevant XPath so you have to work it out. The first part of the XPath statement needs to find a table cell – a ‘td’ in HTML – containing the text ‘5104’. The XPath is:

//td[contains(text(),'5104')]

However what you need is the contents of the following <td> element (i.e. the next cell in the table). Happily XPath has a specific function for this called ‘following-sibling’, so you can use it like this:

//td[contains(text(),'5104')]/following-sibling::td

Finally, you only want to get the contents of this cell if it contains the string ‘STC’ indicating it is an STC number – you can use ‘contains’ again to do this:

//td[contains(text(),'5104')]/following-sibling::td[contains(text(),'STC')]

Putting this all together you get the following formula to enter into cell C2:

=importxml(SUBSTITUTE(B2,"format=999","format=001"),"//td[contains(text(),'5104')]/following-sibling::td[contains(text(),'STC')]")

Once you hit ‘enter’ on this you should see the correct STC information being retrieved:

ESTC Google Sheet Illustration 4

As @BArmintor notes, the STC statement is split into two parts – the first part is preceded by “|a” and the second part – which is the number you actually want is preceded by “|c”. If you want to break this down further there are probably a few options you can use, but you can use the Google Sheet function ‘SPLIT’. You can add this to the formula you’ve worked out for C2, so edit cell C2 to be:

=split(importxml(SUBSTITUTE(B2,"format=999","format=001"),"//td[contains(text(),'5104')]/following-sibling::td[contains(text(),'STC')]"),"|c")

This will result in the statement you’ve retrieved being split into two parts – the STC reference in cell C2, and the STC number in D2 – add some column headings and you’ve got a working sheet that will retrieve the STC number for a given ESTC number:

ESTC Google Sheet illustration 5

Retrieve full record and get the Wing Number

To extend this to retrieve Wing numbers as well is now simple – just use column E to add a modified version of the formula in column C – you need to look for the text ‘Wing’ rather than ‘STC’:

=split(importxml(SUBSTITUTE(B2,"format=999","format=001"),"//td[contains(text(),'5104')]/following-sibling::td[contains(text(),'Wing')]"),"|c")

Unfortunately the example ESTC Number I’ve chosen to use in the first row doesn’t have a Wing reference, so I can add another row to test this – just enter the new test number (R504962) in cell A3 and copy down the formula from B2,C2,E2 into B3,C3,E3 respectively:

ESTC Google Sheets Illustration 6

And you can add new rows and copy down the formula as much as you want of course.

Possible issues

There are some things we might want to look out for that might cause us problems:

  • If a record has multiple STC and/or Wing references in the record, this will end up taking up multiple rows in the spreadsheet
  • We do an exact match on ‘STC’ or ‘Wing’ in the ESTC record – which would mean we wouldn’t find a record that used ‘stc’ or ‘wing’ etc.
  • If the STC or Wing reference more than just two parts (indicated by ‘|a’ and ‘|c’) we might find we don’t separate out the STC/Wing number by itself

In his blog post, the next thing @BArmintor wants to do is “teach a computer to look up a DEEP entry”. Unfortunately this initially looks like it isn’t going to be possible in Google Sheets (although I haven’t looked in detail yet). The reason we hit problems here is the DEEP search page (http://deep.sas.upenn.edu/search.php) uses the HTTP ‘POST’ command – this passes the values to be searched to the DEEP database without showing them in the URL. While this is no problem for a browser, the Google Sheets ‘importXml’ command doesn’t support HTTP ‘POST’ options, but only HTTP ‘GET’ – which is what we’ve relied on in this exercise. I haven’t investigated any work arounds for this so far, and that’s enough for one blog post 🙂

What it means to be Open

I originally started to write this post in reaction to a thread on the BIBFRAME email list in March 2015 entitled “Linked Data”. In reaction to this thread I wanted to write something on what I saw as the potential for Linked Data in libraries, which I felt went beyond the issues generally brought up in the thread (with a couple of notable exceptions). However, other things got in the way, and it wasn’t until I was invited to speak at an event on Linked Data and Libraries organised by OCLC that I managed to find the time to flesh out my thoughts. The following post is based on the talk I gave at that event which was on 22nd May 2015.

The accompanying slides are available and are licensed as CC-BY:

Anyone can say Anything

In the world of linked data it has been said that “anyone can say anything about anything“. This is both a huge challenge and opportunity for libraries wanting to exploit linked data. This talk will explore the ‘open world assumption’ of linked data, how it might benefit libraries and what approaches will allow libraries to take advantage of published linked data while trying to avoid problems caused by data of variable quality and veracity.

“With the Internet, we each have our own printing press”

Holbert, G.L. (2002). Technology, libraries and the Internet: a comparison of the impact of the printing press and World Wide Web . E-JASL, 3(1-2).

What’s the amazing thing about the web? What makes it different to what has gone before? One aspect is clearly the way in which information can reach many people in a very short time over long distances.

Another is the way in which it reduces the barriers to publishing information – and people have been extremely quick to take advantage of this. In 1991 there was one web site. 24 years later there are around one billion (http://www.internetlivestats.com/total-number-of-websites/). That’s a huge number and even with an estimate of 75% of these sites not currently in use, that’s still 250 million websites. Those 250 million sites are made up of a huge range of information of all kinds being published by all kinds of people and organisations: businesses, charities, museums, libraries and individuals.

This is possible because the web has a common system of addresses (URLs) and common standards on how to transfer information across the web (HTTP) and how to format the documents we publish (HTML).

“there may always exist additional sources of data, somewhere in the world, to complement the data one has at hand”

Learning Linked Data Project http://lld.ischool.uw.edu/wp/glossary/

What is the Open World Assumption?  It basically says that others may know things that we don’t. That “there may always exist additional sources of data, somewhere in the world, to complement the data one has at hand” (http://lld.ischool.uw.edu/wp/glossary/).

This is as opposed to the closed world assumption, which assumes that you know and control all the relevant data. An example might be a seat booking system in a theatre or cinema – in such a system it is reasonable to assume that every seat on the system that doesn’t have a booking is currently free.

One of the things that typifies open world systems is support for making statements which negate information about things. If you operated a seat booking system with an open world assumption, for every seat that wasn’t booked you’d need to make an explicit statement to that effect.

A library catalogue as a whole generally operates on a closed world assumption – if there isn’t a record for a book in your catalogue, you don’t have that book. If a book isn’t out on loan, it is in the library (well, or lost or stolen!).

However individual records in a library catalogue – the bibliographic descriptions – tend to work on an open world assumption. For example, if the publisher of a book is not known, you can explicitly state that it is not known. This used to be done with [s.n.] (sine nomine), but now done with the slightly more prosaic “publisher not identified”. This allows us to differentiate between ‘not known’ and ‘not recorded in this catalogue record’.

But what has this go to do with linked data?

In 2006 Sir Tim Berners-Lee published a note on Linked Data (http://www.w3.org/DesignIssues/LinkedData.html), this lays out the four things you need to do to have Linked Data. The first two of these are:

  1. Use URIs as names for things
  2. Use HTTP URIs so that people can look up those names.

That is essentially to say use web URLs as identifiers for things. This means that every one of those 1 billion websites I mentioned earlier is not only a place to host web pages, but also a place where identifiers can be created. If you have a website, you can publish your own linked data identifiers – it’s just more URLs.

The other two things in that note on Linked Data are:

  1. When someone looks up a URI, provide useful information, using the standards (RDF, SPARQL)
  2. Include links to other URIs. so that they can discover more things

Altogether these four things mean that linked data allows you:

  • To create and publish unique identifiers for things you know about
  • To make statements about things you know about using identifiers (your own, or other peoples)
  • Enables you to say things about your own resources
  • Enables you to say things about other resources
  • Enables other people to say things about your resources

I described earlier how the web has made it possible to publish documents about things in a highly interoperable way using URLs, HTTP and HTML. In the same way Linked Data is a lingua franca for publishing data – it makes it possible for data from many sources, published by different people and organisations, to interoperate.

In particular I want to consider the point that publishing linked data, with your own identifiers, allows other people to make statements about your resources – linked data inherently works on the open world assumption. This is something I don’t think is considered enough in discussions of library linked data.

In March 2015 I attended the Early English Books Hackfest at the Bodleian Library in Oxford. The event was to celebrate the release of over 25,000 texts from the Early English Books Online Text Creation Partnership (EEBO-TCP) project into the public domain. As is usual at such events, at the end of the day a number of people demonstrated or talked about the projects they had worked on during the day. There were a whole range of amazing projects, but one of the things that struck me was that several relied on the descriptive metadata, not the actual full text. Sadly, although the public domain texts do include some descriptive metadata, the underlying MARC records that describe the collection are not in the public domain.

One project I was particularly interested in was looking at colophon statements. Colophons are typically statements of who published a book and when and where it was published. However the colophons for material in EEBO often contain more information than this, extending to information about where the item was to be sold. For example:

Printed by M. Flesher, for R. Dawlman and I. Rothwell, and are to be sold at the signe of the Brazen serpent, and Sun in Pauls Churchyard

In the 16th and 17th Century Paul’s Cross churchyard (which is the site now occupied by St Paul’s Cathedral) was full of bookshops. These have been documented by Dr Peter Blayney in “The Bookshops in Paul’s Cross Churchyard. Occasional Papers of the Bibliographical Society, 5. London: The Bibliographical Society, 1990.”

Map of Bookshops of Pauls Cross in 1640

Just think what it would be like if Dr Blayney, or someone else, was able not only to do this research and record it, but publish it in a way that was intimately linked to the catalogue records that described the works being sold. Linked Data makes this possible. If the English Short Title Catalogue (ESTC) which documents works published in the relevant period was published as linked data. Each work with it’s own linked data identifier. Then anyone, including Dr Blayney, could publish data which added to the knowledge that ESTC already represents, and link it to those records from the ESTC.

For the first time there is a way for experts anywhere in the world, no matter who they are to enhance library data in a way that can be captured and used – by them, by the libraries and by others.

Library data already operates on an open world assumption. It is time for us to embrace the full meaning of this – that we are not the experts on the resources we hold, and that potentially there always data in existence elsewhere that complements ours.

What sort of opportunities would be offered by enabling and embracing others to make statements about library data? Three things immediately come to mind:

  • Improved displays in our discovery interfaces
  • Improving our data by finding incorporating corrections to our data
  • Improved search and discovery through the use of external data in our indexes

I created a demonstration of how linked data could be used to enhance displays in library catalogues with the “Composed” bookmarklet which I’ve blogged previously at http://www.meanboyfriend.com/overdue_ideas/2011/07/compose-yourself/

In terms of data corrections we can see the potential of this if we look at the Virtual International Authority File (VIAF) record for the science fiction author William Gibson on VIAF:

Graphic showing excerpt from VIAF record for William Gibson

VIAF has become a key Linked Data resource due to the number of people and organisations it identifies. However, in this example I want to highlight how that data can bring to light inconsistencies in our data, and it should trigger the question ‘have we got this right?’

How do people tell you you’ve got things wrong in your catalogue at the moment? What if they could publish corrections (or at least their view of things) in a way we could use gradually to improve our own data?

Here we can see that unlike all other libraries in VIAF, the National Library of Portugal thinks that William Gibson died in 2008. Whoever is correct, this anomaly at least should trigger the question “which of these statements is correct?”

If we published library data as Linked data and encouraged others to publish linked data statements about our stuff it would open up the ability to see where our data was wrong, or at least where there was disagreement.

Finally in terms of using linked data to improve search and discovery in libraries I want to go back to the example of the bookshops in Pauls Cross Yard. If Peter Blayney had been able to link his knowledge about the booksellers and their shops to library catalogue records or even to the level of colophons in library catalogue records – it would then be possible to bring this data into library discovery services. Imagine how the ‘publisher browse’ shown below could be improved by using the information from Peter Blayney’s research:

Illustration of Publisher browse from EEBO-TCP data


This could change the nature of the catalogue:

“The catalogue could be an information source, rather than just an inventory”

Karen Coyle in “Catalogers + Formats, the Wider Web – Open Discussion” https://youtu.be/OtY3bWhUT9M?t=2371 (39mins 30 sec)

The opportunities offered here are large, but there are problems as well. “Anyone can say Anything”. We know the web is full of mis-information (deliberate or otherwise) and not only that, there can be legitimate disagreement on a topic.

So is this just a free for all? Yes and no.

In general terms it is a free for all – anyone can say anything. But in terms of the data we choose to use – that’s up to us. We need to care about the provenance of the data we use. We can select those sources we trust, and ignore those that we don’t. We can look for contradictions in data we can see and use that to flag issues.

For example – maybe we would trust information about musicians from the BBC

Illustration of Microdata available from BBC Music pages

This screenshot shows linked data (using schema.org) extracted from the BBC page about George Frederick Handel. It includes an image of Handel and his exact date of birth, as well as a link out to more information in MusicBrainz. It also contains a list of recordings and video material relating to Handel.

It’s a rich resource, and just one of many we could make use of in libraries.

But as well as looking to these trusted organisations, we should look to the expert individuals. These are people in our institutions and communities, and who have spent years developing expertise in their chosen fields – Linked Data gives us a chance to work with experts across the globe, and harness that expertise to improve what we do

We live in an open world – we can’t assume that what libraries, or indeed other cultural heritage institutions have chosen to record, is the end of the story. Peter Blayney has been researching and documenting information on the book trade in 16th and 17th Century London for 20 years – I think we can trust the information he publishes as much as any we create.

So libraries should:

  1. Coin identifiers for things we know about
  2. Work with others to get them using those identifiers – this latter point, in my opinion being a vital part of what we need to do

If we publish RDF, but don’t embrace the open world assumption that goes with linked data, we have not much more than just another way of formatting our data. We need to go beyond this and understand what it really means to be Open.