Using Open Refine for e-journal data

Open Refine (previously Google Refine) is a tool for manipulating and ‘cleaning’ data (more information is available on the new Open Refine site). If you use Excel to do general data jobs, then it’s worth looking at Refine to see if it can help.

I’ve used Refine in the past to do explore and clean up data, and been impressed by the tools it provides. I’m currently working on two projects – KnowledgeBase+ and GoKB which are concerned with collecting and organising data about electronic resources. As anyone who has had to deal with data about electronic journal collections knows (especially e-resource librarians), a lot of data is sent around in spreadsheets and as comma/tab separated values – for example the KBART Guidelines, which are used by some publishers/content providers to publish lists of e-journals, recommend a TSV format.

Today I wanted to understand how a particular e-journals package was changing in 2013. I had a list of the journals included in the package in 2012, and a new list of the journals that will be included in 2013. Each file contained the title of the journals, ISSNs, eISSNs, URLs, the year, volume and issue of the first journal issue included in the online package. However, the column order and names were not the same as can be seen here:

2012 file
2013 file

I wanted to know

  • which titles were in the 2012 version that were not  in the 2013 version
  • which titles were in the 2013 package that were not in the 2012
  • for titles that were in both, if there had been any changes in key information such as the first issue included

I’d seen a blog post by Tony Hirst (@psychemedia on Twitter) on merging datasets using Refine which shows how you can match values across two Refine projects. Following this tutorial I was able to start matching across the data sets. Since both data sets contained the ISSN and eISSN it seemed likely that one of these would be a good starting point for matching – alas, this was not the case. Not all entries had an ISSN or eISSN, in more than one case the what was recorded as eISSN in one was listed as the ISSN in the other.  I decided to look for another approach to matching across the data sets.

In the end the most successful approach was using a three letter code that was used in the URLs in both files to identify the journal – this allowed me to get good matching between the two files and be pretty happy that I wasn’t missing matches. Interestingly the next most reliable matching mechanism I found was using a ‘fingerprint’ version of the journal title (‘fingerprint’ is a mechanism to try to standardised text strings, which is also described by Tony in his blog post).

Having found a decent way of matching between the files, I started to try to answer the questions above. Firstly from the 2013 file, I added in a new column which pulled the matching title from the 2012 file. Any blank cells in this column represented a 2013 title not in the 2012 file (easy to find using the Refine ‘faceting’ function).

To discover the titles in the 2012 file, not int the 2013 one, I did the same match process, but starting from the 2012 file. I couldn’t think of any other way of doing this which was a shame – it would be nice to get all the data into a single project and then do all the analysis from there – at the moment the only way I can think of doing this would be to somehow merge the files before importing into Refine – which would seem to defeat the point a bit.

Finally, I used the same matching mechanism to pull in the information relating to the first issue (first issue number, volume number, year) from the 2012 file into the 2013 file. I could then compare the 2012 version of each of these to the 2013 version

The expression used is: if(value==cells[“Frontfile 1st Issue Online Vol”].value,”same”,”changed”)
This compares the value in the “Frontfile 1st Issue Online Vol” with the value in the column I started from – and allocates a value of ‘same’ or ‘changed’. I found you needed to be careful when doing these comparisons that the data is of the same ‘type’. I had one example where I ended up comparing a ‘number’ type with a ‘string’ type and getting a ‘changed’ outcome even though both contained the character ‘4’.

By using facets to find all those that had ‘changed’, and using another facet on the 2012 title match to eliminate those titles that were not in the 2012 file, I was quickly able to find the 5 titles where the year had changed, and a further 16 titles where the volume of the first issue available was different, even though the year had stayed the same.

Could I have achieved the same outcome in Excel? Probably. However, Refine has several nice features (like faceting) that are very straightforward compared to doing the same thing in Excel. Perhaps, though, it’s greatest strength is the ability to easily view a history of all the changes that have been made to the file, undo changes, copy changes and re-apply by amending field names, and the ability to export all the changes applied in such a way that you can apply exactly the same changes to future files where the same actions are required.

Working with Data using OpenRefine

Over the last couple of years, the British Library have been running a set of internal courses on digital skills for librarians. As part of this programme I’ve delivered a course called “Working with Data”, and thought it would be good to share the course structure and materials in case they were helpful to others. The course was designed to run in a 6 hour day, including two 15 minute coffee breaks and a one hour lunch break. The focus of the day is very much using OpenRefine to work with data, with a very brief consideration of other tools and their strengths and weaknesses towards the end of the day.

Participants are asked to bring ‘messy data’ from their own work to the day, and one session focusses on looking at this data with the instructor, working out how OpenRefine, or other tools, might be used to work with the data.

The materials for this course are contained in three documents:

  1. A slide deck: “Working with Data using OpenRefine” (pdf)
  2. A handout: “Introduction to OpenRefine handout CC-BY” (pdf)
  3. A sample date file generated from https://github.com/BL-Labs/imagedirectory/blob/master/book_metadata.json (csv)

The slides contain introductory material, introducing OpenRefine, describing what type of tasks it is good for, and introducing various pieces of functionality. At specific points in the slide deck there is an indication that it is time to do ‘hands-on’ which references exercises in the handout.

The schedule for the day is as follows:

Introduction and Aims for the day (15 mins)

Session 1 (45 mins)

  • Install Open Refine
  • Create your first Open Refine project (using provided data)
  • Basic Refine functions part I
    • Columns and Rows
      • Sorting by columns
      • Re-order columns
    • Using Facets Part I
      • Text facets
      • Custom facets

Break (15 mins)

Session 2 (45 mins)

  • Basic Refine functions part II
    • Refine data types
    • Using Facets Part II
      • Clustering facets
    • Transformations
      • Common transformations
      • Using Undo/Redo
      • Write transformations with ‘GREL’ (Refine Expression Language)

Lunch (60 mins)

Session 3 (60 mins)

  • – What data have you brought along?
    • Size
    • Data
    • How can Refine help?
    • What other tools might you use (e.g. Excel,…)
  • Your data and Refine
    • Can you load your data into Refine
    • Handson plus roaming support

Break (15 mins)

Hour 4 (60 mins)

  • Advanced Refine
    • Look up data online
    • Look up data across Refine projects
    • Refine Extensions and Reconciliation services
  • Handson plus roaming support

Round-up (15 mins)

The materials linked above were developed by me (Owen Stephens, owen@ostephens.com) on behalf of the British Library. Unless otherwise stated, all images, audio or video content included in these materials are separate works with their own licence, and should not be assumed to be CC-BY in their own right.

The materials are licensed under a Creative Commons Attribution 4.0 International License http://creativecommons.org/licenses/by/4.0/. It is suggested when crediting this work, you include the phrase Developed by Owen Stephens on behalf of the British Library.

Using OpenRefine to manipulate HTML

Jon Udell wrote a post yesterday “Where’s the IFTTT for repetitive manual text transformation?“. In the post Jon describes how he wanted to update some links on one of his web pages and documents the steps needed to do the update to all links in a systematic way. Jon notes:

Now that I’ve written all this down, I’ll admit it looks daunting, and doesn’t really qualify as a “no coding required” solution. It is a kind of coding, to be sure. But this kind of coding doesn’t involve a programming language. Instead you work out how to do things interactively, and then capture and replay those interactions.

and then asks

Are there tools – preferably online tools – that make this kind of text transformation widely available? If not, there’s an opportunity to create one. What IFTTT is doing for manual integration of web services is something that could also be done for manual transformation of text.

While I don’t think it is completely the solution (and agree with Jon there is a gap in the market here) I think OpenRefine (http://openrefine.org) offers some of what Jon is looking for. Generally OpenRefine is designed for manipulating tabular data, but in the example Jon gives at least, the data is line based, and sort of tabular if you squint at it hard.

I think OpenRefine hits several of the things Jon is looking for:

  • it lets you build up complex transformations through small steps
  • it allows you to rewind steps as you want
  • it allows you to export a JSON representation of the steps which you can share with others or re-apply to a future project of similarly structured data.

These strengths were behind choosing OpenRefine as part of the data import process in the http://gokb.org project I’m currently working on where data is coming in different formats from a variety of sources, and domain experts, rather than coders, are the people who are trying to get the data in a standard format before adding to the GOKb database.

So having said in a comment on Jon’s blog that I thought OpenRefine might fit the bill in this case, I thought I’d better give it a go – and it makes a nice little tutorial as well I think…

I started by creating a new project via the ‘Clipboard’ method – this allows you to paste data directly into a text box. In this case the only data I wanted to enter was the URL of Jon’s page (http://jonudell.net/iw/iwArchive.html)

Screen Shot 2014-12-17 at 09.17.52
I then used the option to ‘Add column by fetching URLs’ to grab the HTML of the page in question

Screen Shot 2014-12-17 at 09.21.36

I now had the HTML in a single cell. At this point I suspect there are quite a few different routes to getting the desired result – I’ve gone for something that I think breaks down into sensible steps without any single step getting overly complicated.

Firstly I used the ‘split’ command to break the HTML into sections with one ‘link’ per section:

value.split("<p><a href").join("~<p><a href")

All this does is essentially add in the “~” character between each link.

I then used the ‘Split multi-valued cells’ command to break the HTML down into lines in OpenRefine – one line per link:

Screen Shot 2014-12-17 at 09.27.17
The structure of the links is much easier to see now this is not a single block of HTML. Note that the first cell contains all the HTML &gt;head&lt; and the stuff at the top of the page. If we want to recreate the original page again later we are going to have to join this back up again with the HTML that makes up the links so I’m going to preserve this. Equally at this stage the last cell in the table contains the final link AND the end of the HTML:

<p><a href="http://www.bing.com/search?q=site%3Ainfoworld.com+%22jon+udell%22+%22Web services %22">Web services | Analysis | 2002-01-03</a></p>
</blockquote>
</body>
</html>

This is a bit of a pain – there are different ways of solving this, but I went for a simple manual edit to add in a ‘~’ character after the final &gt;/p&gt; tag and then using the ‘split multi-valued cells’ again. This manual step feels a bit messy to me – I’d prefer to have done this in a repeatable way – but it was quick and easy.

Now the links are in their own cells, they are easier to manipulate. I do this in three steps:

  1. First I use a ‘text filter’ on the column looking for cells containing the | character – this avoids applying any transformations to cells that don’t contain the links I need to work with
  2. Secondly I get rid of the HTML markup and find just the text inside the link using: value.parseHtml().select(“a”)[0].innerHtml()
  3. Finally I build the link (to Jon’s specification – see his post) with the longest expression used in this process:
"<p><a href=\"http://www.bing.com/search?q=site%3Ainfoworld.com+%22jon+udell%22+%22"+ value.split("|")[0].trim().escape('url')+"%22\">"+ value + "</a></p>"

Most of this is just adding in template HTML as specified by Jon. The only clever bits are the:

value.split(“|”)[0].trim().escape(‘url’)

This takes advantage of the structure in the text – splitting the text where if finds a | character and using the first bit of text found by this method. It then makes sure there are no leading/trailing spaces (with ‘trim’) and finally uses URL encoding to make sure the resulting URL won’t contain any illegal characters.

Once this is done, the last step is to use the ‘join multi-valued cells’ to put the HTML back into a single HTML page. Then I copied/pasted the HTML and saved it as my updated file.

I suspect Jon might say this still isn’t quite slick enough – and I’d probably agree – but there are some nice aspects including the fact that you could expand this to do several pages at the same time (with a list of URLs at the first step instead of just one URL) and that I end up with JSON I can (with one caveat) use again to apply the same transformation in the future. The caveat is that ‘manual’ edit step – which isn’t repeatable. The JSON is:

[
 {
 "op": "core/column-addition-by-fetching-urls",
 "description": "Create column Page at index 1 by fetching URLs based on column Column 1 using expression grel:value",
 "engineConfig": {
 "facets": [],
 "mode": "row-based"
 },
 "newColumnName": "Page",
 "columnInsertIndex": 1,
 "baseColumnName": "Column 1",
 "urlExpression": "grel:value",
 "onError": "set-to-blank",
 "delay": 5000
 },
 {
 "op": "core/text-transform",
 "description": "Text transform on cells in column Page using expression grel:value.split(\"<p><a href\").join(\"~<p><a href\")",
 "engineConfig": {
 "facets": [],
 "mode": "row-based"
 },
 "columnName": "Page",
 "expression": "grel:value.split(\"<p><a href\").join(\"~<p><a href\")",
 "onError": "keep-original",
 "repeat": false,
 "repeatCount": 10
 },
 {
 "op": "core/multivalued-cell-split",
 "description": "Split multi-valued cells in column Page",
 "columnName": "Page",
 "keyColumnName": "Column 1",
 "separator": "~",
 "mode": "plain"
 },
 {
 "op": "core/multivalued-cell-split",
 "description": "Split multi-valued cells in column Page",
 "columnName": "Page",
 "keyColumnName": "Column 1",
 "separator": "~",
 "mode": "plain"
 },
 {
 "op": "core/text-transform",
 "description": "Text transform on cells in column Page using expression grel:value.parseHtml().select(\"a\")[0].innerHtml()",
 "engineConfig": {
 "facets": [],
 "mode": "row-based"
 },
 "columnName": "Page",
 "expression": "grel:value.parseHtml().select(\"a\")[0].innerHtml()",
 "onError": "keep-original",
 "repeat": false,
 "repeatCount": 10
 },
 {
 "op": "core/text-transform",
 "description": "Text transform on cells in column Page using expression grel:\"<p><a href=\\\"http://www.bing.com/search?q=site%3Ainfoworld.com+%22jon+udell%22+%22\"+ value.split(\"|\")[0].trim().escape('url')+\"%22\\\">\"+ value + \"</a></p>\"",
 "engineConfig": {
 "facets": [
 {
 "query": "|",
 "name": "Page",
 "caseSensitive": false,
 "columnName": "Page",
 "type": "text",
 "mode": "text"
 }
 ],
 "mode": "row-based"
 },
 "columnName": "Page",
 "expression": "grel:\"<p><a href=\\\"http://www.bing.com/search?q=site%3Ainfoworld.com+%22jon+udell%22+%22\"+ value.split(\"|\")[0].trim().escape('url')+\"%22\\\">\"+ value + \"</a></p>\"",
 "onError": "keep-original",
 "repeat": false,
 "repeatCount": 10
 },
 {
 "op": "core/multivalued-cell-join",
 "description": "Join multi-valued cells in column Page",
 "columnName": "Page",
 "keyColumnName": "Column 1",
 "separator": ""
 }
]

A worked example of fixing problem MARC data: Part 1 – The Problem

In what will eventually be a series of 5 posts (I think) I’m going to walk through a real life example of some problematic MARC records I’ve been working with using a combination of three tools (the Notepad++ text editor, MarcEdit and OpenRefine). I want to document this process partly because I hope it will be useful to others (including future me) and partly because I’m interested to know if I’m missing some tricks here. I’d like to thank the Polytechnic of Namibia Library for giving me permission to share this example.

This is the first post in the series, and describes the problem I was faced with…

I was recently contacted by a library who were migrating to a new library system but they’d hit a problem. When they came to export MARC records from their existing system, it turned out that what they got wasn’t valid MARC, and wouldn’t import into the new system.

I agreed to take a look and based on a sample of 2000 records found the following problems:

  • Missing indicators / indicators added in the incorrect place within the field, rather than preceding the field
  • Incorrect characters used to indicate ‘not coded/no information’ in MARC field indicators
  • Subfields appearing in fixed length fields
  • Use of invalid subfield codes (in particular ‘_’)
  • System number incorrectly placed in 002 field, rather than 001 field
  • Several issues with the MARC record leader (LDR) including:
    • Incorrect characters used to indicate ‘not coded/no information’
    • Incorrect character encoding information (LDR/09)
    • Incorrect characters in “Multipart resource record level” (LDR/19)
    • Incorrect characters in “Record status” (LDR/05)
    • Incorrect characters in “Bibliographic level” (LDR/07)
    • Incorrect characters in “Encoding level” (LDR/17)
    • Incorrect characters in “Descriptive cataloging form” (LDR/18)
    • Incorrect characters in “Multipart resource record level” (LDR/19)
    • Incorrect characters in “Length of the implementation-defined portion” and “Undefined” (LDR/22 and LDR/23)

At this point I felt I had a pretty good view of the issues, and agreed to fix the records to the point they could be successfully loaded into new library system – making it clear that:

  • It wouldn’t be possible improve the MARC records beyond the data provided to me
  • That where there was insufficient data in the export to improve the MARC records to the extent they are valid, I’d use a ‘best guess’ on the appropriate values in order to make the records valid MARC
  • That I wouldn’t be trying to improve the cataloguing data itself, but only to correct the records to the point they were valid MARC records

At this point the library sent me the full set of records they needed correcting – just under 50k records. Unfortunately this new file turned up an additional problem –  that incorrect ‘delimiter’, ‘field terminator’ and ‘record terminator’ characters had been used in the MARC file – which meant (as far as I could tell) that MarcEdit (or code libraries like PyMARC etc.) wouldn’t recognise the file as MARC at all.

So I set to work – my first task was to get to the point where MarcEdit could understand the file as MARC records, and for that I was going to need a decent text editor as I’ll describe in Part 2


A worked example of fixing problem MARC data: Part 3 – MarcEdit

This is the third post in a series of 5.

In Part 2 I describe how I used a text editor to get a malformed file to the point where it could be read as a MARC file by MarcEdit. I knew that there would still be many issues in the file at this point, because I’d spotted them in my initial investigation, and when editing the file in a text editor – but I wanted to get a more structured list of the issues and happily the MarcEdit software has an option to validate files.

Like several other functions in MarcEdit, the ‘Validate MARC Records’ option can be accessed both from the MarcEdit opening screen, and from with the MarcEdit editor. To access the validation option without going through the editor look in the ‘Add-ins’ menu:

MarcEdit Add-ins menu

However, first I wanted to make sure that the file would open OK in the MarcEdit Editor, and see how it looked, so I used the ‘MarcEditor’ option and opened my file:

marcedit5


The layout of the MARC record in the editor is much easier to read than the native MARC format – for comparison:

Example of a MARC Record

The MarcEditor layout is called ‘mnemonic format‘ (for what seem like slightly obscure reasons to be honest, and as far as I can tell relate back to the origins of this format in the Library of Congress MarcMaker and MarcBreaker software)

The layout of this mnemonic format is reasonably easy to read if you are used to MARC records – each line contains:

  • an equals sign as the first character on the line
  • a three digit (or letter in the case of LDR) MARC field code
  • two spaces
  • two MARC field indiciators
  • the content of the field – with subfields included where appropriate using the syntax ‘$’ followed by the subfield code

Even from a very brief examination of the MARC record in the editor I can immediately see there is a problem with the fixed fields (LDR, 001-009 fields) in that they all start with a subfield:

Illustration showing problem with Indicators on fixed fields

I can also see that I’ve got a ‘002’ field containing what seems to be a system number – which I’d expect to be in ‘001’.

I then ran the Validate Marc Records function, which can be accessed from inside the MarcEditor through the ‘Tools’ menu:

How to access the Marc Validator from the MarcEditor

When you choose this option, you are prompted for the ‘rules’ file you want to use:

Choose rules file for Marc Validator


MarcEdit comes with a ready made rules file for validating MARC – but you can modify this, or design your own validation file if you have specific things you want to validate (or ignore) in different types of file.

(n.b. in the illustration above shows the option to select the ‘source’ file – that is the file you want to validate. This isn’t an option when using the Marc Validator from the Marc Editor, as it will always validate the file you are viewing in the editor. However when you access the Marc Validator directly without going via the Editor, you will be asked which file you want to validate)

There are different options for the record validation process, but in this case I want to use the default ‘Validate Record’ option. When I click ‘OK’, the validator runs (this will take a while on a large file) and then displays the results which in my case looked something like:

Marc Validator results

I can see now that my problems extend beyond the fixed field problems I identified by eye – I’ve got all kinds of problems with incorrect indicators (and many other problems not shown in this screenshot).

I used the clipboard icon to copy these results into the clipboard and pasted them into a text file so I could refer back to them.

At this point I have a file of MARC records that will at least open in MarcEdit. I also have a list of issues with the MARC records in the file. I now want to start fixing these errors. Of course I could start fixing these issues directly in MarcEdit, and there are some tools and approaches in MarcEdit that might help me – but with this volume of issues over a file of 50,000 records I’m not sure MarcEdit is the right tool.

Instead I’m going to use another tool to start fixing the records – a tool called OpenRefine which is designed specifically to help ‘fix messy data’. I’m a big fan of OpenRefine and use it a lot, so for me it is the obvious tool to use for this task.

However, OpenRefine doesn’t understand MARC records. It can use XML, and so converting to MARCXML might be one approach I could use – but to be honest I don’t think it is the right approach in this case, and I suspect trying to fix MARCXML in OpenRefine would be a very painful process.

Instead I’m going to use the ‘mnemonic’ format that is used by the MarcEdit editor. There are two ways of converting a MARC file into the mnemonic format in MarcEdit. You can use the ‘MARC Breaker’ function which can be accessed from the MarcEdit opening screen, or (and this is the approach I took) once you have a file open in the MARC editor you can simply save it in the Mnemonic format simply by using the File->Save option from the File menu. The mnemonic format is designated in Marc Edit by the ‘mrk’ file extension (as opposed to ‘mrc’ which designates a proper aka ‘compiled’ aka ‘binary’ MARC file). ‘mrk’ files are simple text files, and can be opened in any text editor, and happily also in OpenRefine.

I now have a file of errors (from the MARC Validator) and my MARC records in mnemonic format – the next step is to open the files in OpenRefine so I can see all of the different types of error that I need to fix and start to fix them – which I’ll describe in Part 4 of this series.

A worked example of fixing problem MARC data: Part 4 – OpenRefine

This is the fourth post in a series of 5.

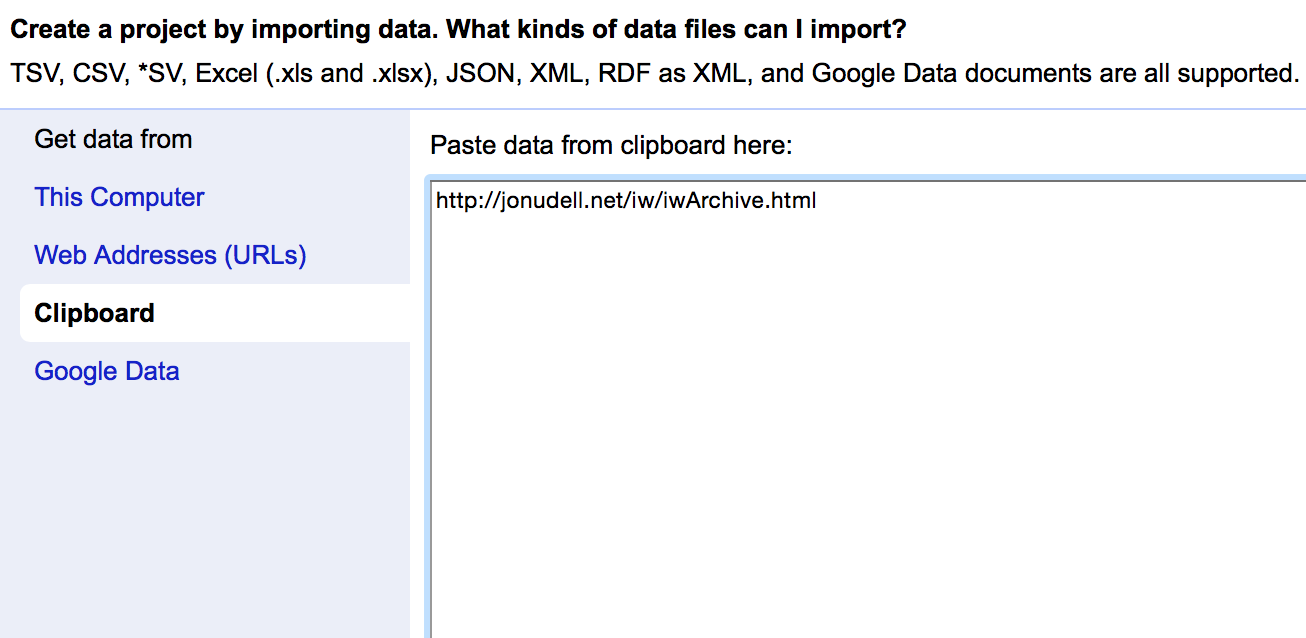
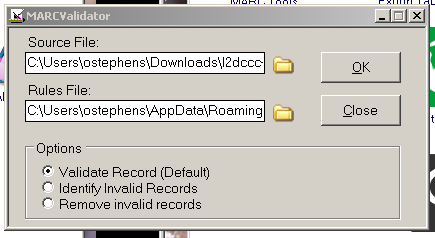
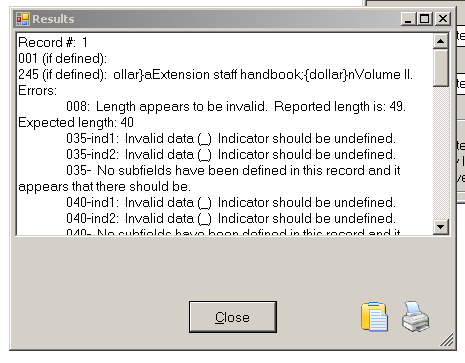
In Part 3 I describe how converted the MARC records into the ‘mnemonic’ format using MarcEdit, and also created a list of issues with the file using the MarcEdit Marc Validator. In this post I’m going to describe how I used OpenRefine to investigate and fix the issues in the file. (n.b. this post dives straight into OpenRefine functionality – I’ve written an introduction to OpenRefine which includes a full tutorial which covers much of the basic functionality)

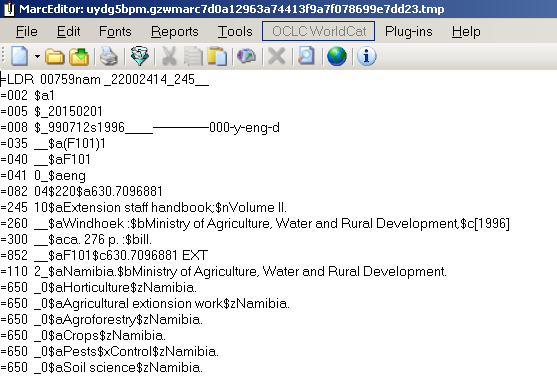
The mnemonic MARC format looks like this:

=LDR 00759nam _22002414_245__
=002 $a1
=005 $_20150201
=008 $_990712s1996____--------------000-y-eng-d
=035 __$a(F101)1
=040 __$aF101
=041 0_$aeng
=082 04$220$a630.7096881
=245 10$aExtension staff handbook;$nVolume II.
=260 __$aWindhoek :$bMinistry of Agriculture, Water and Rural Development,$c[1996]
=300 __$aca. 276 p. :$bill.
=852 __$aF101$c630.7096881 EXT
=110 2_$aNamibia.$bMinistry of Agriculture, Water and Rural Development.
=650 _0$aHorticulture$zNamibia.
=650 _0$aAgricultural extionsion work$zNamibia.
=650 _0$aAgroforestry$zNamibia.
=650 _0$aCrops$zNamibia.
=650 _0$aPests$xControl$zNamibia.
=650 _0$aSoil science$zNamibia.
=LDR 00289nam _22001214_245__
=002 $a2
=005 $_20150202
...

As you can see, each line starts with the same layout – an equals sign, three digit/letter tag, two spaces. There are then either the first two characters of a fixed field, or two indicators, the the content of the MARC field with subfields marked with ‘$’ signs.

The other thing to note is that a new record is indicated by a blank line.

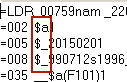
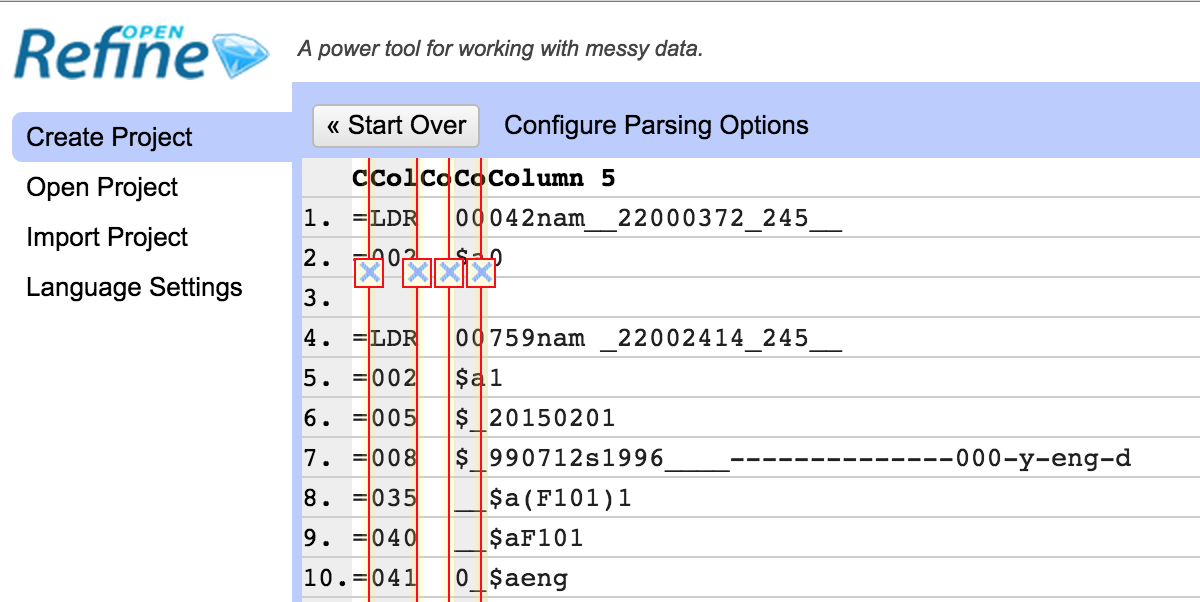
This layout makes it easy to import into OpenRefine using the “Fixed-width field text files import” option – this format assumes a standard format for each line which we basically have here. You can set the places where you want to split each line into columns by clicking in the appropriate place.

Fixed-width field text files import


I split the file up as shown here – so I’m going to get one column with the MARC tag in, one that will generally include the indicators (for the non-fixed width fields) and then a last column with the content of the MARC field (the two other columns I’ll get contain the ‘=’ and the spaces between the tag and the indicators).

I immediately removed the columns without any real data in them, and renamed the columns to ‘Tag’,’Indicators’ and ‘Content’.

MARC Mnemonic in OpenRefine


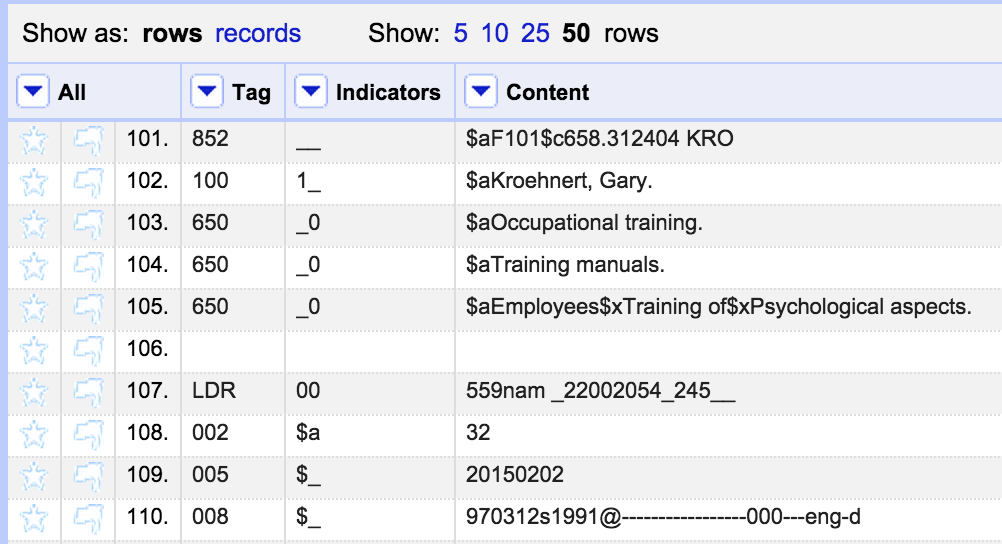
The lines between records are empty, as you can see in the screenshot above. As long as I keep these rows in order, and maintain the order of the file then this will easily export back to the MARC mnemonic format.

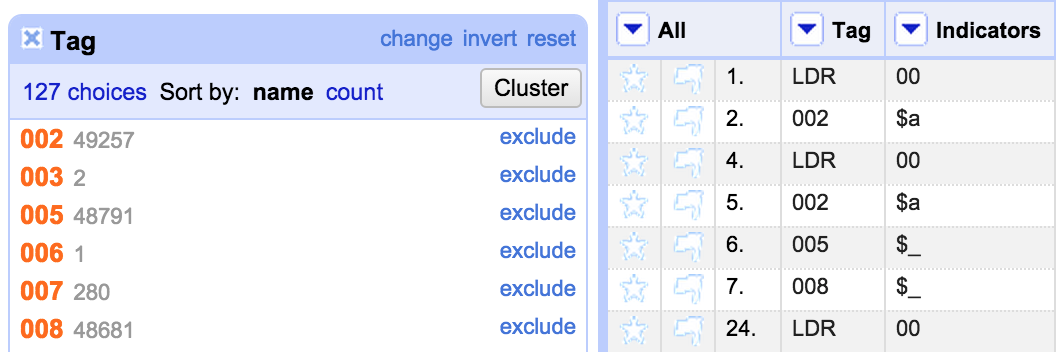
However, this approach has lead to some characters from the fixed fields in the ‘Indicators’ column rather than in the ‘Content’ column. So the first thing I do is to fix this. Firstly I create a Facet on the ‘Tag’ Column:

Tag facet with fixed fields selected


I used the facet to select the fixed fields and I could then see where (for some unknown reason) the file had a subfield at the start of a fixed field, I was able to use another facet on the Indicators column to see what values were there:

Tag and Indicator facets

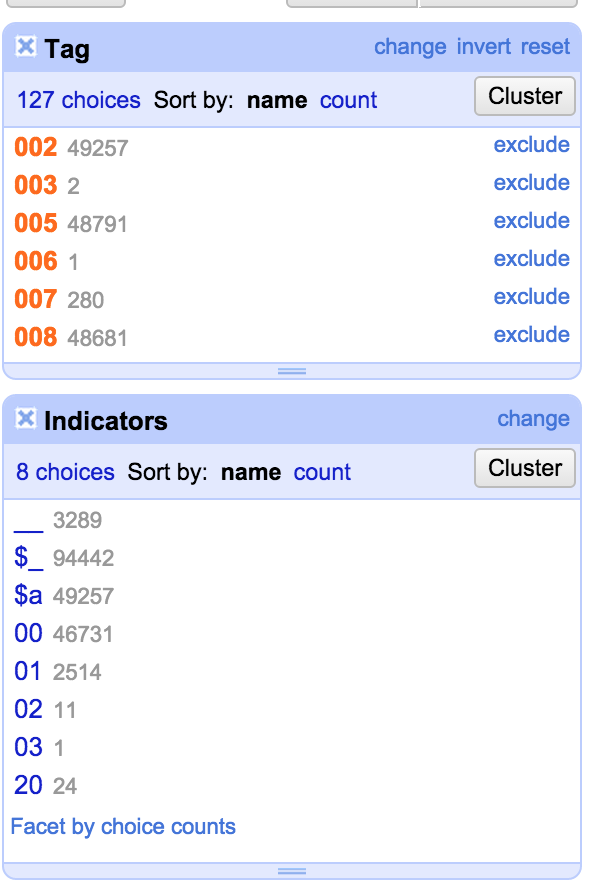
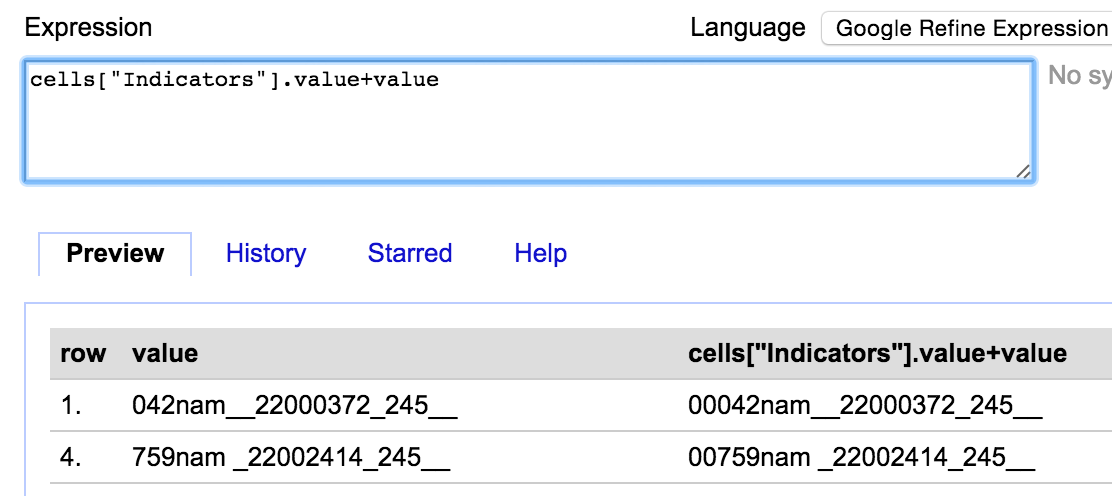
All the ‘Indicators’ that started with a ‘$’ I was able to just remove (by clicking ‘edit’ in the Indicators facet and just deleting the contents). Once I’d done this I was left with the situation where, for the fixed field, the contents of the Indicators column should actually be the first two characters of the ‘Content’ column. So the next job was to fix this. I made sure that the I was only working with the rows where the characters were misplaced (using the facets to select the right rows) and then I used the ‘Edit cells’->’Transform’ option for the ‘Content’ column and used the GREL expression:

cells["Indicators"].value+value

This takes the value from the Indicators column, and puts it in front of the value in the Content column:

Combine column values


I could then get rid of the values from the Indicators column (again just for the filtered rows).

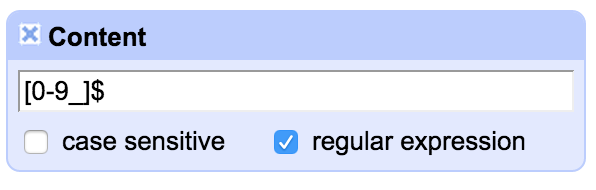
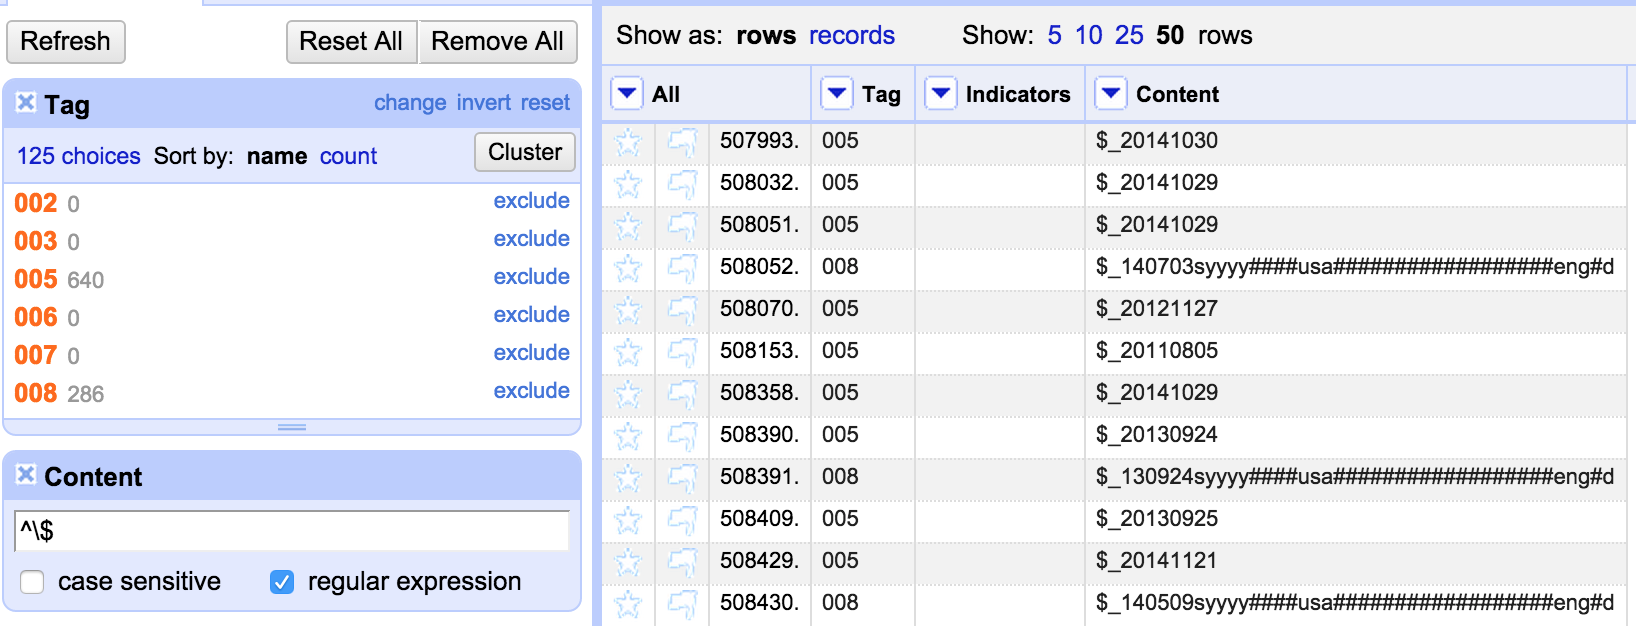
The next thing I’d noticed was that some fixed fields still had subfield indicators at the start. I wanted to find all fixed fields starting with a ‘$’ symbol. I could do this using a ‘text filter’:

Text filter

I’ve used a regular expression in the Filter which allows me to find only rows that start with the ‘$’ symbol (as opposed to having ‘$’ anywhere in the string).

All the lines I can see start with ‘$_’ but I want to check that there are no other patterns that I might need to take account of. I did this with a ‘Custom Text Facet’ on the Content column (Custom Facets are one of my favourite features and I use them a lot):

Custom Text Filter


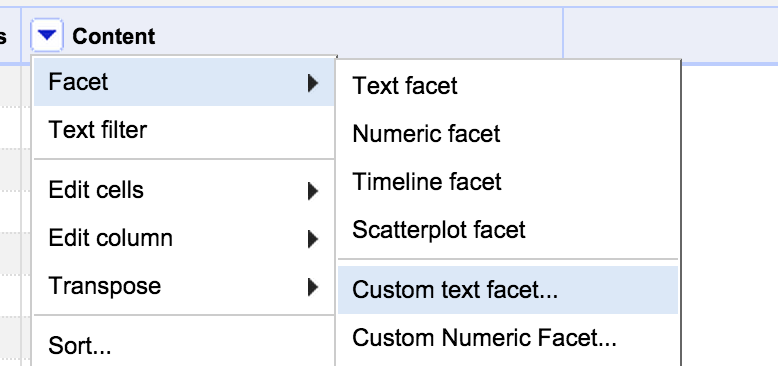
The Custom text facet allows you to create a facet by writing a GREL expression. I use the expression:

value.substring(0,2)

Which creates a facet with the first two characters from each cell – this immediately tells me that out of the rows I’ve filtered, they all start with “$_”:

Facet illustration


So I could now confidently run a transformation on the Content column to remove the first two characters for all these rows – using:

value.substring(2)

Which takes the whole of the string excluding the first two characters.

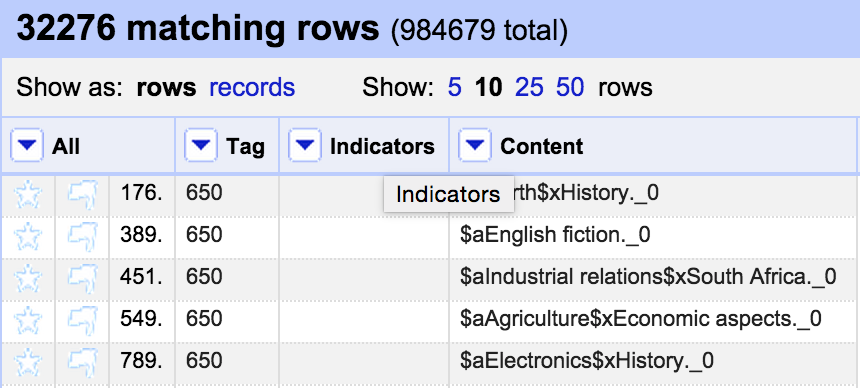
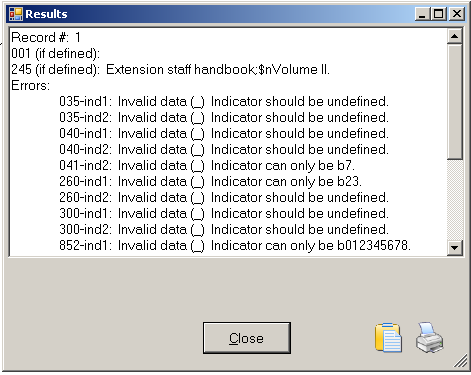
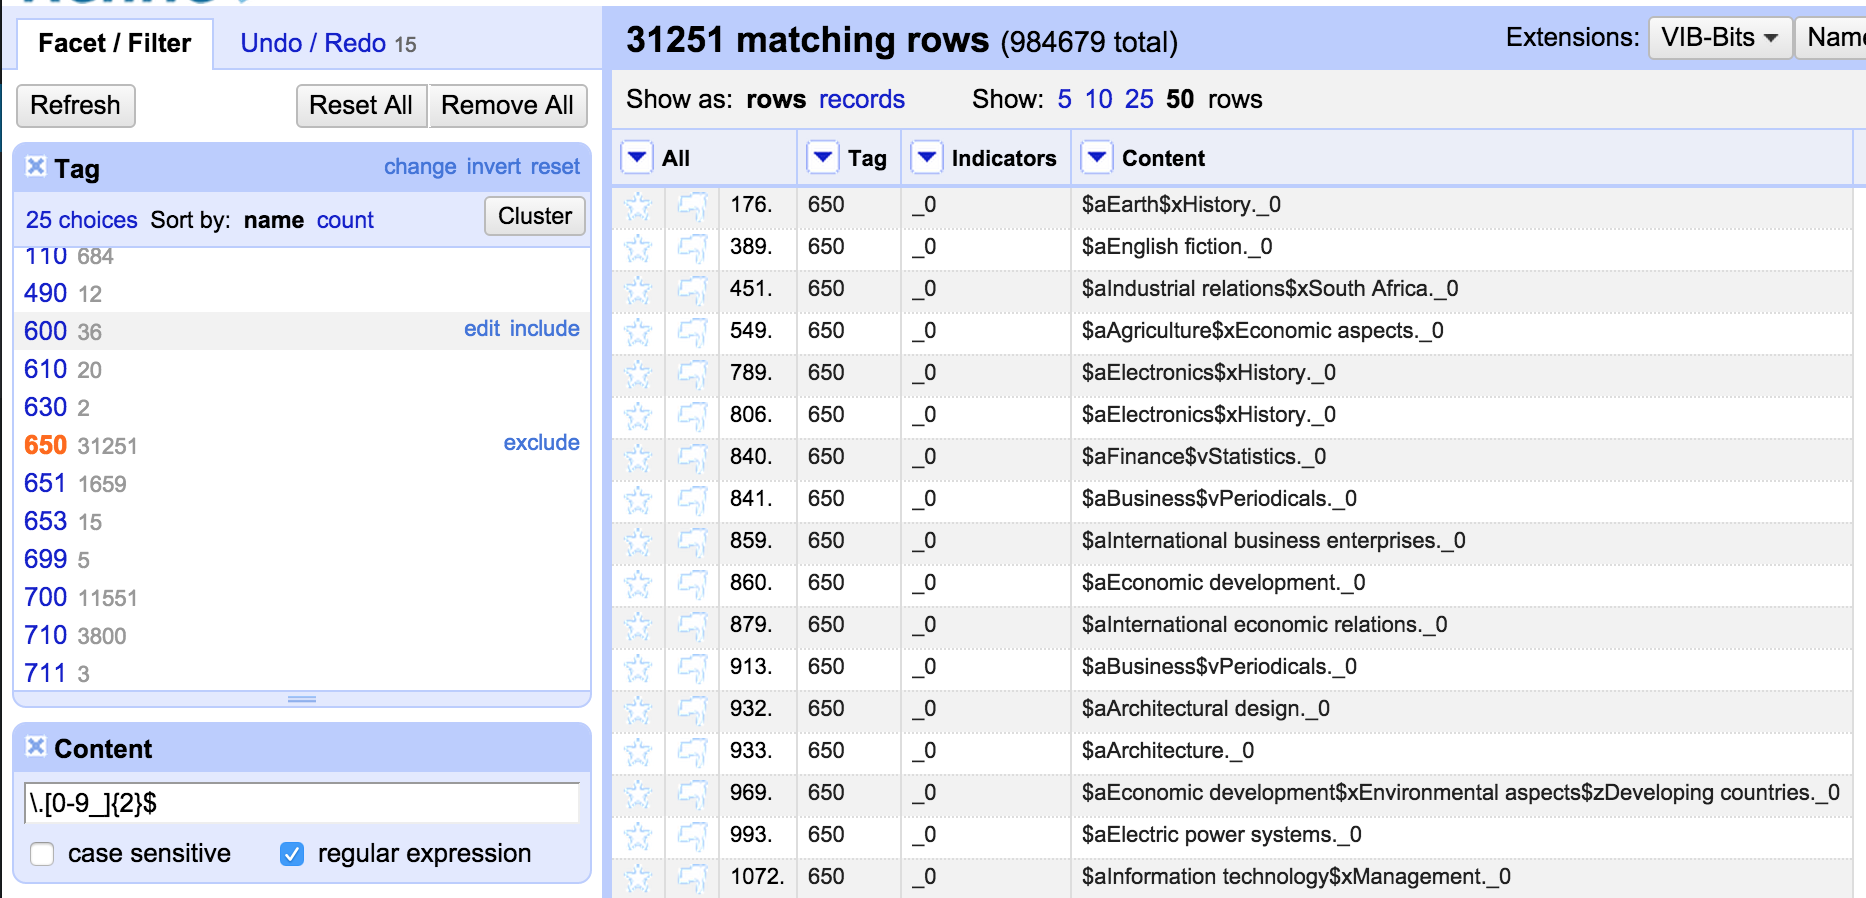
From the errors file (which I also opened in OpenRefine in a separate project which allowed me to group the errors easily) I could see situations where there were incorrect indicators for a MARC field (and other errors) – and I could use the facets to filter down to the field in question, and then look at the issues with the indicators – and fix them. I’m not going to describe every single situation, but one example was the 650 field. Here for some reason the indicators seemed to have been shifted to the end of the field, rather than appearing at the start of the field. This, in turn, had lead to the first subfield appearing where the indicators should have been:

650 issues


So here I want to move the contents of the ‘Indicators’ column into the Content column. I did this with the same approach as described above. Then I wanted to move the indicators from the end of the string into the Indicators column. I used a Filter with a regular expression to find 650 fields ending with a digit or an ‘_’ which seems to be used generally for uncoded indicators:

Regular expression filter


This seems to give me what I need:

650 fields ending with indicators


So now I can run a transformation on the Indicators column:

cells["Content"].value.substring(-2)

Which inserts the last two characters from the Content column into the Indicators column.

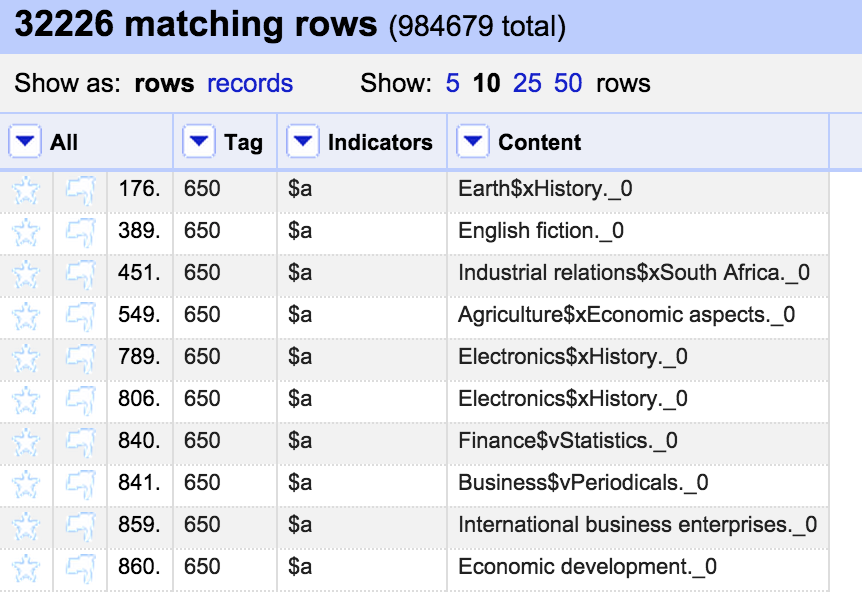
However, after doing this, I realised that this had ended up including some situations where the 650 field finished with a year (hence ending with two digits). So I used the ability of OpenRefine to reverse my last steps, and then I improved my filter and made sure I didn’t include those rows and then re-applied the transformations:

Improved 650 filter

As you can see in this screen shot – this transformation is being applied to over 30,000 650 fields in one go.

A lot of the issues in the MarcEdit Validation report were incorrect indicators on various fields. I could see from this that there were problems with the second indicator on the 650 field in some cases. To investigate this I created a new custom text facet using the expression:

value[1]

This takes the second character in the ‘value’ (lots of stuff in OpenRefine counts from zero – value[0] is the first character from value, and value[1] takes the second). I used the ‘Tag’ facet to filter down to the 650 field, and then I could see where there were problems:

Indicator facet

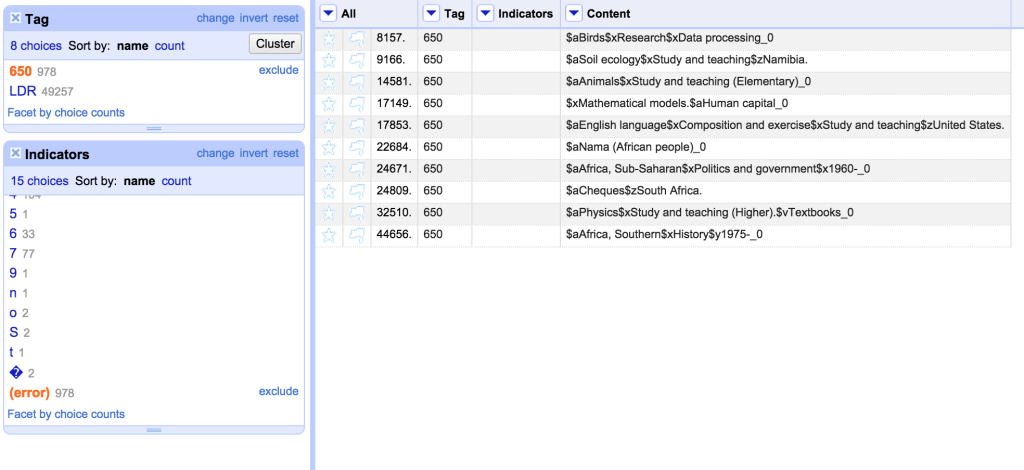
I can see that there are lots of 650 fields which have no second indicator (and for some reason haven’t been caught by my previous expression) and also some odd stuff like ‘9’, ‘n’ and ‘S’. These need investigating individually. However, you can see how this method could be used to check for incorrect indicators and look for patterns to fix them.

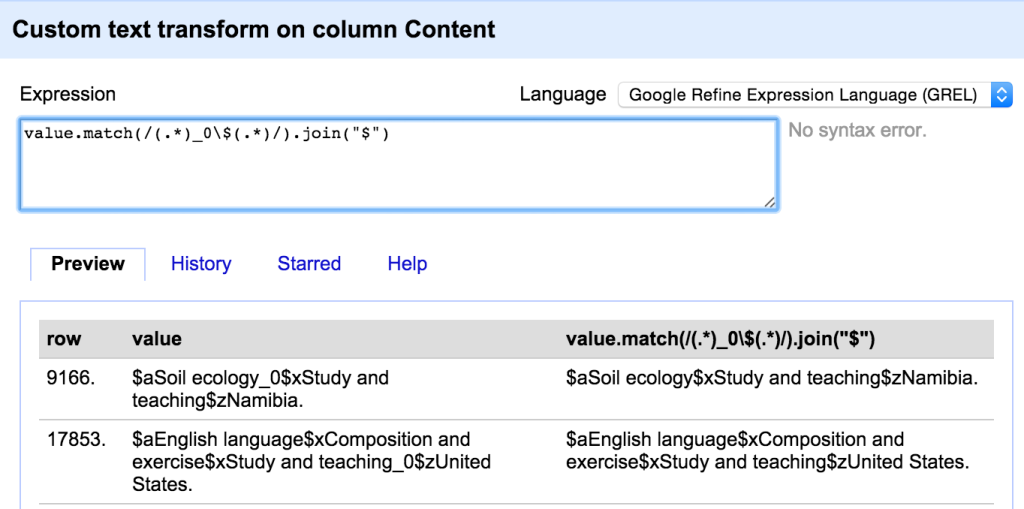
While there were many more issues to work through, the techniques were pretty much what I’ve already described here – lots of use of filters, facets, custom facets, substring and replace transformations. There were also situations where I wanted to find and extract values from the middle of a MARC field and in this case I used the ‘match’ transformation with a regular expression – for example here I’m using a ‘match’ transformation to remove some indicators that have somehow ended up in the middle of a MARC field:

Using a Match expression

For the LDR and 008 fields I was able to check various character positions using custom text facets with the ‘substring’ command. I was also able to check the length of these fields using a custom text facet with:

value.length()

All of these showed me problems that I could work on fixing.

I want to share one final example in this post – because while the records I was dealing with here were obviously really messy, and invalid, and hopefully not issues you’d see in most MARC data, while I was dealing with the records I noticed some of the 245 fields had incorrect non-filing indicators. Despite the fact this wouldn’t affect the validity of the records, I couldn’t ignore these, and so I thought I should look for any examples of this and fix them. So I used the Tag facet to get the 245 field only, and then started playing around with filters intended to find potential non-filing words at the start of the field. I started by looking for 245 fields that started with a $a subfield followed by the word ‘The’:

Incorrect non-filing indicators

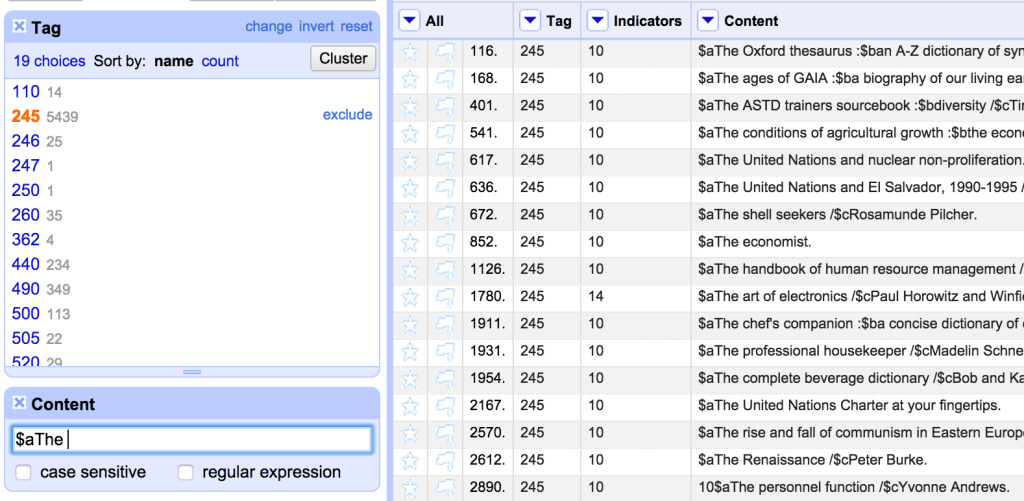
As can be seen, the indicators are incorrect for most of these. So I could fix these in one go by setting the second character in the indicator column to ‘4’ using the following expression on the Indicator column:

value[0]+"4"

(value[0] takes the first character from whatever string is in the column currently – I want to preserve this as it is, and only change the second character)

I then got a bit more inventive with the Filter – doing things like looking for 245$a starting with one, two or three letter words, then identifying common patterns (essentially definite and indefinite articles in various languages) and fixed those as well.

This kind of small data fix might apply to any set of MARC records where some inconsistencies and typos will have occurred.

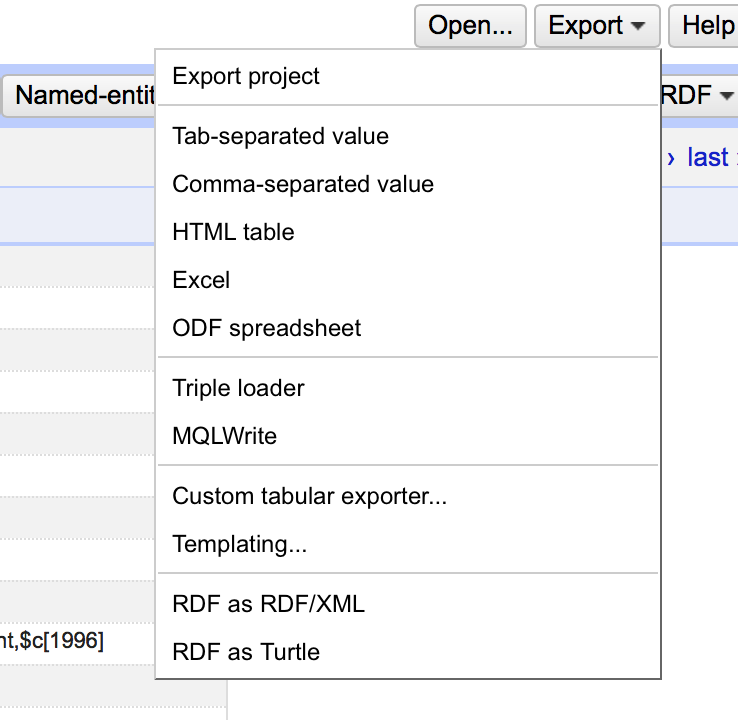
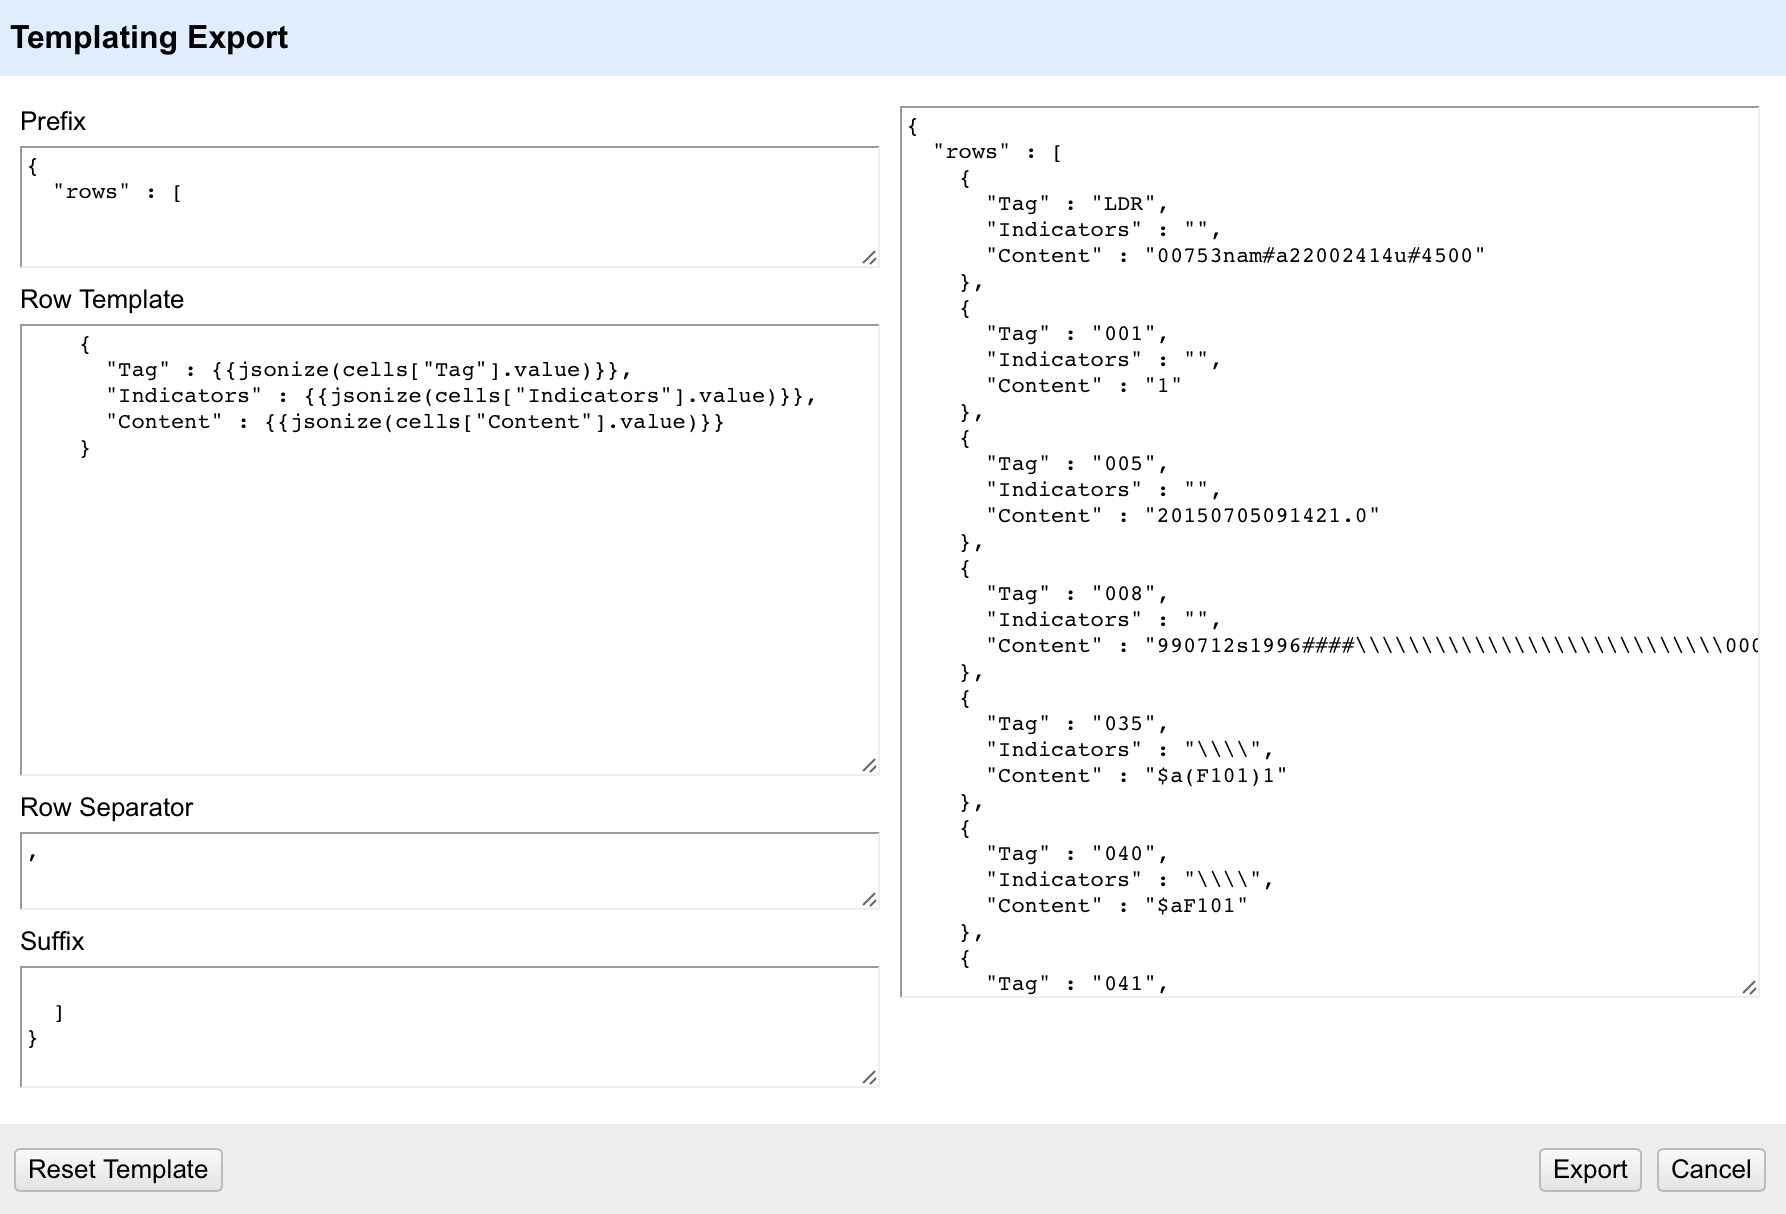
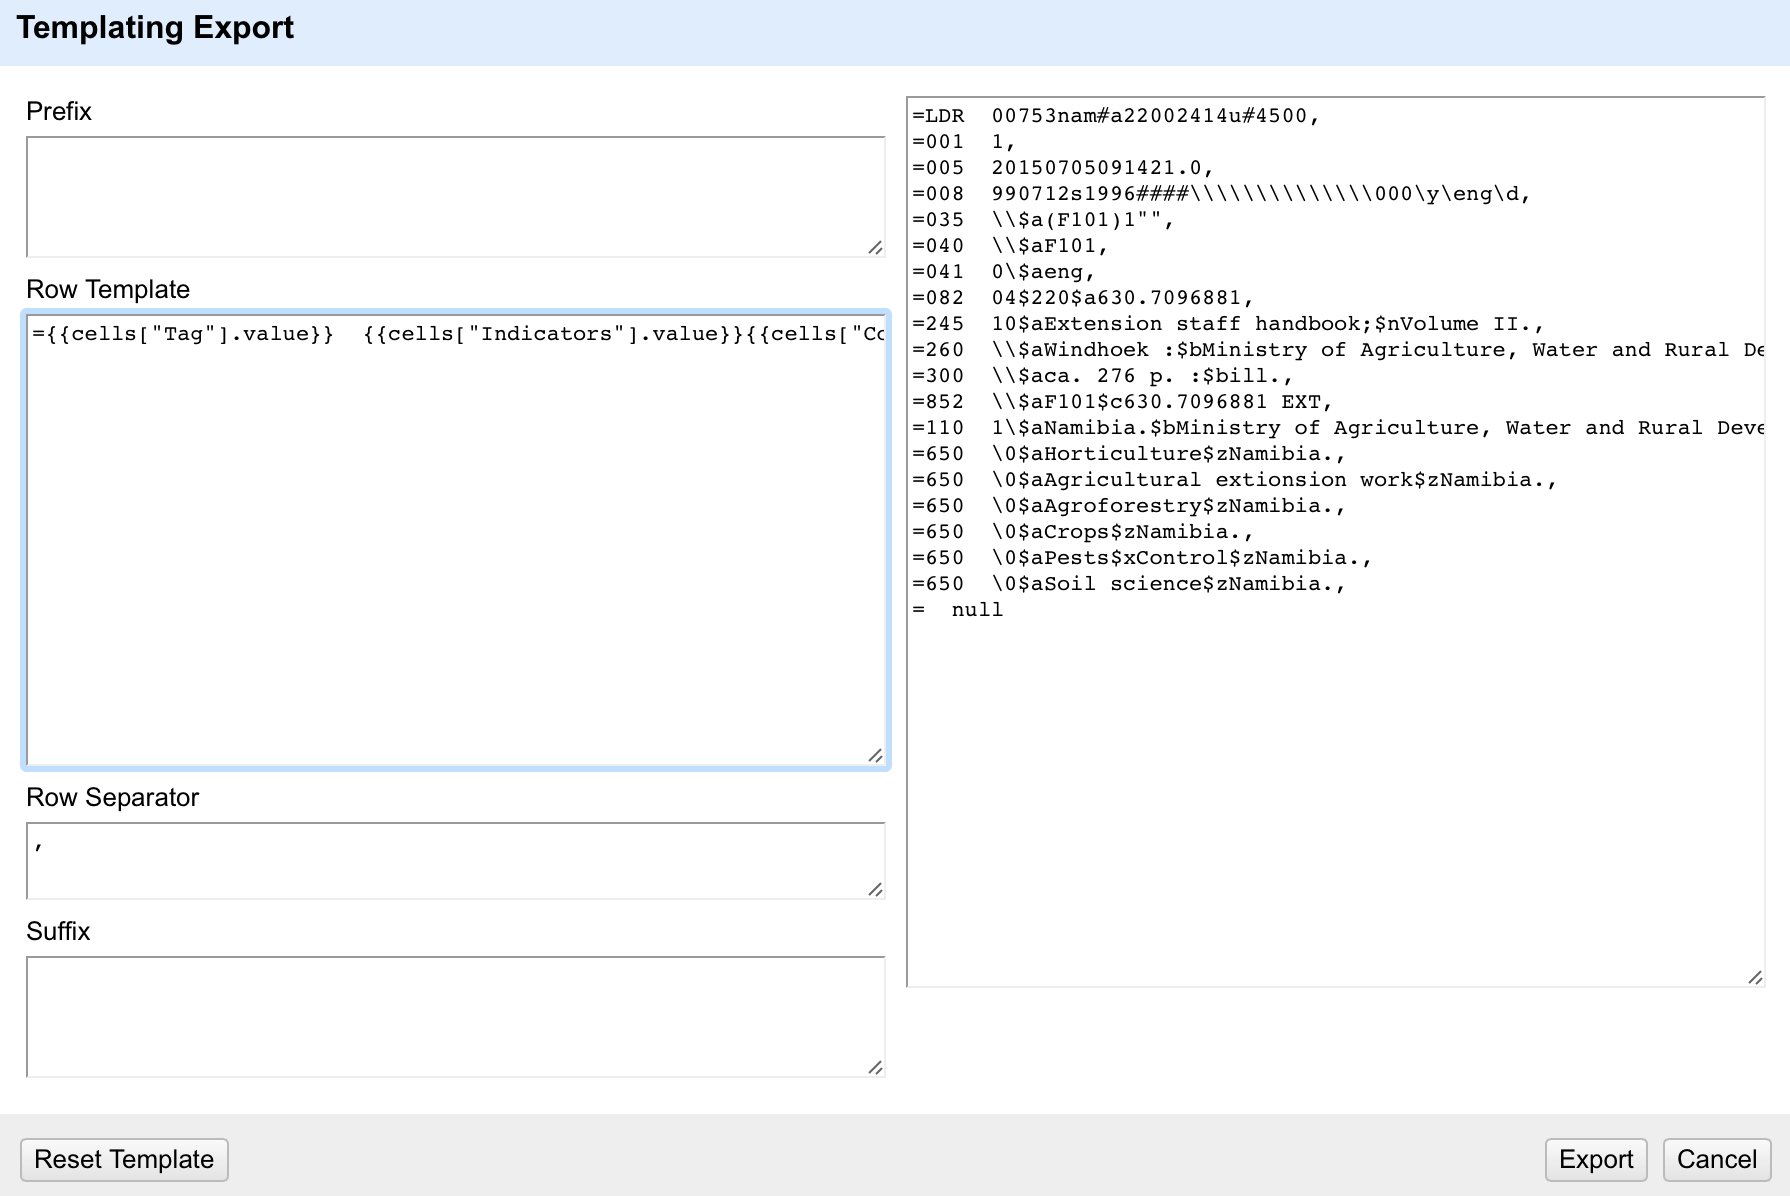
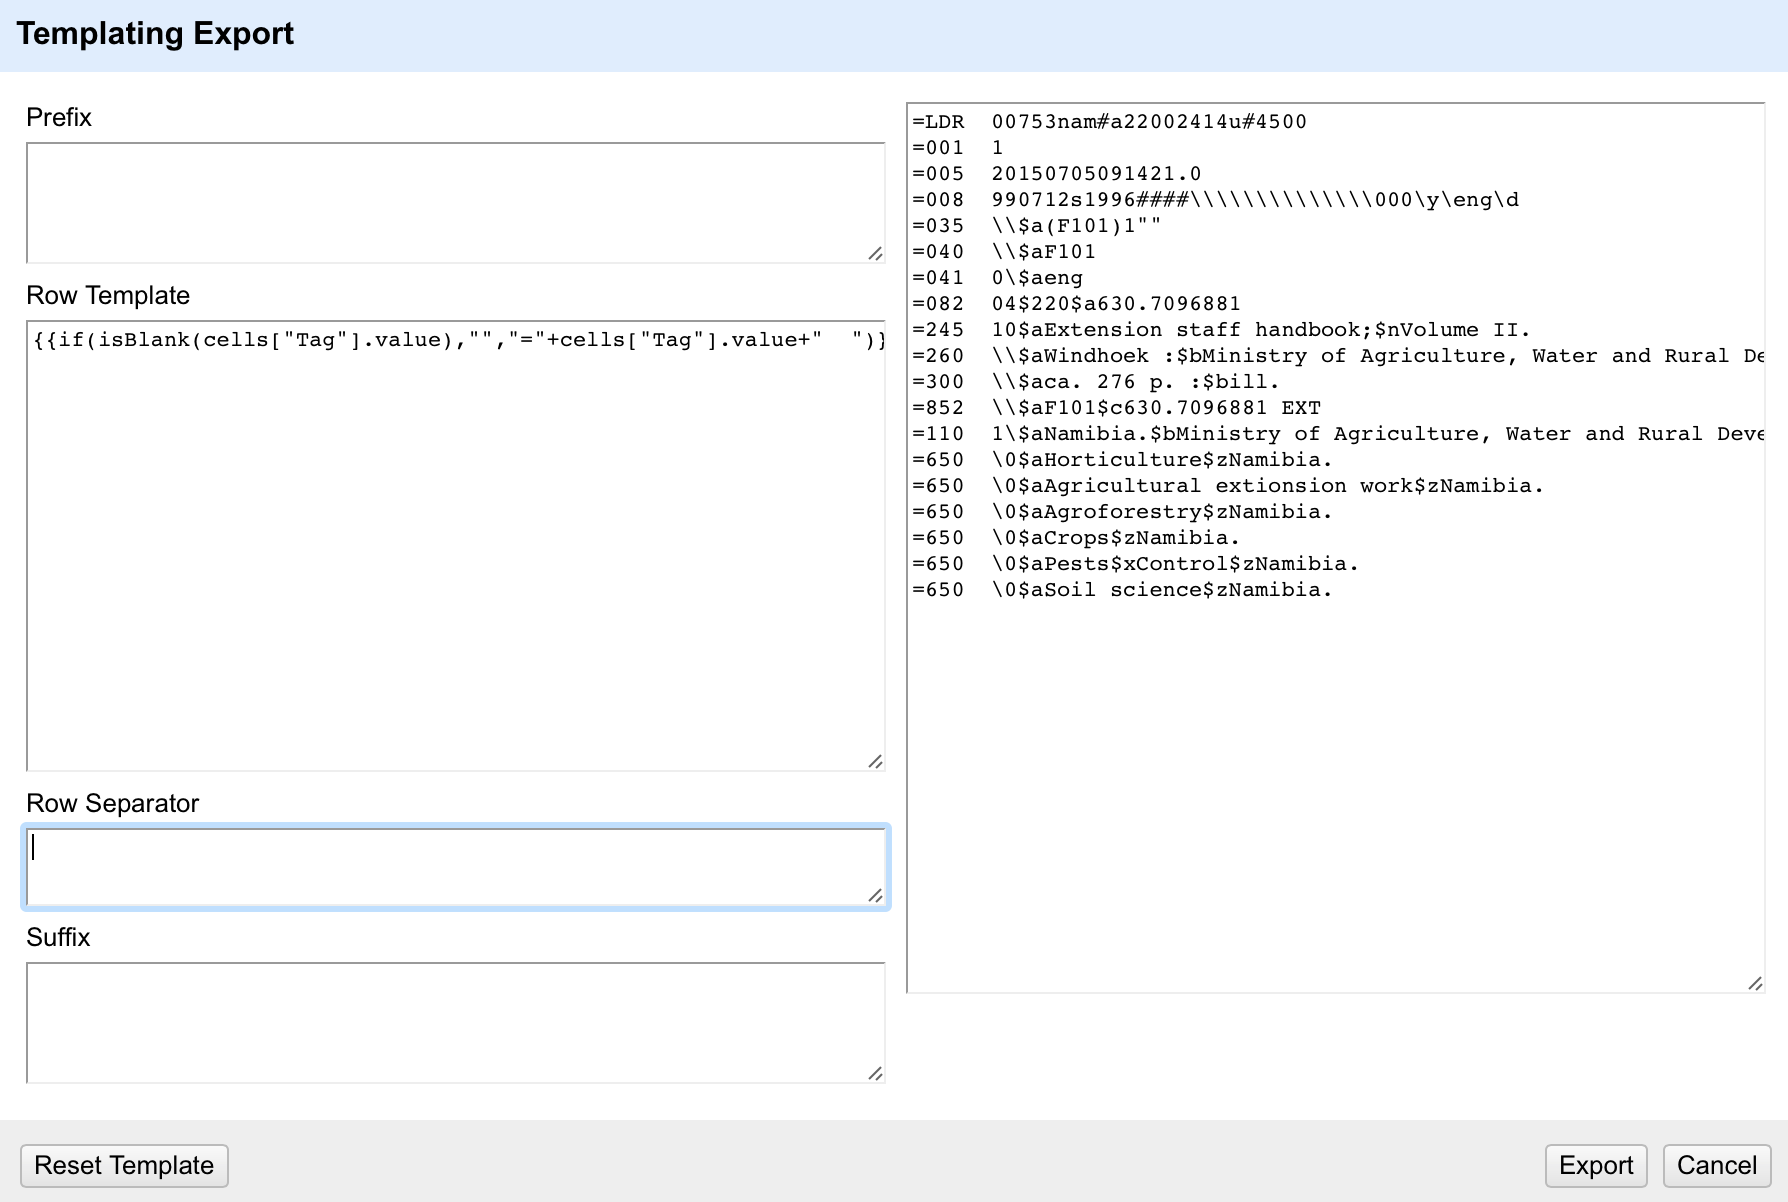
After a lot (a lot!) of work, I’d finally fixed up the records as far as I could. There were circumstances where I’d had to make my best guess (were those ‘650’ fields really LCSH?) but generally I was pretty happy with what I’d achieved. It was time to export the records from OpenRefine and get them back into MarcEdit to validate them again… which I’ll cover in Part 5.

A worked example of fixing problem MARC data: Part 5 – OpenRefine and MarcEdit redux

This is the fifth and last post in a series of 5.

In Part 4 I described how I used OpenRefine to fix issues with MARC records. In this fifth and final blog post in this series I’m going to cover exporting the mnemonic MARC records from OpenRefine and back to MarcEdit to produce a file of valid MARC records.

The mnemonic MARC format consists of one line per MARC field. Each line starts with an ‘=’ sign, followed immediately by the three digit/letter tag, which in turn is followed by two spaces. For fixed length fields the spaces are followed by the contents of the field. For other MARC fields the spaces are followed by the two indicators for the field, and then the content of the field (subfields marked with a ‘$’ signs):

=LDR 00759nam _22002414_245__
=001 000000001
...
=245 10$aExtension staff handbook;$nVolume II.

Where you have multiple records they are separated by a single blank line.

When I imported the file into OpenRefine I had put the information into three columns – one containing the MARC field tag, one containing indicators (blank for fixed fields) and one containing the field contents. However, I’d kept the blank lines that were in the original file and not done any sorting that would lose the order of the original file contents (I had removed some lines completely, but none of the blank lines). This is important because preserving the ordering and the blank lines from the original file is the only way the ‘records’ are preserved. I could have done some work in OpenRefine to link each field to a record ID, and then not worried about the blank lines and ordering, but to be honest that was extra work that wasn’t necessary in this case.

There are a number of export options in OpenRefine, all accessed from an ‘Export’ menu in the top right of the screen:

OpenRefine Export Options

It is worth remembering that when exporting data from OpenRefine the default is to only export data that is in the current OpenRefine display – observing any filters etc you have applied to the data. So if you want to export the whole data set, make sure you remove any facets/filters before doing so.

As well as a number of standard formats, the “Custom tabular exporter” and “Templating” options allow you to build exports to your own specification. In this case I needed to use the “Templating” option which is the most flexible way of configuring exports.

The Templating option allows you to fully configure how each field in your OpenRefine project is exported. It also allows you to specify how records are separated and any header (prefix) or footer (suffix) you want in the complete export.

OpenRefine Export Template

The default layout is a format called ‘JSON’ (Javascript Object Notation, but it doesn’t really matter). However we can completely re-write this into whatever format we want. The ‘Prefix’ and ‘Suffix’ areas on this form as simple text – you can just type whatever you want in here. Since in the case of mnemonic MARC file there are no headers or footers, I can remove all the text from the ‘Prefix’ and ‘Suffix’ areas in this form.

The ‘Row Template’ is the key part of the template – this defines how each row in the OpenRefine project is processed and output for the export. Inside the Row Template the text inside double curly brackets {{ }} is processed as a GREL expression – so you can manipulate the data as you output it if you need to – this makes the template extremely flexible. Because the export doesn’t relate to any single column you have to use the ‘cells[“Column name”].value’ syntax to bring in the values from the cells.

The default is to use a ‘jsonize’ function – which essentially makes sure that the data from a cell is valid for a JSON output file. However, in this case we don’t want to mess with the data on output – we just want the values, with the additional text required for the mnemonic MARC format.

So the row template I need to use is:

={{cells["Tag"].value}}  {{cells["Indicators"].value}}{{cells["Content"].value}}

Because some lines will have values in the Indicators column and some won’t (the fixed fields), we have to sure that the indicators are populated (even if uncoded) for all non-fixed fields, and contain an empty string for fixed fields. As long as this is the case, the output will be formatted correctly for both types of field.

One thing to look out for is that there are a few different ways in which a field can appear ‘blank’ – it can be an empty string (“”) or ‘null’ or an error. In the export template any cells containing a ‘null’ rather than an empty string will appear as ‘null’ – as can be seen in the last row in this screenshot:

Null field in export template

To avoid these ‘null’ values appearing you can either do a cell transformation on the appropriate columns to replace ‘null’ with “”, or you can write tests for ‘null’ values and replace them with blanks within the template using GREL expressions.

The other issue I’ve got here is that the ’empty’ line at the end of the record still starts with an ‘=’ sign – because I’ve set this to output on every row – and it doesn’t care that the row is blank. I could decide to not worry about this and edit out these lines after the export (e.g. in a text editor using find/replace on lines only consisting of an equals sign and two spaces). Alternatively I can write GREL in my template that checks to see if there is a value in the Tag column before outputting the equals sign and spaces. If I put this together with a check for ‘null’ values I get a more complex expression:

{{if(isBlank(cells["Tag"].value),"","="+cells["Tag"].value+"  ")}}{{if(isBlank(cells["Indicators"].value),"",cells["Indicators"].value)}}{{if(isBlank(cells["Content"].value),"",cells["Content"].value)}}

This tests if the Tag cell in the row is blank and only outputs the ‘=’ at the start of the row and the two spaces following the tag if it finds a tag to use.

The final option on this screen is the ‘Row Separator’. In the default this is a comma followed by a newline/enter (which is of course difficult to see in the editor). I don’t need the comma at the end of each line but I do need a newline (otherwise all the rows would merge together). So I end up with:

Finalised mnemonic MARC export template

Unfortunately there is no way of saving the Template within OpenRefine (although it will persist between sessions, but if you are using different templates at different times, this won’t help). If I’ve got a complex export I usually create a text file with each part of the export template (prefix, suffix, row template, row separator) documented. This would be important if you were doing a complex export like this OpenRefine MODS export template.

I can now export the the file in mnemonic MARC format by clicking Export. It will download as a text file with a ‘txt’ extension. I will want to rename the file with an ‘mrk’ extension so that MarcEdit recognises it as a mnemonic MARC file.

My final step is to use MarcEdit to do a final validation of this file (happily this found only one outstanding error which I was able to correct directly in the MarcEdit Editor), and finally I can use one of several routes in MarcEdit to covert the mnemonic MARC file to a proper MARC file (you can do this using the ‘MARC Maker’ function, using ‘Save as’ or ‘Compile File to MARC’  options in the Marc Editor).

And that’s it – a worked example of fixing MARC records using a combination of three tools – the Notepad++ text editorMarcEdit and OpenRefine. I’d like to re-iterate my thanks to the Polytechnic of Namibia Library for giving me permission to share this example.

Finally – if there are things that I’m missing here, steps that could be improved/more efficient, questions to ask or clarifications to make please leave comments here or contact me on Twitter – I’m @ostephens.