Sound the Octo-alert!

Standard

Both our children are currently big Octonauts fans – if you haven’t come across the Octonauts, they are a team of underwater explorers who featured in a series of books by a Canadian duo jointly known as Meomi. The books have been made into an incredibly popular TV cartoon shown in the UK on the CBeebies channel (the BBC channel aimed at younger children).

 Octoalert illustration

Whenever there is an emergency, Captain Barnacle will order “Sound the Octo-alert!” – the big button with the distinctive Octopus logo will be pressed, and alarms sounds, and the Octonauts report for duty. As I said, both our children are big fans, and Freya does a mean Octo-alert imitation, so when I was looking for a new Arduino project to do with Bryn, I thought building a working Octo-alert would be great fun.

While you can get an extension (called a shield) for an Arduino to record and play sound (e.g. http://www.ladyada.net/make/waveshield/) I hadn’t got one of these, and I thought a simpler (and in some ways more satisfying) approach would be to have the Arduino joined up to the computer and have a button on the Arduino trigger a sound/video file on the computer. A quick search found the Octoalert website – with a clickable Octo-alert image which then plays an mp3 of the Octo-alert sound. Given this was already there and worked, my idea morphed into triggering the alert from this website by simulating a ‘click’ on the image.

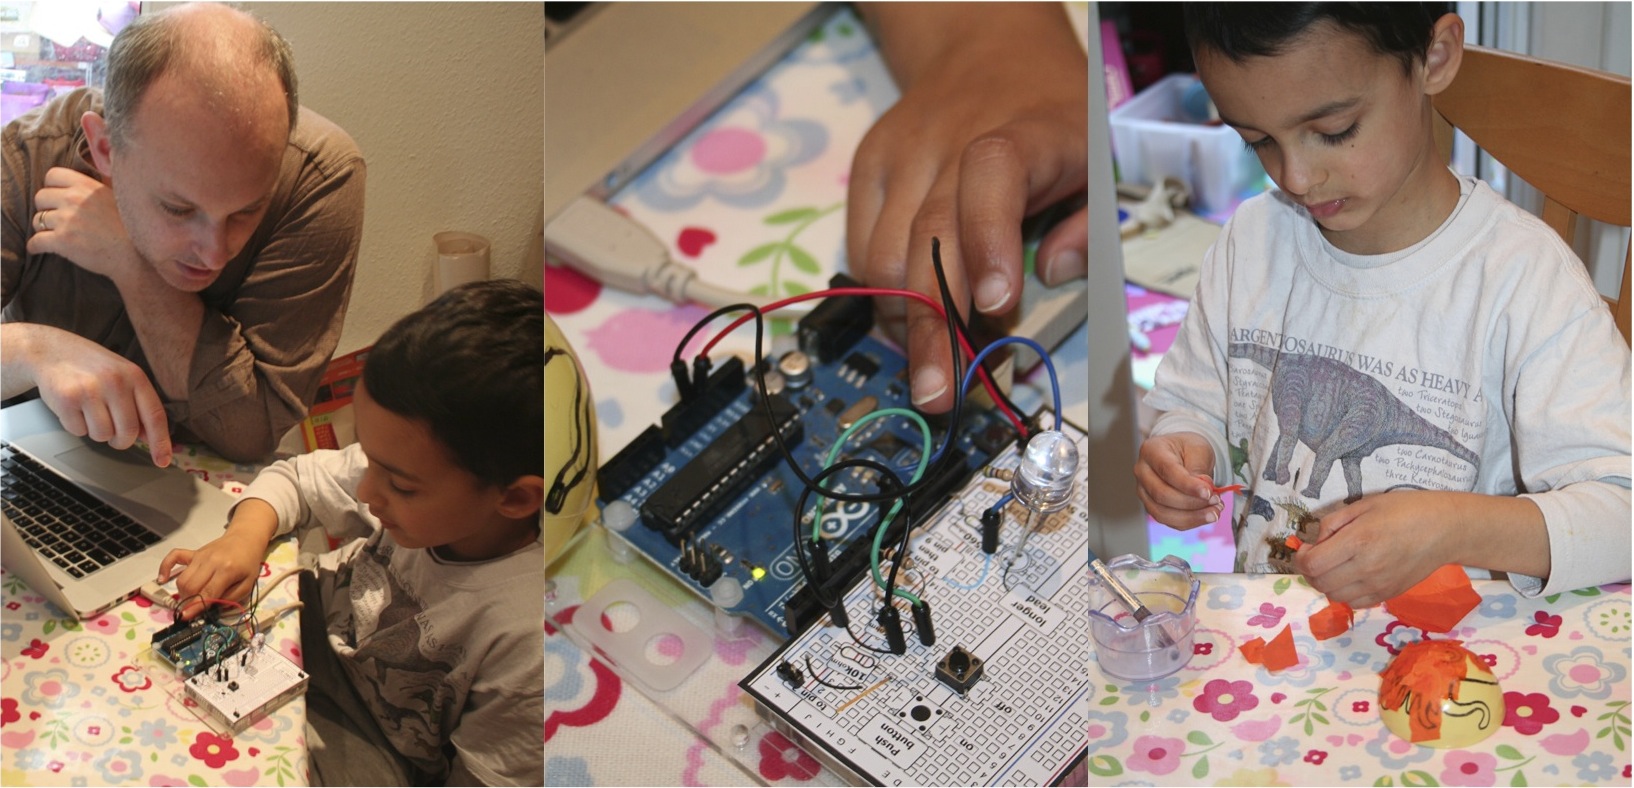
However, before we got to this point we needed to build an appropriate Arduino circuit and craft a button and console. The Arduino circuit is a very simple one – just a single button wired up to an LED and of course a pin on the Arduino. Once I’d put the circuit diagram on, Bryn was able to get going on the wiring. Some of the components are still a bit fiddly for Bryn to put into the breadboard by himself, but for the wires he can follow the diagram and put the wires in himself. I helped with the bits he couldn’t manage, and generally supervised him – but he could do a lot of this himself.

To create the button we cut in half a small plastic ball, Damyanti drew the logo, and Bryn set to work glueing on orange tissue paper

octoalert1


A simple ‘button press’ program for the Arduino is available from http://www.oomlout.com/oom.php/products/ardx/circ-07 and I adapted this slightly so that the LED flashed several times on a single button press, and so the button also controlled the output to the serial port – which allows the Arduino to send data back to the computer it is joined to. The Arduino code looked like this:

// set pin numbers:
const int buttonPin = 3;     // the number of the pushbutton pin
const int ledPin =  9;      // the number of the LED pin

// variables will change:
int buttonState = 0;         // variable for reading the pushbutton status

void setup() {
  // initialize the LED pin as an output:
  pinMode(ledPin, OUTPUT);      
  // initialize the pushbutton pin as an input:
  pinMode(buttonPin, INPUT);
  // initialize serial port
  Serial.begin(9600);  
}

int interval_time = 500;

void loop(){
  // read the state of the pushbutton value:
  buttonState = digitalRead(buttonPin);

  // check if the pushbutton is pressed.
  // if it is, the buttonState is HIGH:
  if (buttonState == HIGH) {     
    // LED off:    
    digitalWrite(ledPin, LOW);
    Serial.println("0");
    delay(interval_time);
  } else {
    // turn LED on:
    Serial.println("1");
    for (int i=0;i < 10;i++) { 
      digitalWrite(ledPin, HIGH); 
      delay(500);
      digitalWrite(ledPin, LOW);
      delay(500);
    }
    delay(interval_time);
  }
}

On the computer side I needed a mechanism to read the output on the serial port – I found a hint on how to do this here http://playground.arduino.cc/Interfacing/Ruby. I also needed a way of accessing the Octoalert website – I knew there was a Ruby Gem to control a browser called Watir, so I got this installed, and after a few false starts (the task was complicated by the fact that clicking the button on the website actually runs some javascript) I got some code working that could read the input from the Arduino and trigger the necessary javascript on the website:

#!/usr/bin/ruby
require 'rubygems'	
require 'watir-webdriver'
require 'serialport'

#params for serial port  
 port_str = "/dev/tty.usbmodem1411"
 baud_rate = 9600  
 data_bits = 8  
 stop_bits = 1  
 parity = SerialPort::NONE  

 sp = SerialPort.new(port_str, baud_rate, data_bits, stop_bits, parity) 
 browser = Watir::Browser.new

 #just read forever  
 while true do
   while (i = sp.gets) do
   	puts i
    if i.to_i > 0
    	browser.goto "http://octoalert.com"
		browser.link(:id,"playLink").fire_event "onclick"
		sleep(7)
		browser.goto "http://brynpatelstephens.com"
   	else
		puts "No Octoalert"
	end
   end 
 end

With this code running on the computer, and the Arduino program loaded to the board we had a working button – we now needed to put the whole thing together.

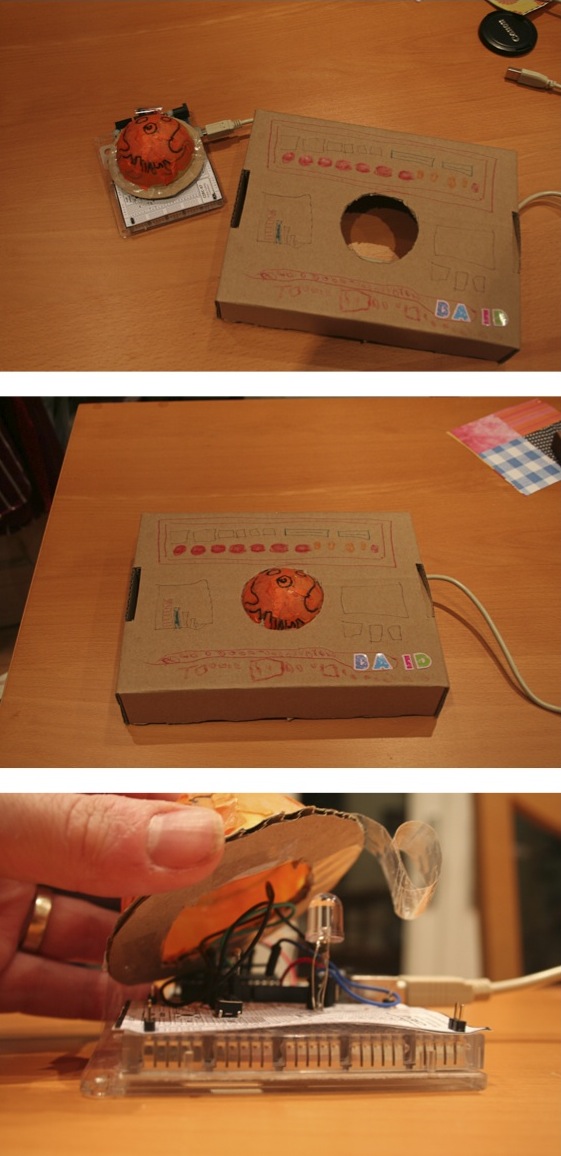
A bit of improvisation with some cardboard and we mounted the Octo-alert button in such a way it could sit over the Arduino and pushing down on it pushed the actual button on the Arduino. I cut a hole in a cardboard box for the button to be mounted in, and Bryn decorated it in the style of the Octonauts instrument panel.

octoalert2

This was a nice project, in that it mixed some nice crafting (glueing the tissue paper, making the control panel) with a very simple circuit – all of which Bryn could either do by himself, or with a small amount of help. The programming was slightly more tricky, and I just got on this with while Bryn did other stuff – but I explained a bit about how the Arduino was able to ‘talk’ to the computer which I think he got. He also was quite concerned that by using the sound/graphic from the website that we were ‘stealing’ another’s work – which meant an opportunity to talk about the web and how it worked – although I’m not entirely sure he understood my explanation of using the website versus copying the files – and to be honest I’m not sure I quite understand it either – after all in both cases you end up with a copy of the file on your computer!

And it wasn’t just fun for me and Bryn – Freya got to join in too as you can see in this video – yes, it’s time to sound the Octo-alert 🙂

Arduino powered dinosaur

Standard

Bryn’s recent 5th birthday brought with it an extremely cool Dinosaur toy (available from Maplins in the UK). It consisted of a set of cleverly engineered cardboard cutouts which you fold and join to make a T-Rex, coupled with a motor, cogs, wires, battery box, switch and plastic stick, which all join together to make the cardboard T-Rex move and gnash it’s teeth when you’ve put it all together.

Bryn and I built it (although to be honest the cardboard folding/joining was pretty fiddly, and while he pushed the motor, battery box etc. in the base confidently, I had to do most of the construction of the cardboard model. The result was much much better than I really expected. The dinosaur moved (on the spot) and it’s teeth gnashed pretty effectively – enough for Bryn to play a game of putting his finger near it’s mouth and getting ‘bitten’.

The next day, I had an idea that if the dinosaur’s motor could be driven off our arduino, we could wire the dinosaur up. I asked Bryn, if he’d like to do this as a project and he was keen, so the next day we sat down to do this.

The most recent project we’d done with the arduino had been using a light sensitive resistor to detect light levels and switch an LED on/off, so making the dinosaur light activated seemed an obvious way to go. I got the basic motor circuit design out (details at http://www.oomlout.com/oom.php/products/ardx/circ-03) and started to try to work out how wire the photo-resistor.

While I was doing this, I was pretty impressed that Bryn just got on and wired up the motor circuit from the diagram pinned to the breadboard. While I had to put the more fiddly components in, all the wires Bryn did without prompting or help.

I was able to wire up the photo-resistor separately on the same breadboard (using http://www.oomlout.com/oom.php/products/ardx/circ-09) – including (at Bryn’s request) an LED also to be controlled by light levels. I have to admit it took me a little while to work out the wiring, and this led me to just write the code to run the circuit without really getting Bryn to help – which I was sorry about afterwards.

I’d got some concerns about whether the arduino board would drive the motor OK, as I hadn’t been able to establish what voltage/current was required for the motor. The circuit above uses a transistor to enable the arduino to drive a small toy motor, but I wasn’t sure if it would be enough for the dinosaurs motor (which usually runs off two AA batteries).

We covered the photo-resistor – and success. The dinosaur leapt (if slightly lethargically as the motor clearly not quite getting the power it really needed) to life. A dinosaur that comes to life when you switch the lights off!

I guess the next step would be to get some LEDs on wires to push through the cardboard as eyes, and some sound effects …

More Arduino projects

Standard

“Dad, can we play Arduino this morning?” asked 4 year old Bryn at the weekend – music to the ears of a geek parent 🙂 We had such a pleasant hour building and using a temperature sensor I thought I ought to blog it, and also another project we did quite a while back getting the Arduino to play sounds. (see also my previous post on the first two projects we did)

Music Maker

This was a project we did a while ago. Again we were playing with the Arduino at Bryn’s request, and he asked if we could make some sounds. I knew there was a piezo speaker in the starter kit we had, so I looked up the example circuit that used it, and found it played “Twinkle, Twinkle Little Star” (or Twinkle Twinkle Traffic Light for those of you with similarly aged children).

We worked together to wire up the circuit, and then I downloaded the program (http://www.arduino.cc/en/Tutorial/Melody) and we loaded it onto the Arduino. Uploading the program to the board is one of the easiest things for Bryn to do on the computer side – just clicking an icon to compile and upload the program. The nice thing about this is that it emphasises the connection between the program on the computer and the behaviour of the circuit.

This worked fine, but wasn’t quite what Bryn wanted – he said he wanted to push a button to make music. Since this required me to get my head round wiring up and programming a button – which I’d not done before – I went for the simplest thing I could think of, and set up a button so it would play a random note from a C major scale (within an octave range). I was pretty happy to get this working.

But Bryn was still not happy – he wanted several buttons, each one to play a different note – essentially he wanted to build an electronic piano 🙂 After some more work we got there – 3 push buttons, each playing a different note (I only had 3 buttons in the kit, so we couldn’t do anymore). Bryn was very happy with this.

We had a lot of fun, but it was harder to get Bryn engaged on the programming side with this one. The transformation of frequencies into specific notes clearly makes it difficult to relate the program to simple notes, and ‘melody’ code isn’t the most elegant in the world. But it was nice that Bryn had a clear idea in his head of what he wanted it to do, and we worked towards getting it working together.

Temperature sensor


This was the most recent project, following Bryn’s request at the weekend. Unlike with the music project, Bryn didn’t have any particular idea this time round, but I was inspired both by the fact it was shaping up to be a warm day, and the fact the Arduino starter kit has a temperature sensor in it. Even before started the build, this gave us a chance to talk about temperature and thermometers – of course thermometers are pretty familiar ground to a young child, and since our daughter had been ill recently Bryn had seen the thermometer in action quite a few times.

We built the basic circuit – actually one of the simplest so far and Bryn was able to put wires in at my direction, only needing my help with the temperature sensor itself, and with a few wires on the occasions when they didn’t slip into the breadboard without a bit of a push.

Once we had it wired up, I showed Bryn the output on the computer screen – this was the temperature in celsius being taken at frequent intervals. Bryn was able to read the numbers on screen. We measured the temperature in our dining area, where we did the build, and then moved into the conservatory. We could see the numbers go up which gave a chance to talk about “higher” and “lower” and how the numbers were higher because it was (noticeably) warmer.

Then we went on a measuring spree – outside (cooler); fridge (cooler but not by much); Freezer (took a while but went below zero). With the freezer we had to wait quite a while watching the numbers go down and down before it got below zero – but Bryn seemed to enjoy every minute of it. While we waited we talked about the ‘scale’ and I explained how 100 was for boiling water and 0 was for freezing.

Then more measuring upstairs, finding the warmest bedroom (ours!).

Although there wasn’t much to change in the program, I showed Bryn how there was a number in the program that told the Arduino which analogue pin the sensor was connected to. We then moved the wire to another pin, he could read the number from the board (with a bit of help) and type the new number into the program, and upload it to the Arduino so the new configuration worked.

It was a great project, and lots of good stuff to share and learn. In an ideal world I would have liked to design a better way of displaying the temperature on the computer in advance – something colour coded, with large digits reflecting an average reading. However, Bryn seemed relatively comfortable just reading the number from the serial port monitor!

Arduino Thermometer

We covered a large number of things:

  • What is temperature
  • Reading numbers on the celsius scale
  • Boiling and Freezing points
  • Updating a program when you update a circuit
  • The link between the circuit and the program

Pretty amazing for a Saturday morning

Arduino and son

Standard

Not quite sure where to blog this, so it’s going here on our rather unloved personal/food blog (for a better loved blog you might want to have a look at the stuff Damyanti has been doing over on Overdue Books)

For a while now I’ve been wondering how I might introduce Bryn (now 4) to the concepts of computer programming. I’d looked at all the usual ‘programming for kids’ stuff, and had a look at Scratch, Hackety Hack and other languages aimed at children learning to programme, but felt this would all be difficult for a 3-4 year old to get to grips with – especially as he isn’t yet reading and has only recently started writing – although he can recognise letters and numbers.

I did find a couple of approaches that were fun for both of us which were the Lightbot game and a Constructa-Bot (a programmable ‘robot’ aimed at the primary school market) – both of which require you to plan a series of moves, and programming them into a robot (one virtual and one physical). Lightbot was fun, but got too hard too quickly. The Constructa-Bot works well, and I think will get more use in the future – partly this is about thinking up ‘games’ to play with the bot.

At the same time I’ve had it in mind for a while to get myself an Arduino kit to play with. Arduino is an “open-source electronics prototyping platform” – essentially allowing you to build electronics circuits – and write software to run on it. A really simple example of what you can do is wire up a circuit with an LED and make it blink on and off as detailed at http://arduino.cc/en/Tutorial/Blink. To encourage me, Damyanti got me a book on programming Arduino for Christmas and so I ordered an introductory kit from oomlout.

While the Arduino was for me, and I hadn’t even thought of doing it with Bryn – I guess I assumed it would be fiddly and a bit difficult – it has already proved a great way of engaging Bryn with basic concepts of electronics, programming and just the basic idea that these are tools that can be used to create.

So far we’ve done two little ‘projects’:

Colour wheels

This was the first one we did together. Damyanti drew some circles on a piece of card, and Bryn decorated them with lines, squiggles, spots, spirals and stars. They did this while I worked out how to wire up a motor, and got a programme (or ‘sketch’ as they are called for arduinos – no idea why) written that would just spin the motor for a number of seconds.

Having got this working we attached the ‘wheels’ to the motors spindle and watched what happened to the colours and patterns as it span around. Bryn was immediately interested in the circuit and how the motor was controlled – and once I’d got the cursor in the right place in the programme he could type in numbers to set the length of time the motor would spin for each time, and then press the button to upload the sketch to the Arduino board.

Traffic Lights

After the colour wheel project both Bryn and I wanted to do something else. I asked for suggestions on Twitter and I think it was @bencc who suggested traffic lights – which immediately seemed like an ideal project. I had red and green LEDs, and Bryn has plenty of toy cars, and I knew that even my basic Arduino knowledge could manage a simple circuit and programme which would change the lights at set intervals.

This time Bryn was keen to help with the whole circuit – so we did this together, and this worked better than I thought. Although wiring stuff up (using a ‘breadboard’ to plug the components into) proved a bit fiddly, and some of the components I had to do, Bryn was able to plug the connecting wires in with only a very little help.

I’d got the (very simple) programme ready, and we uploaded it, and played around with the time between the lights changing – doing some very very short times to get a flickering affect, and longer times that might be more suitable for traffic lights.

The next stage of the project was to make a box for the Arduino to slot into to make the ‘traffic lights’ – Damyanti found a suitable box, cut some holes in the right places and got it ready for Bryn to decorate – we got out a road that Bryn and Damyanti had made a while ago and some toy cars – and you can see the results in the picture above.

Next…?

The challenge is to think of projects that are fun, engaging, and within my ability to carry out (as well as Bryn’s!) – any suggestions welcome :). I love the way the two projects above combine fun, creativity and technical concepts.