Oriental Sea Bass with spicy dipping sauce

Standard

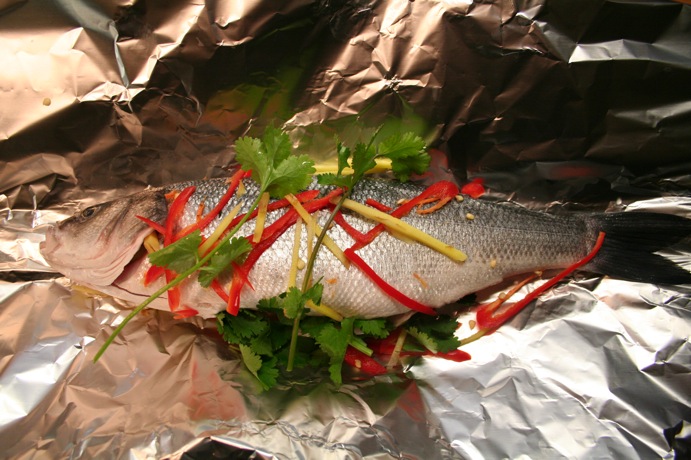
Sea Bass preparation

Sea Bass preparation

Appetite by Nigel Slater
is one of my favourite cookery books. I have to admit that if I’m
cooking from a recipe, I generally like to follow it – despite my
wife’s best attempts to get me to relax, and treat the recipe as a
starting point rather than a set of rules that have to be followed.
‘Appetite’ doesn’t generally have recipes, but rather guidelines and
suggestions – and it was the book that finally got me to engage in wha
I was cooking, taste as I went along, and gave me some confidence in my
ability to produce something edible without strict instructions.

In
the same vein the quantities here are vague, and can, and should, be
varied to taste, and depending on how many you are serving.

  • Enough Sea Bass to go around – the one above served two, although without any scale clearly difficult o know how big it is!
  • Chilli – I used 1
  • Ginger – a bit – lets say about the same amount ginger as you have chilli
  • Some coriander
  • Lemon grass
  • Chinese Rice Wine (a.k.a Shaoxing wine, Shaohsing wine, Shao hsing wine, Hsao Shing wine)

Scale and gut the sea bass – or buy it that way of course – I take a
slightly peverse pleasure in doing this myself when I have the time.
Put the fish on a piece of foil – big enough to form an envelope around
the fish.

Bash
the lemon grass a bit – e.g. with a rolling pin – so it splits a little
(don’t overdo it – you don’t want it in pieces), and stuff it in the
cavity in the fish.

Thinly slice the chilli and ginger into
strips, and scatter around the fish, add some coriander (stalks and
leaves) – in the cavity and around. Finally add salt, and a small glass
of rice wine (making sure you’ve turned the foil up so it stays in the
foil)

Make an envelope out of the foil, sealing the fish inside.
You can leave this for an hour or two, or cook immediately if you want.

To
cook, put the oven on about 200 C, I recommend putting the foil parcel
is a shallow tray or dish just in case any liquid leaks out. For a
small sea bass it could take as little as 15 minutes – just check it
regularly after this – you want it so the flesh pulls away from the
bone easily.

This can be served with plain rice, but Nigel recommends (and I concur) a dipping sauce with it:

  • Rice wine
  • Sugar
  • Chilli
  • Dark Soy sauce
  • Lemon or Lime

Put equal amounts (by volume) of sugar and rice wine in a pan (for
2-3 people, 6 tablespoons of each). Bring this to the boil, and simmer
until it starts to get a bit syrupy – maybe 5 minutes or so. Finely
slice a chilli (again for 2-3 people 1 will be fine), and add to the
sauce, along with a tablespoon of dark soy (based on the same
quantities) and juice of half a lemon or lime (depends on the juiciness
and size – basically you don’t want to water down the sauce too much,
but just add a bit of zing)
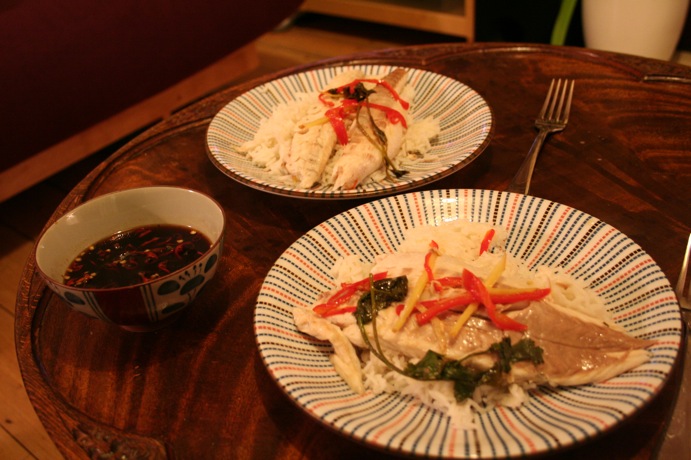
Sea Bass with Spicy Sauce

Sea Bass with Spicy Sauce


Red Snapper and Spicy Rice

Standard
Red Snapper with Spicy Couscous

Red Snapper with Spicy Rice

This is a variation on a Jamie Oliver recipe – I have to admit that I think the original is better than this variation (it’s in Jamie’s Dinners, called Omega 3 and Couscous if you are interested) – but we were missing some of the key ingredients, including the Couscous, so this is what we got instead (some of the quantities I’m guessing about)

2 fillets of red snapper (although you could use another fish – barramundi would probably work well)
Cherry Tomatoes (a small punnet – 125g I think)
1 Red Onion
1-2 tsp dried chilli
1 tsp fennel seeds
1 bay leaf (fresh is better – you can freeze them and use straight from the freezer)
Basmati rice (enough for 2 – I would say a cupful)
1 anchovy fillet

Cook the rice leaving it just slightly underdone

You want a pan that is going to fit everything in it – we use a deepish wide frying pan – ideally with a lid, although you could use foil to cover the pan as well.

Chop the onion finely, and cook on a low heat in some good olive oil, with the fennel seeds, bay leaf and chilli in a covered pan (you want the onion to get quite soft – it will take 10 minutes or so)
Chop the tomatoes into halves or quarters (depending on the size – you don’t want the pieces to be too small), and chop the anchovy as well, and add them both to the onion and herbs/spices. Season the mixture to taste.

Spread the tomato/onion mixture over the base of the pan, then spread the rice over the top, covering the tomato/onion completely. Lay the fish fillets, skin side up, on top of the rice, and cover the pan. Cook on a low heat until the fish is cooked through. You may well want to add a drop of water during the cooking – I usually end up adding half a cup or so. How long it takes to cook will depend on the size of the fillets – 10-15 minutes as a guide.

What you will hopefully get is a thick, spicy, jammy, tomato mixture at the bottom of the pan which you can mix through the rice.

Serve with a yoghurt dressing – yoghurt, lemon juice, salt, pepper, mint, coriander if you like.

I would recommend the original recipe – couscous takes the flavours of the tomato mixture better, and uses fresh fennel to give a bit of an aniseed edge.

Apricot and Oat Bread

Standard

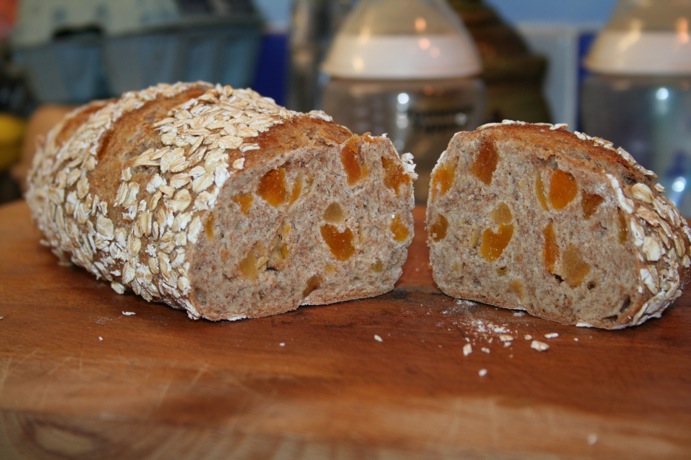
Apricot Oat Bread, Sliced

Apricot Oat Bread, Sliced


This recipe is from Dough by Richard Bertinet. I came across this book in Richmond library while actually looking for a Chinese cookery book, and thought it looked interesting. After a few weeks, several loaves, and some overdue fines, I decided I needed to invest in my own copy.

Richard Bertinet is a Frenchman living in the UK (around Bath somewhere), and he has some definite views on the way you should bake bread. He dispenses with the traditional ‘kneading’ process, and replaces it with a method where you stretch and fold the bread. For some of the breads I think the technique makes quite a big difference, giving a more open texture. However in this case, the bread has quite a close texture anyway, so I think normal kneading will be fine.

If you are interested in trying a different approach, I’d really recommend the book and it includes a DVD showing how to carry out the technique. If you are really  interested you can book yourself on one of Richard’s cookery courses!

This recipe makes two smallish loaves.

300g Strong (Bread) wholemeal flour
200g Strong (Bread) white flour
10g yeast (fresh or dry, but not the easy bake stuff)
10g salt
350g water (or 350ml – but you’ve got the scales out anyway, and weighing is more accurate they say)
200g apricots (roughly chopped)
50g (or so) Oats (e.g. Jumbo oats)

Mix the flours together. If you are using fresh yeast, rub it into the flour – like you would butter in pastry. If you are using dry yeast (which I did) just mix in the yeast with the flour – you just want to get the yeast distributed through the mixture.

Add the salt, and mix through (do this separately to the yeast, as a concentration of salt can kill the yeast). Then add the water, and mix. You’ll get a slightly wet dough – it will be sticky, but should be firm enough to knead, and as you knead the stickiness will go.

When the dough feels less sticky, and firmer, add the chopped apricots to the dough – and keep on kneading to spread them evenly throughout the dough. I usually flatten the dough, put the apricots on top, then fold the dough over and start kneading again. I have to admit I find the dough slighly more difficult to handle once its got bits in, and find the bits (in this case apricot of course) fall out and shoot across the work surface (or onto the floor).

Once you’ve got the apricots pieces mixed in with the dough, form the dough into a ball by flattening the dough just a very little, and then fold in the edges to the middle. Turn the ball over, so you’ve got a smooth side on top. Put the ball of dough in a lightly floured bowl (big enough for the dough to double in size) and cover the bowl with a damp tea towel.

You need to rest this in a reasonably warm place for about an hour – until the dough has doubled in size. It really shouldn’t take more than 90 minutes at the very most. If your kitchen is warm this is an ideal place to put it.

Once the dough has doubled in size, turn it out and divide it into two. Form each half into a ball, and rest on the side (you may want to flour the side to stop it sticking) – covered with the damp tea towel – just for 10 minutes.

You now want to form each of the balls into a loaf. Turn the ball upside down, so the smooth side is down on the work surface. Flatten it out into a slight oval. Along one long side – fold the edges into the middle. Then do the same with the other long side. You should have something vaguely loaf shaped by now. Fold it in half lengthways, and turn it over so the ‘seam’ you’ve just made is on the bottom. Hopefully this will look pretty much like a loaf! (the shaping is meant to help the rising – but to be honest you can probably get away with any shape!)

Brush the top and sides of the loaves with water, spread the oats out on a plate, or on the side, and roll the loaves in the oats until they are covered (not on the bottom).

Put the loaves on a tea towel you have generously dusted with flour, pleating the tea towel slightly between the loaves so they don’t touch as they rise. Make three or four cuts across each loaf with a sharp knife (again, this helps the loaves rise). Cover the loaves (I usually just fold over the edges of the floured tea towel they are resting on), and leave to rise for another hour. This is often a good point to put the oven on – you want to pre-heat it to 250 Celsius. If you have a pizza stone, you can use this to bake the bread on – put this in oven now so it has plenty of time to heat up.

After an hour, put the loaves in the oven – either on a baking sheet (don’t worry about handling the loaves at this stage – they should be quite robust), or on a pizza stone that has been in the oven as it was pre-heated. I also pour half a glass of water into a tray in the bottom of the oven to get some steam in the oven – once again, to help with the rising of the loaf – but you can omit this if you want. Immediately turn the oven down to 220 degrees, and bake for 25 minutes.

Take the loaves out of the oven – check they are cooked by tapping the bottom of the loaf with your fingers – they should sound hollow – if not, put them back for another 5 minutes or so.

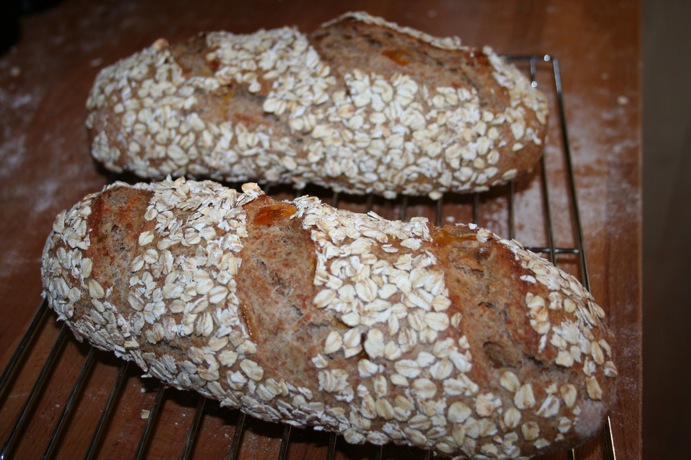
Cool the bread on a cooling rack.

Apricot Oat Bread

Apricot Oat Bread


Russian Fish Pie

Standard

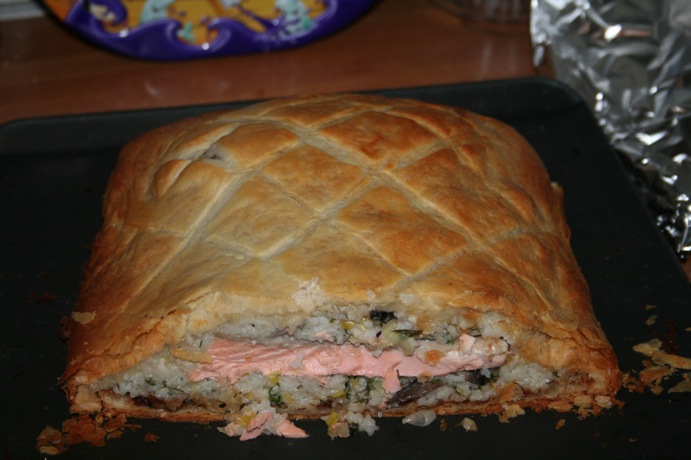
Dinner tonight was a version of Russian Fish Pie, the recipe is from “Tana Ramsay’s Real Family Food: Delicious Recipes for Everyday Occasions’ and is salmon encased in rice in puff pastry. As we no longer have this cook book (had to go back to the library) I have no quantities for the ingredients, I tend to do this just by eye.

Russian Fish Pie

Russian Fish Pie

2 x Salmon fillets

Pack of puff pastry

Rice
Creme Fraiche

Mushrooms (chestnut)

2 x Leeks

Thyme

Dill

Cinnamon

Star Anise

Garlic

1. Roll out a third of the puff pastry into a rectangle, this will be the base of the dish, then place in oven (200c) for 10-15 minutes till brown.

2. Cook enough rice to cover the base of the puff pastry and the salmon. I use basmati rice, which I wash thoroughly then fry in some oil with star anise and cinnamon before adding enough water, once water is boiling reduce heat and leave to simmer. When the rice is just about cooked, turn off the heat and cover pan with foil then the lid, the steam should then continue cooking the rice.

3. Fry the leeks and garlic till soft, season, add thyme and mushrooms and continue cooking for a few minutes.

4. Add salmon to the pan, on top of mushroom and leek mixture then put the lid on and let the salmon cook for 10-20 mins. Once cooked remove the salmon and take off the skin.

5. Add remaining mushroom and leek mixture to the cooked rice and combine with dill and creme fraiche, the mixture should be a thick consistency. Add a layer of rice mixture on top of the cooked pastry, add the salmon then cover the fish with the rice mixture.

6. Roll out remaining puff pastry and cover the dish, then bake in over for 15-25 minutes.
This dish works well on its own, you could add some capers or green peppercorns to the rice mixture for some added bite.

Foods for thought

Standard

This blog was originally intended to be a “personal’ blog, complementing the professionally oriented “Overdue Ideas‘ blog. However, we never really managed to keep this up to date – partly because of time, but I think mainly because there was no natural audience for the comings and goings of our everyday lives apart from close friends and family – who already knew what we were doing.

Recently I tweeted what I was cooking for our evening meal, and got a couple of requests to share the recipe, and it made me think that perhaps it was worth resurrecting this blog as a food focused blog. This was there will be a reason to blog on a regular basis (after all, we eat every day, even if it isn’t always that interesting), and if no one else is interested we can look back and see what we’ve cooked, and what we thought.

So, here is the first entry – unfortunately no pictures with this one, as we cooked and ate it on New Year’s Eve, but here is the recipe and comments:

Mushroom and Pickled Walnut Suet Puddings (serves 2)

This is actually a simple variation on a Waitrose Recipe card for “Mushroom and Chestnut puds“. I was originally going to follow this directly, but I initially had difficulty finding the chestnuts, and decided to try it out with pickled walnuts instead. The results were good, although we both felt that the walnuts were a bit to vinegary, and if I did it again I’d probably cut down the walnuts and mix with chestnuts – I do think the walnuts add something a bit extra to the recipe. The original recipe makes two small puddings (300ml each), but I made one large one. Anyway, the recipe here is as I cooked it.

The other thing about the recipe that I was both pleased and suprised by was how easy the suet pastry was to make – and how light it turned out – my first attempt at a suet pastry and I was really pleased with it.

Olive Oil
250g Portabellini (or field) mushrooms
Clove of garlic
Pickled Walnuts (I’d estimate about 6, but to taste really)
1 tbsp tomato puree
300 ml good red wine (I used a Barolo, but any meaty red wine – a Burgundy or good Cabernet Sauvignon from elsewhere would be good)
150g self-raising flour
75g vegetable suet (I used Atora – I don’t even know if there are other brands)
Salt
Pepper
Water

You will also need a 600ml ovenproof bowl – greased with olive oil, some kitchen foil, some string, a saucepan (with lid) large enough to accommodate the bowl and a steamer or trivet.

I made the pastry first:

Mix the flour, a pinch of salt and suet in a bowl. Add about 100ml (or a bit more if needed – I would guess I actually used more like 110ml in the end) cold water and mix to a dough. The original recipe describes this as a “stiff’ dough, but I would have said it was slightly wet (compared to a normal pastry anyway). I then wrapped this in clingfilm and put it in the fridge to rest.

Then the filling:

Slice the walnuts (about half a centimeter thick) – don’t worry if they disintegrate a little.

Chop the mushrooms into chunks – a little bigger than bite sized – fry in olive oil until they just start to go golden (a few minutes). Crush the garlic, add to the mushrooms and continue to cook for about another minute. Add the sliced walnuts, the tomato puree and the red wine. Season with a pinch of salt (I think I overdid this a bit, so I’d just add a small pinch now, and season again towards the end), and a generous grinding of pepper.

Bring the mixture to the boil, then reduced the heat and simmer for about 5 minutes, then take off the heat.

Get the pastry out of the fridge, and remove about a quarter and put to one side. Shape the remaining dough into a ball, then roll out into a circle, until it is big enough to fit the bowl with a little extra over the edge (don’t forget to grease the bowl with olive oil). Line the bowl with the pastry.

With the smaller piece of dough that you reserved, roll a circle large enough to cover the top of the pudding.

Pour the filling into the lined bowl – you may not need it all, I would suggest not filling quite to the top, as my pudding leaked a little in the end. Wet the edge of the pastry around the rim of the bowl, and push the pastry cover down over the top making sure it seals all the way round. Trim away excess pastry with a knife. I was worried when I poured the filling in that the liquid would just soak the pastry, but this didn’t happen I’m glad to say.

Cover the pudding with an oiled piece of kitchen foil, and tie this into place with string. Place the pudding on a steamer/trivet in a large saucepan with water in the bottom, put the lid on, and bring to the boil. Steam the pudding for about an hour – check regularly to make sure the water doesn’t boil dry – just top it up if it looks like this might happen.

Take the pudding out of the steamer, loosen around the rim with a knife, put a plate over the top, and turn over. Lift the bowl off (I found this very difficult with a hot bowl and rather clumsy oven gloves) and hopefully you will be left with a perfectly formed pudding.

We served with boiled potatoes, but some greenery – perhaps some broccoli – wouldn’t go amiss.